 If you have Gearbox problems which follow any form of repair that involves jacking the front of the car up, ie replacement track rod ends, lower wishbone ball joints replacement struts, then please read this e-mail from Chris before doing anything further it may well save you hundreds of £££, see also Mypage 29 where a similar even occurred.:-
Hi lofty
Sorry for the delay , have received your disc and tools many Thanks.
Ps Website is a fantastic help.
I have recently purchased a Mercedes A160 W168 with a known gearbox issue which I was hoping was not too serious.
It was jumping out of gear randomly and in any gear.
Had resigned myself to drop the engine and investigate the gearbox, This I did and may I add it is not a simple job.
Anyway once engine was out ( I had read your article on replacing drop links) and read about the chap who’s drive shaft had come out and experienced a similar problem to mine all be it a sudden loss of gears in his case.
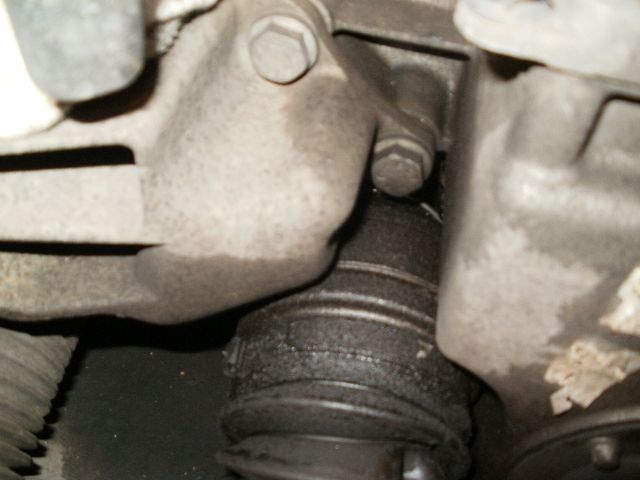
So I started to look at this and began to think this was a very similar problem but part of the shaft did not break off , The more I looked at my problem ( the bits off history I got with the car included a bill for a suspension strut replacement on the passenger side 4 months previous, Also when I pulled on the drive shaft it popped out too easily, and there was a oily deposit all around the area off the drive shaft location into gearbox.
I then took the gamble that this was the problem and put the engine back into the car making sure the drive shaft was fully located into the gear box. after replacing fluids and reverse bleeding the clutch (Ps it is an Automatic clutch)(ACS) .
And Guess what the problem is sorted it has not slipped out of gear since ....
Have enclosed some photos to go with this.
Again Thanks for the website..
Chris Fuller
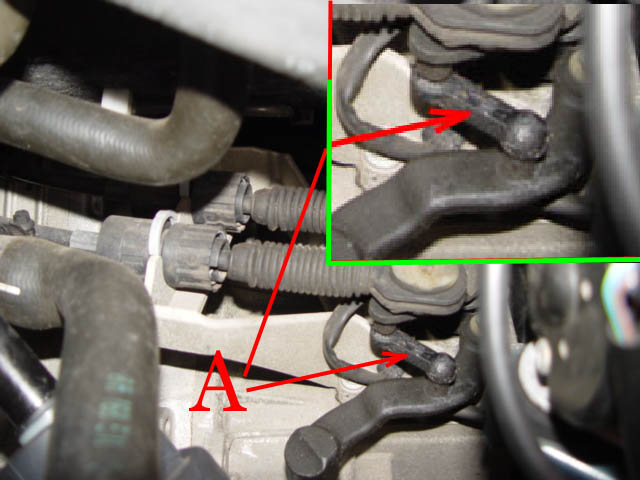
The above Photo supplied by Chris clearly shows that either the drive shaft oil seal has gone defective /been damaged or the drive shaft is not correctly installed , if you have such leaks always check the correct location of the drive shaft before going further .
And another case resulting in the same problem being diagnosed.
Note I have included this defect which occured on a w169 on this page because the defect could also apply to a W168 A class
Hi Lofty,
On Friday I had a total auto gearbox failure! While sitting at a junction I went to pull out, heard a "clunk" and the box went into "neutral" with no drive in any gear or forward or reverse. The was also a "grinding" noise in Park with the engine running.
Interestingly, there were no warning on the instrument panel, so it appears to be a "mechanical" rather than electrical/electronic failure. When I switched the engine off it still appeared to be in "neutral" even in Park and the only way it would hold was with the hand brake.
Long story short and because I have the MB Mobilo service they recovered the car and took it to the nearest MB dealer. They haven't come back to me yet with what they think is wrong, but I'm trying to decide what to do when/if they say I need a new gearbox! I bought it new and my car has only done 43000 and I've already had a gearbox valve body failure at 27000 which cost £1200 to replace, so I hate to think what they will want if it needs a new gearbox!.
I've looked at a couple of outfits on the internet who do exchange or rebuilt boxes with fitting, etc for about £2500 with a 24 month warranty and I'm wondering if you can offer an opinion or any suggestions if Mercedes says I need a new gearbox?
Thanks Ed
I immediately replied to Ed and advised him to contact the MB garage to whom his car had been taken as this was almost certainly another case of drive shaft problems.
The end product was that my Diagnoses was right, the shaft had partially withdrawn and as a result the end of the shaft was damaged to the degree that it would no longer engage of the crown wheel of the differential, resulting in no drive to either wheel.
Even though the diagnoses of the fault was made for MB from the other side of the World they still charged a considerable amount of money for this repair and claimed they had not encountered this fault before.( of course they would not admit to knowing of a problem)
My advise is if you suffer a total loss of drive from your gearbox check your drive shafts before even contacting a garage or get the breakdown service to check.
I would jack up each front wheel in turn and with the car in a low gear, ignition off, see if you can turn the wheel, if you can then that clearly indicates that the drive shaft is at fault You may even hear the grinding noise as Ed did. This method may not work with automatics, but with the wheels removed it is easy to see when the drive shafts are not housed correctly.
Always support the drive shafts when for instance changing drop links this will prevent the problem above occurring on your vehicle.
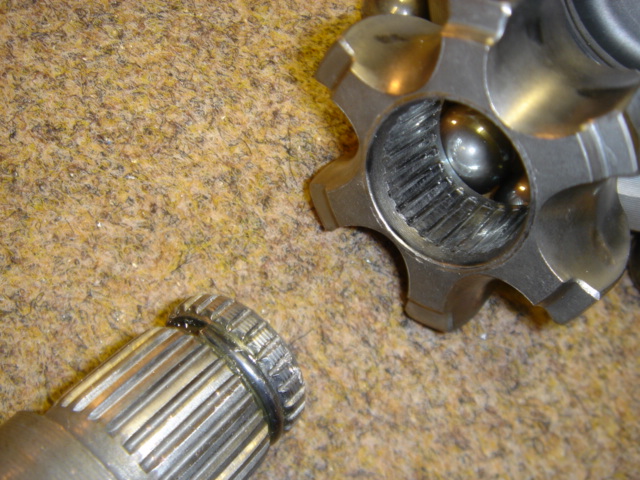
Further information from Ed has indicated that the fault on his drive shaft was in the intermediate UJ situated in the near side drive shaft, where the spine had failed, this was without doubt caused by incorrect assembly when new in that the spline had never been fully housed and had only been driving on the extreme end. see photo on right which shows the end of the drive shaft spline which is damaged as well as damage to the female section of the UJ
 As with the failure above this happened when turning the steering wheel fully left or right when the drive shaft parts are under extreme stress.
So for just once MB may be correct as I have not heard of the failure previously. Either way it is no consultation to the owners when faced with large bills for such unnecessary defects
The replacement of drive shafts will be well within the capability of DIY owners albeit a few tools are required when the symptons of the failure are known it is hoped that this information will do just that.
Thank you ED for the Informatiuon and photos.
For further information go to :- page 28 in the w169 section of this site.
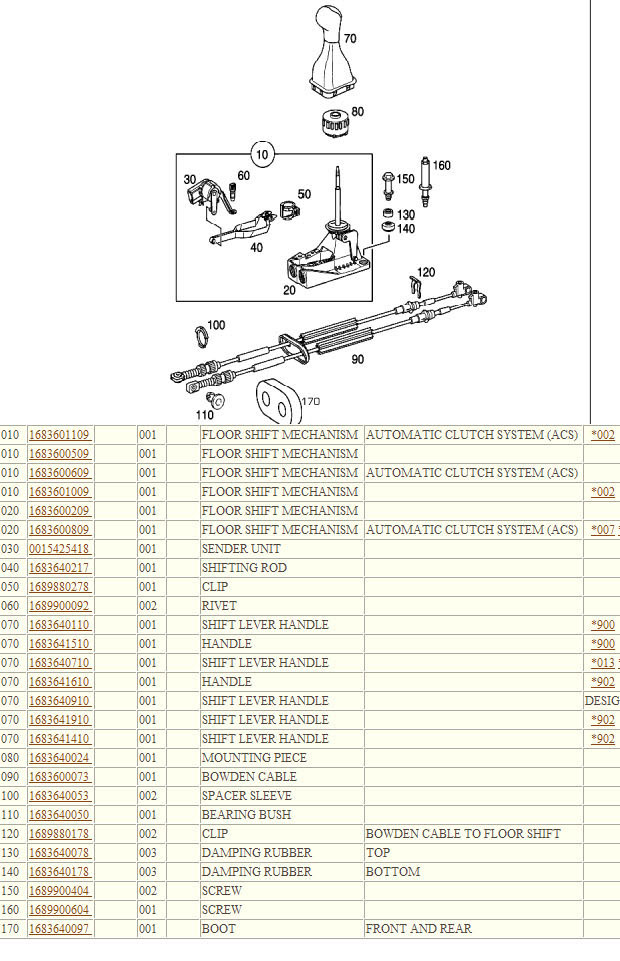
My 'A' Class first registered February 2002 is fitted with a 5 speed manual gearbox. ref 706.512 having a chassis number WBD168033XXXXXXXXX
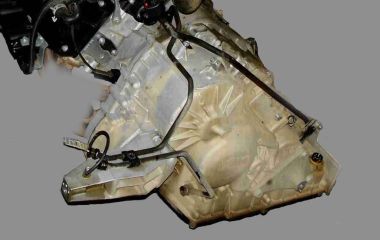
The gear box shown in the photo is an automatic but the basic shape, and location are the same.
When seeking spares for the gear box you will be asked for the chassis number of your car, there are a number of different numbered gear boxes fitted to the 'A' Class.
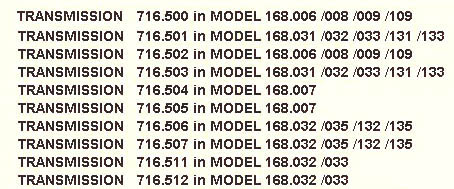
do not ask me what the differences are but these boxes are differently numbered for the different chassis or VIN number The information I have shows that all those listed which are manual boxes have a capacity of 1.8.litres.
Automatic boxes start with the pre-designation number of 722 and have a much larger capacity for obvious reasons.
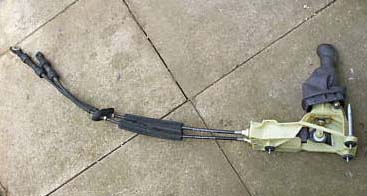
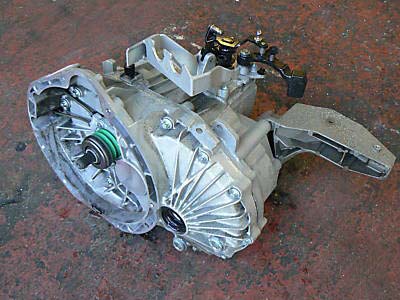 This photo shows the gearbox removed and split from the engine, the hydraulic thrust bearing is still fitted.
The removal of this complete unit is of course necessary when the clutch assembly needs replacing, this is only possible with the engine lowered from beneath the car which for most owners makes it a commercial garage job.
Manual Gear Box
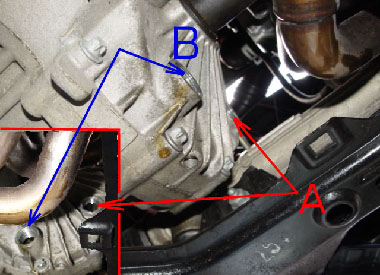
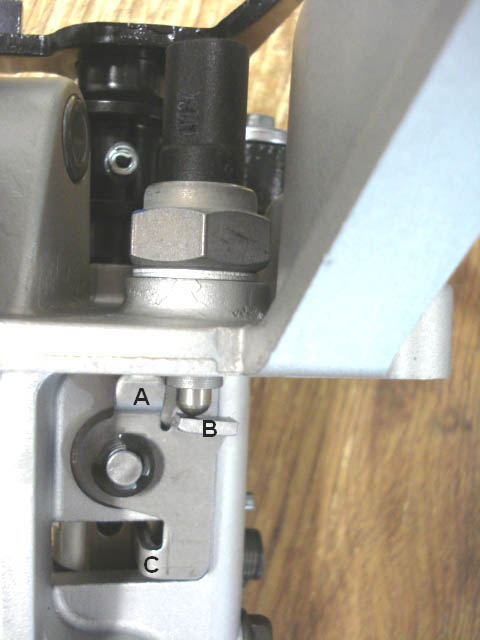
Two holes can be seen on the side O/S of the gear box, It is logical that the lower one B is the drain plug and the upper A the filler/level plug. In this day and age it is rare for gear box oil to be drained unless a full dismantle/service of the gearbox is required.
If you are tempted to check your gear box oil first ensure the car is level. If on ramps the whole car will need to be leveled, remove the upper plug, its normal for the oil to be level with the threads at the bottom of the plug location hole when the correct amount is installed, a few drops may seep away from the gearbox as the plug is removed. HOWEVER I did not level my car and so measured the oil removed and replaced with a litre measuring jug Do not try and overfill. If top up is required, if possible use the same Gear oil, MB specify 75W-80W MB part/invoice/number MA 001 989 26 03/10 -020201 trans fluid/gear oil . @£13.66 litre plus vat I could find no details of this in the hand book or service records.
Please remember other models of 'A' Class along with automatic boxes may use a different grade of gear oil or fluid, as well as quantity of fluid, therefore check the spec for your model of 'A' Class with Mercedes-Benz against you chassis number before replacing or topping up the gearbox. From what I can see all the above manual boxes fitted to the 'A' Class hold 1.8.litres. However it would be prudent to just confirm with MB when purchasing the gear oil, what the capacity of gear oil is in your particular gearbox is.
I have had my car now for just over three years and am a member of the www.baby-benz.com owners club to date I have not heard of problems with the manual gear box, with the exception of the linkage.
However automatics are a different story!
The ones that have given trouble appear to be around the 65000-75000 miles mark. This is a known problem to Mercedes-Benz which they appear to have chosen to do little or nothing about, albeit they have offered some financial assistance to some owners who have the work done within their company.
There was one case in Brazil of which I have photographs, where because Mercedes-Benz anti freeze/coolant/anti corrosion additive had not been used /replaced at the prescribed time a valve corroded in the gearbox requiring the engine to be removed, gearbox stripped and this relatively cheap valve replaced, even in Brazil it cost close to a £1000. Such work in the UK would be almost prohibitive by cost, and it would be cheaper to fit a new automatic gearbox costing several thousand pounds with the labour and vat. So be warned use MB products, cheap imitations can cost you thousands of £££££££££
Linkage see below,
The only problem I am aware of is the fact that a number of owners have found that there gearbox is not filled to the correct level.
My own car has had a very slight whine in 3rd gear for some time and so I decided to check the gearbox oil level
This is not an easy task as you need to safely get under the car, and the car needs to be level, the only other way available to the DIYer is with the vehicle on ramps, drain and measure the gearbox fluid.
As this was the only option open to me without garage costs I decided to change the fluid. I purchased two 1.litres containers of Gear oil /fluid at £13 66 a litre plus vat and set about the job.
 The first problem was locating a 14mm 'Allen' key to remove the plugs, filler and drain. Because of the limited space available I made up an adaptor from a 14mm nut with a deep head section and locked two 14mm nuts on the bolt shank so that I could then use a ring spanner.
Note
that both plugs were very tight, the filler plug so much so that I had to put the electric heat gun on the plug before I could move it. Bear in mind that these steel plugs are situated in an aluminium gearbox case which is not the most resilient metal in the World, take care not to damage of crack the casing.
The first problem was locating a 14mm 'Allen' key to remove the plugs, filler and drain. Because of the limited space available I made up an adaptor from a 14mm nut with a deep head section and locked two 14mm nuts on the bolt shank so that I could then use a ring spanner.
Note
that both plugs were very tight, the filler plug so much so that I had to put the electric heat gun on the plug before I could move it. Bear in mind that these steel plugs are situated in an aluminium gearbox case which is not the most resilient metal in the World, take care not to damage of crack the casing.Having removed the plugs I drained and measured the fluid. I removed 1.41 litres when in fact the box should have contained 1.8 litres the drained fluid was also much darker in colour than the new fluid, so the time spend changing it was well worth while.
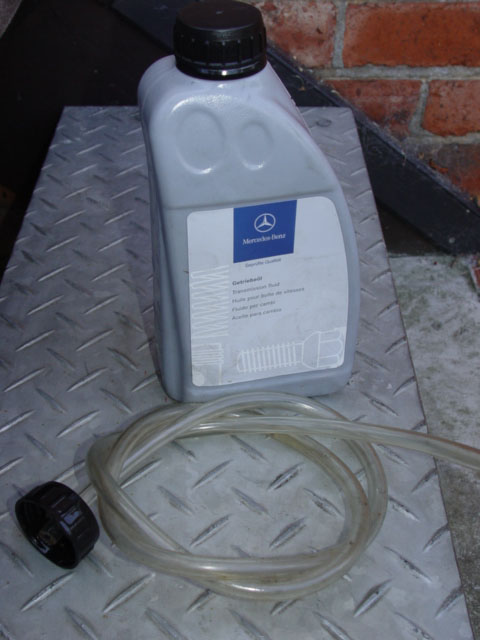 Getting the new gear oil from the can was relatively easy, I used one of the caps drilled the centre and pushed a polythene tube through the cap, ensuring it was a tight fit, I placed this on one of the full containers and allowed it to run into into the gearbox under gravity, I did have to withdraw the tube a couple of times to allow air to enter the plastic container as the vacuum created prevented the fluid leaving the container. I then de-canted .8 of a litre to the now empty container and put that into the gearbox using the same method.
I am now confident that my gearbox not only has the correct quantity of fluid and that it has also been renewed.
Remember to reseal the plug/plugs when refitting. I used PTFE (polytetrafloraethylene)tape rather than 'Loc-Tite' if they do ever have to come out again hopefully they will not be so tight.
Gear box selector linkage
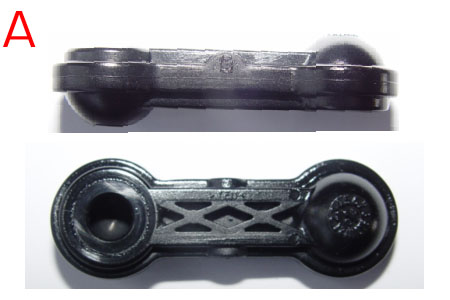
Gear box selector linkage, best left well alone, but be aware of it is presence, if you are unable to engage 3rd and 5th gears the problem could well be due to this missing or detached link
. Having purchased the link which will cost you just under £3.00 it is easily fitted, However Tony, one of my readers has recently informed me that he had to use some force to get the link to clip over the small balls on which it engages, something like 'mole' grips will make the job easy but do not over do it or you will damage the link. When properly engaged you will hear a click as the cup on the link snaps over the ball either end.
It almost sounds as though MB have altered the design. Lets just hope so.
Once again Modern car, a number of dry metal joints and no grease nipples! Nylon joints and fittings are less likely to need lubrication but even they can bind against one another making their movement stiff and less fluid. I use Silicone spray on plastic, nylon fittings and a small amount of molly slip grease on metal moving parts, only you can decide whether you do the same, but it certainly does no harm.
These are e-mails received from fellow owners who have saved a fortune by reading the information on this site along with the www.baby-benz.com in particular relating to the link below.
These are genuine e-mails the contents are in some cases alarming when you consider you are paying £85-£100.00 per hour for the expertise of Mercedes-Benz staff
Quote
 Dear Lofty,
You have saved me a small fortune and I am eternally grateful. I lost 3rd & 5th gears on the way back from Wales last week so I took my car to my local mechanic. He could see no problem but said he would ring the nearest Mercedes dealer for advice and let me know.
Mercedes dealer said they had no experience of this problem and suggested stripping the gearbox for further investigations - I thought expensive.
Knowing a little about cars I was not convinced that this was in my best interest as there were no strange noises from either gear box or clutch and that gears 1,2 & 4 all worked fine.
I posted a question about fitting heating elements in the front seats on the Baby-Benz web site a few weeks ago with little response but in desperation posted a plea for help about the gears and thankfully you answered.
You were absolutely spot on. I printed the picture and the part number details and two days later I had a bill for £20 and a perfectly working gearbox again. Thank you once again
Stephen & Philippa Unquote
Quote
Thank you!!!!!
After much panic, shaking of heads from "mechanical" colleagues, and rubbing of hands of garage owners we have 3rd and 5th gear again!!! We have an A140 A Class which lost the use of 3rd and 5th gear. Our first option was to top up oil in gear box (cheapest option) but after looking on the baby-benz website for help in locating the filler point I came across your website.....the page on the gearbox and the item on the SELECTOR LINKAGE!!! Again thanks for just being there, the right place at the right time. Regards, James Russell
Unquote
Hi, Just a quick line to tell you what a brilliant site you have put together. You have possibly saved me the cost of a new clutch. It was the 3 pound linkage on the 3rd and 5th gear. I was thinking I would have to shell out between 6-800 pounds for a clutch but something in the back of my mind told me the clutch was ok. I just thought I would search the forums and came across your site.
Thanks Very Much. Joe Cox unquote.
Quote
Having problem engaging 3rd and 5th gear on my A160 of 1998 I turned to your homepage as usual. I bought the car as my families extra and I do not like paying to much in repairs. Thanks to you I have been able to change spark plugs and other service actions.
So looking in the parts on gear I found the section on gear box selector linkage. I did run out to the car and looked on the top of the gear box, and yes (may be no) the plastic linkage was missing. I cancelled my time at the Mercedes Garage and ordered the spare part for a little more than 4 Euro. Next I went to collect it and then it was an easy task to fix the problem. The only things to add is that I wasn't totally out of fifth and third gear, sometimes they worked, I guess due to the the part that were swinging freely on the gearbox. I also agree that it is necessary to be careful applying the part, I used a tool.
Well, thank you very much for an excellent page
Yours
Anders Jörle Stockholm,, Sweden Unquote
and yet another e-mail,this time from Australia.
Hi Lofty,
I just sent a 10 quid (£10)donation via PayPal. I couldn't find a link on the homepage to email you so I'm hoping this gets through to you OK.
Many thanks for the A160 pages mate. It has so much info that just isn't available anywhere else. It's a huge service you're doing for other baby benz owners, and it's very appreciated.
My wife's A160 2001 manual is having a problem with gear selection, but it doesn't seem to be like the issues detailed on your page.
There's no error code or warning light involved.
What happens is that the car will be locked out of all gears except neutral and second pretty much every time the car turns left, and will unlock back to full range of gears access by turning right.
There's an audible clunk both ways.
I took the car to a good independent Merc repairer who said he wasn't sure what the problem was, but it would mean taking the front end off the car, dropping the engine and gearbox out to investigate, and if it could be fixed the whole bill would come to at least $2,500 Aus, around £1,200, which is pretty much the value of the car in good condition.
He recommended scrapping the car, which I would hate to do because it is so loved.
It has done 199,000 kilometers, and I'd love to squeeze out another few years of use for my wife.
Have you come across this in your travels?
Best of British mate,
Bruce
After many e-mails back and forth this was the outcome
Hi Lofty,
I'm the most popular man in Australia, and you're the most popular man in the UK mate.
I thought I understood the gear selector linkage issue but until I had a better look at the photos on the site I really didn't get it. So, first I tried the Gear Selector Reset procedure, which confirmed that I could hear the ACS engaging.
Next I followed down the page and thought I'd better not skip over anything, and followed the link to the Gear Selector Linkage info, and had an ah-ha! moment when I saw the linkage hanging free. I went to the car with a torch and found the selector linkage hanging on one end.
The clunk I was hearing when turning left and right corners is the counter-weighted swing arm that the actuator pushes/pulls, swinging back and forth and banging on the body work or whatever, going alternately from lockout to select mode, hence the odd behaviour of having to turn right to swing the arm back into select mode. If anyone ever has exactly this symptom, it's this, and if anyone is stuck somewhere away from home, chart a course back with lots of right turns in it!
My wife thinks I'm Gandalf. My son has alrady borrowed her car, do do 'user testing' in his words. You've saved me losing a brilliant car to the wreckers. I'll be buying a couple of spare linkages, one for the car straight away and one for run.
A firm handshake and all the best mate,
Bruce in South Australia
Bruce donated £10 to the site and as a result received information that saved his car and his money and complimentary copy of my e-DVD, so he now has comprehensive information on his W168 'A' class with ACS clutch for the long time term, a wise move because when I 'pop off' and I'm now 78 the site will drop off the www. and the information will not be availoable, so order you copy NOW while I'm still able to supply it
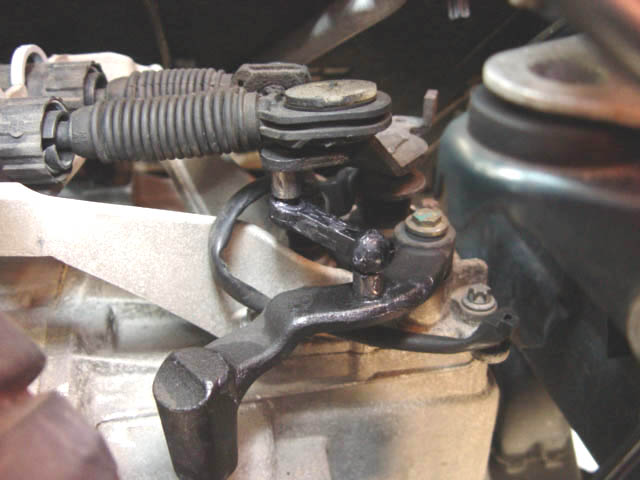
So if you experience problems of the type above do not be conned by some ill informed Garage be it a Mercedes Benz garage or not difficulty in selecting 3rd & 5th gears and in Bruce's case any gears as has been experienced by several A class owners as well as Phillipa and Bruce above, can be interpreted at a very expensive excuse for unnecessary work on your car. Before you commit, check to ensure that the link marked A is still in situ, if missing it can be replaced from MB parts part Number MA 000 993 01 61 Ball socket, Costing just under £2.72 18/04/06 with the VAT and a DIY repair will save you pounds.if not thousands of £££££££.
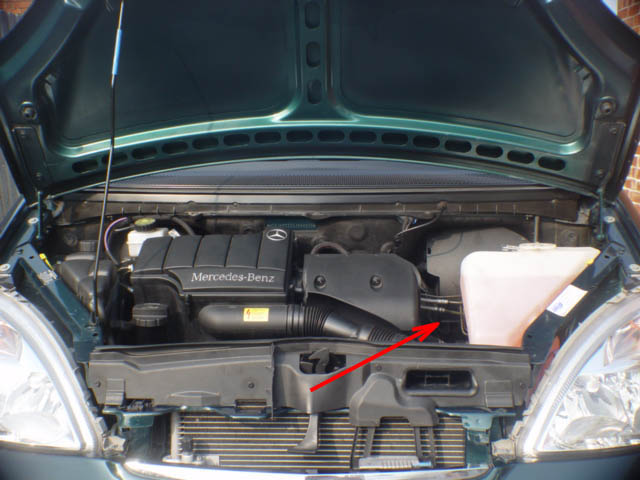
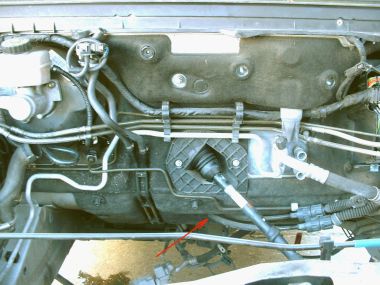
You can see the linkage just by lifting the bonnet, and looking in the direction of the arrow, Doing so could save you a lot of money, as well as anxiety, Come to that why not like me, carry a spare you have nothing to loose at that price.
Chris has also brought to my attention that this self same link is fitted to A class fitted with the ACS transmission, the only difference was that he also lost the use of 4th gear as well, so do not get caught out investigate the location of this vulnerable link and carry a spare it could save you a lot of time and a lot of money in getting your car transported to a garage, who if are as knowledgeable as Mercedes Workshops will want to remove and replace your transmission, Frightening.
Gear selector Linkage
Unlike most gear boxes the gear lever does not go into the top of the gearbox but into a gear selector mechanism, this in turn operates cables which are attached to the top of the gearbox selector, this can be seen when lifting the bonnet, where the change of gears is finally made.
 Controls buttons which reset the cables.
 Situated on the top of the gear selector mechanism, under the leather gear stick surround are two Orange coloured push buttons, these allow the mechanic/owner to adjust to cables in relation to the gearbox selector; with neutral selected, when these buttons are pressed the gear lever cables can be re-set ensuring that all gears are easily obtainable.
(I would however stress that I have not had to touch my car in respect of this adjustment feature and cannot therefore state accurately what action they play when using these adjusters. However you do not need to be a mechanic to see that they play a part in the adjusting of the gear lever selection cables)
If ordering parts for your car always use the Vin number this will ensure you get the correct parts for you model and car.
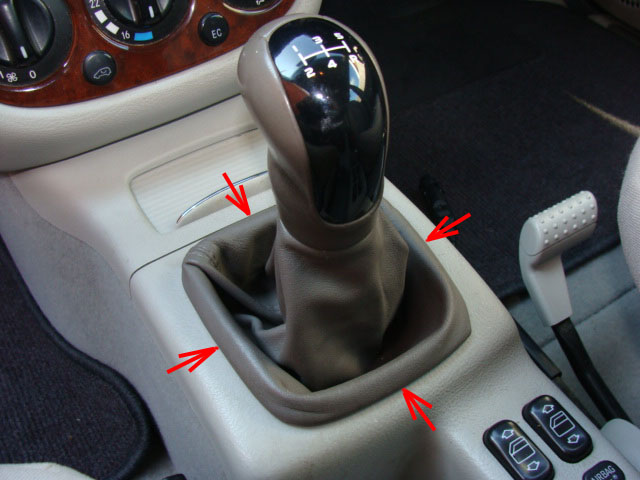 To access the orange reset buttons you will need to remove the leather gear lever surround, this is best done using plastic wedges, plastic cycle tyre levers are ideal, ease the moulding up evenly ensuring the leather is not cut or damaged.
 To replace ensure the leather is positioned on the plastic frame, position carefully and push down until it is heard to clip into place.
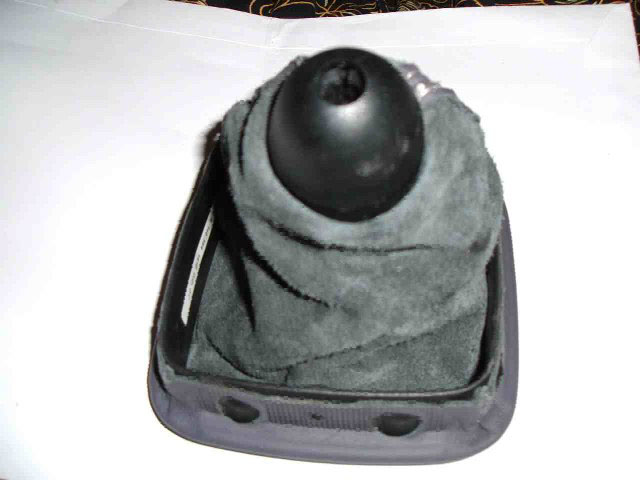
Carefully ease the leather sleeve up towards the lever knob until you can access the locking collar.
Removing the gear lever knob
I can't remember how many times I have seen this question asked, it seems every body for some reason wind's to remove the gear lever knob, however when I was asked this question again this week I forwarded it on to Tony, a fellow owner who I knew had successfully removed the knob from his gear lever.
Some months ago I attempted to follow guidance I have but gave up as I couldn't get the component indicated in the instruction to release the knob from the lever.
I then began to question whether the two W168 'A' class models pre, and post face lift were different, there are known differences such as the central heater knob for bulb replacement, so I was cautious as plastic components are easily damaged especially when the plastic is cold and brittle. Also Tony's car was pre-face lift.
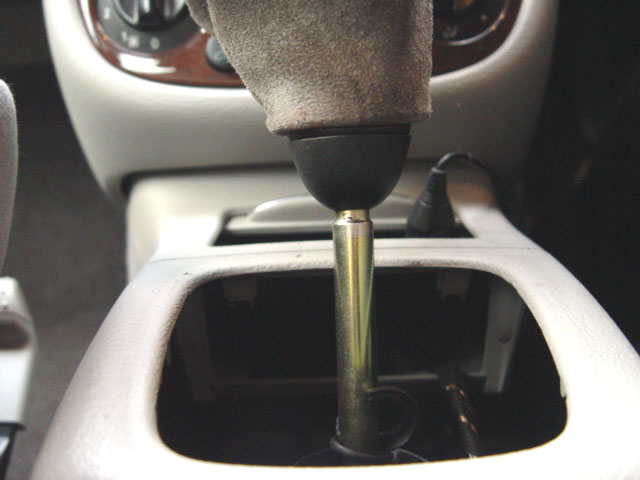
You should now be able to turn the collar anti clockwise, however mine was very tight , you would stand a better chance while the unit is warm or gently heat using a heat gun or hair dryer but take care, better still leave the job until the weather is warm or the car is at least warm throughout.
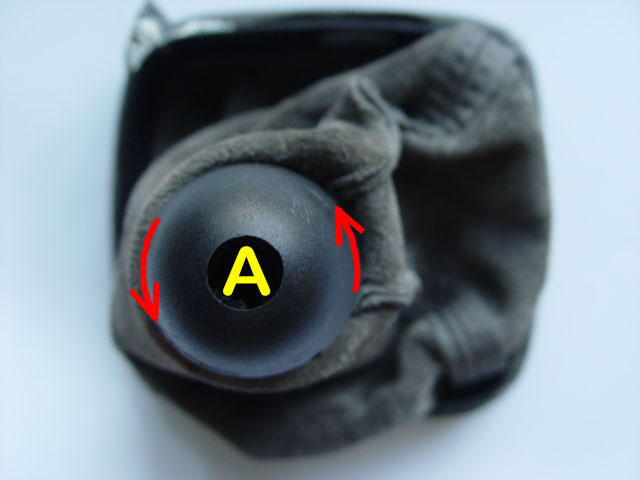
As seen from the underside of the leather sleeve the locking collar is turned anti-clockwise to release the gear lever from the gear stick.
However today I have had another go this time because the rubber gasket that fits around the gear lever has split on my car and I wanted to replace it with an alternative dust excluder, attempts to purchase the correct replacement part have already failed so it was a case of improvising.
However undoing the locking collar was difficult because it was so tight, I managed eventually by wearing a rubber glove which gave me more grip.
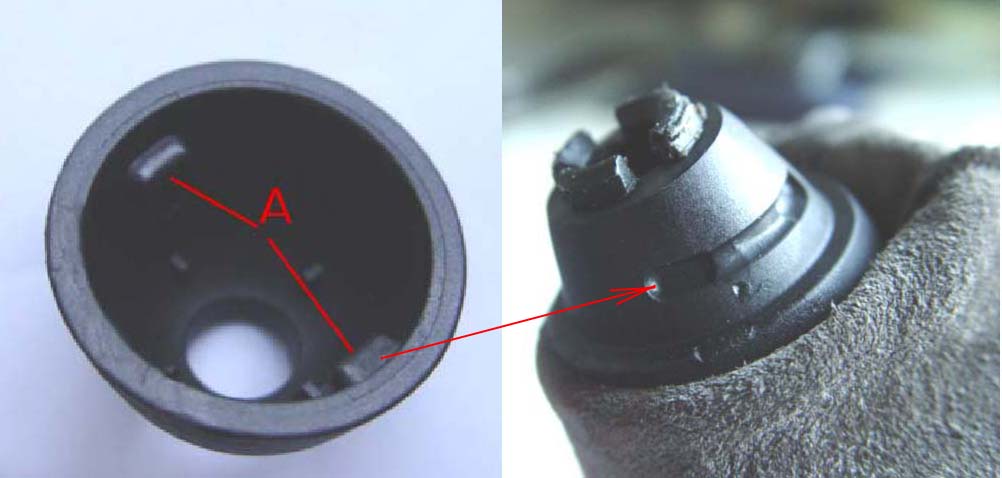
having exposed the lever and removed the knob I was able to fit an improvised seal over the exposed selector mechanism, in my case I used the rubber off of a drop link swivel joint which was ideal the hole in the centre being just the right size for the gear stick. I then fitted a plastic washer which holds the rubber firmly in place.
The insert photograph is the part of the rubber gasket that had split and torn.
This is to be expected as the rubber is stretched in all directions as the various gears are selected.
I also spray lubricated the gear linkage while it was exposed using 3 in 1 light oil.
The two gear lever selector cables enter the car at the bulkhead /lower fire wall. These then travel through the central tunnel to the gear lever
Reversing light switch
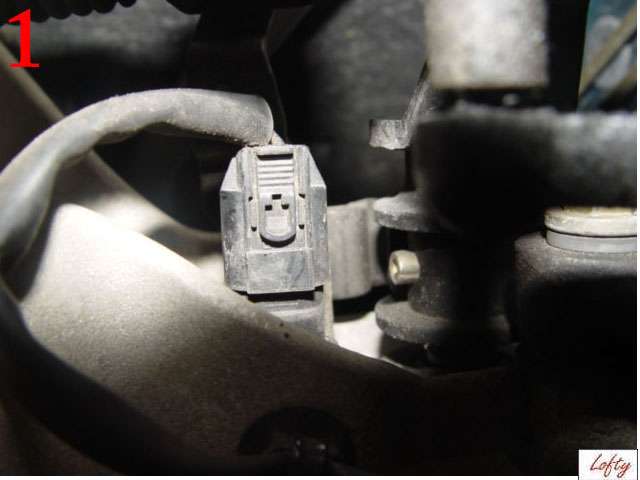
 Yes the reversing light switch is located in the gearbox millimetres away from the link mentioned in the linkage for the gear selection.
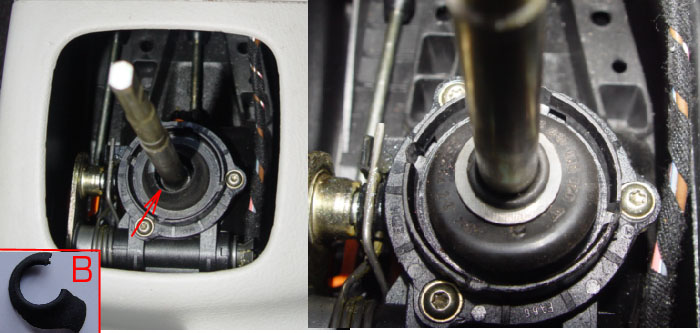
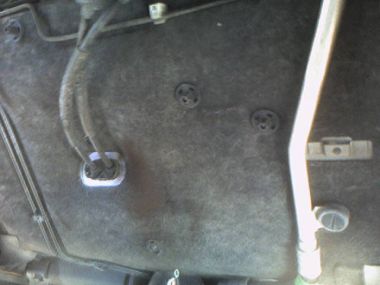
I have indicated it is location with a small arrow. The item that can just be seen is the switch electrical connector. I found that removing the electrical connector was easiest carried out with the car in 4th gear. However having removed the connector see the warning Note below, before going further.
 1 and 2
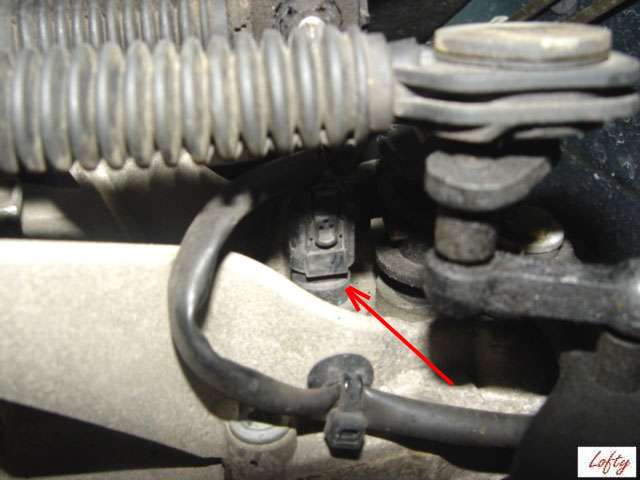
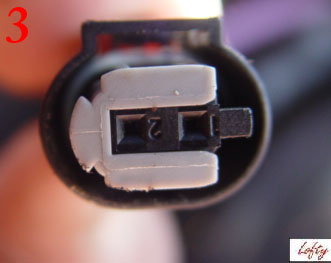
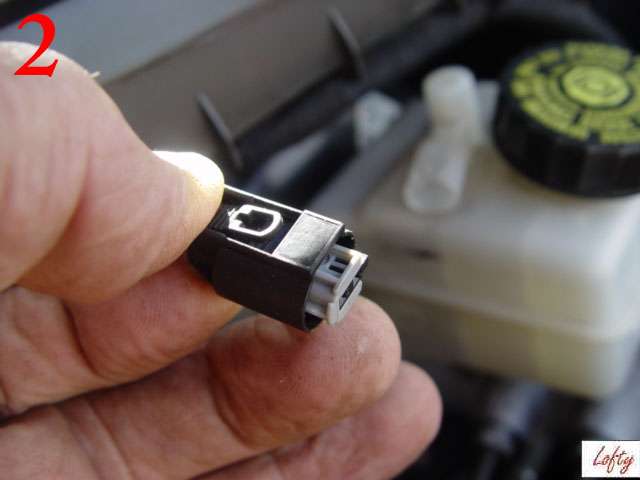
It is worth familiarising your self with the connector that is attached to the brake master cylinder reservoir, as this connector is exactly the same, the sides of the clip are pressed, which allows the connector to be removed.
1 and 2
It is worth familiarising your self with the connector that is attached to the brake master cylinder reservoir, as this connector is exactly the same, the sides of the clip are pressed, which allows the connector to be removed.Having removed the connector be aware that it must be correctly re-located for the plug to house and the clip to lock 2 & 3
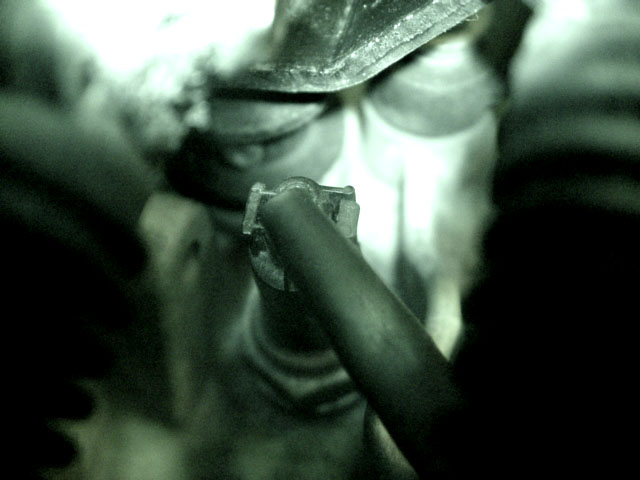
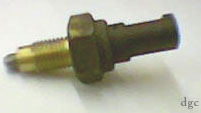
To date I have not had the need to remove or replace my switch. However 'dgc' a fellow Baby-benz.com member has, He adapted a long reach 22mm socket which he has to shorten to fit under the cables servicing the gearbox, my advise to anybody doing this is to use the New switch to adjust the socket, the switch is not unlike a plug and if you shorten the socket too much it will not reach the hexagon section of the switch which you obviously need to engage to remove and re-fit the switch.
ADVISORY WARNING
 Another of our Owners 'Shaggy' being in the know has also warned that the reverse gear
MUST
be selected.
Another of our Owners 'Shaggy' being in the know has also warned that the reverse gear
MUST
be selected.He says:-quote "Ensure that you only fit or remove the reversing light switch with the reverse gear selected and do not take the gear out of reverse until the job is completed (switch fitted and tightened )the reason for this is long and complicated but if you do it without the vehicle in reverse it may well end up requiring a new selector mechanism" so you have been warned! unquote
One owner caused himself some real problems by taking the switch out without selecting reverse gear. Having replaced the switch he was not able to get 5th gear, this was because as the switch was removed a plate in the gear box selector mechanism moved preventing the gear being selected. He had to strip the selector and manually move the plate back into the position it locates when the switch is fitted in the reverse position. He was fortunate in being able to do the job himself others may be less fortunate, so Please observe this strict rule or leave to job to the professionals where you will at least have come back if the job satisfactory on completion. Always test the light before you drive away from the garage.
OH yes they make the same mistake and this has arisen more than once, so take great care to follow the above procedure If you do not you are going to cause yourself real problems.
Already made the mistake so now what!
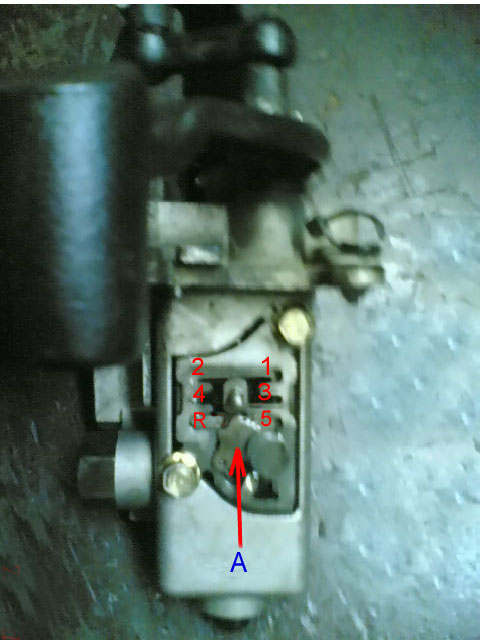
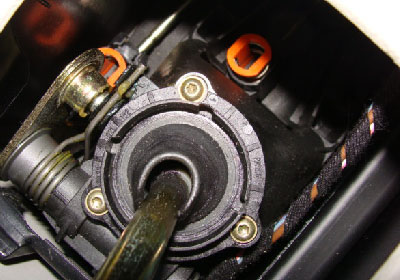
This photo shows the selector mechanism which is located by the gear selector cables, which is situated on the top of the gearbox assembly.
Plate A moves if the selector is moved with the switch removed
Or the switch is removed without selecting reverse gear. This directly affects the selection of gears and will need to be corrected before the reverse switch will operate correctly or gears can be obtained as normal.
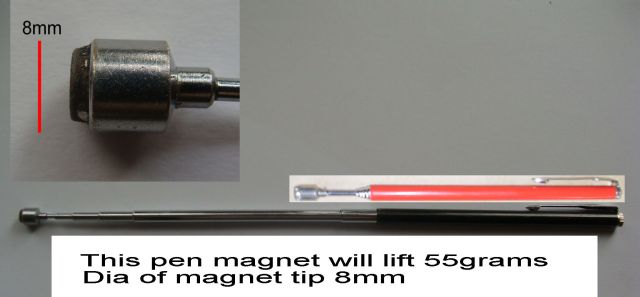
Up and until David a fellow owner contacted me there was no option but to remove the selector,(30/4/2010 now see below) re-site the plate and re-assemble, however this is apparently not easy as there is nothing to hold the plate in position while the selector is re-assembled. David has as a result come up with an easy answer which does not require the selector to be removed by using a small pen telescopic magnet to pull the selector plate back into the correct position. His procedure for doing so is available here:-
Bearing in mind that this situation will only arise if the switch is removed without the manual transmission being placed into REVERSE gear.
1. Select neutral
2. Remove the newly installed reversing switch.
3.Using your Pen magnet by placing it through the switch location hole, raise the 'PLATE' A seen in the photo above,
4.Secure or get a third party to hold in position while reverse gear is selected in the cab.
5. Remove the magnet.
6. Replace reverse light switch.
7. Test, Satisfactory, Job done.
I'm sure that if you have made to error of removing the switch without selecting reverse gear you will want to thank David for enlightening us all in his method of overcoming what is a very difficult situation and one that Mercedes Workshops will want to make the most of if you take your car to them for repair.
David came up with this procedure after having had to remove the selector to cure the fault on his car a difficult and time consuming job, which is best avoided.
Aug 2011 Are you better getting you work done by Mercedes Benz???
I received a mail from a distressed owner, his car has been into a Mercedes Workshop in Main land Spain who have changed his reversing light switch, only to find that when he collected the car the reversing light was still on, even though the new switch had been fitted.
he was now requesting help, as the garage said the cause was now a defective selector .
I mailed him back and asked if he had also lost the use of some gears, yes he had but at the time of mailing wasn't aware of it, he now even more distressed.
I mailed him Explaining that the garage had not used the Mercedes Benz work shop procedure to fit the switch and that there was now ever chance the selector would be damaged.
To my astonishment the garage informed him that moving the gear lever to reverse gear when changing the switch was optional and that they had not damaged anything.
We exchanged several mails with me suggesting that unless the garage sorted the problem they had now caused, he would be better taking the car to another MB garage and then giving the bill to the MB repairer who did the work and caused the damage.
They had even suggested that it might pay him for me to go to Spain to fix his car if I new better than they!
Having now sent him the file which clearly states reverse gear must be selected and maintained throughout the repair or the selector will be damaged, they now decided to take another look at his car at no cost to him, and yes they removed and found the selector damaged but repairable in that the lever that blocks you going into reverse gear inadvertently was bent but could be straightened.
On returning the selector and having followed the correct procedure the second time around all was well and the light now switched off when other than reverse gear is selected
So be warned it's happened before it will happen again, the gear lever MUST be placed in reverse position and remain there throughout the repair. Fail to do that and you like this garage will almost certainly damage the selector. If getting the work done at any Garage you would be well advised to tell them of the procedure required or you well suffer the same after problems.
The photo right shows the selector, with switch located, on the plate B it believed that the damage was cussed in the area of C I myself suspect it was simply a case of re-locating the plate which allows 3rd and 5th gears to be obtained and the switch to operate and thus the reversing light to illuminate when reverse is selected
If you are having difficulty in obtaining gears
If you are having difficulty in obtaining gears then try this re-set procedure:-Published by SVC Sergio, if you would like to join the SVC site member then mail :-svcglobal@svcglobal.com send them you user name with a request to join them and they will return you a password which will enable you to post information and questions.
Sergio posted the following information on MB ACS (clutch-less) and manual gear boxes.
Intrigued with the simplicity of this procedure, he personally did research and found that the suggested procedure does work and due to its importance I felt it would be valuable to owners if I posted it on his site, As we both have a common aim I know he will not mind me copying it to this page.
This reset is a must to those who suffer the old issue of difficulty in getting first and/or reverse gears ACS
Note ensure the car is on level standing or chock wheels as necessary.
1. Pull the hand brake lever. On
1a. Turn the ignition key on but do not start the engine.
2. Press the brake pedal.
3. Engage the first gear, you may hear clicking inside the wing . This is the actuator push-rod moving within the ACS module.
4. Return to gear lever to neutral (*).
5. Release the brake pedal.
6. Press the brake.
7. Engage the rear gear (*)
8. Return to gear lever to neutral (*).
9. Finally release the brake pedal.
10. Release the hand brake lever, turn off and remove the ignition key.
11. Re-apply hand brake remove chocks
Even with the engine off, the clutch auto system is always energized but in this mode and following the script above, it will learn the correct position of the clutch drive plate.
So, if you let your children play with the gear lever, or even yourself move the gear lever just for fun and without pressing the brake pedal, in the reality, you (or your children or anyone else) are misadjusting all the system.
Remember that this fully computerized electro-hydraulic clutch is very delicate and a complex system, not a toy and should be used only for driving.
Do not ever play with the gear lever and do not allow to anyone to do that, if the engine is off.
For the fully manual system, do the same but, instead of brake pedal, use the clutch pedal.
Sergio.
John's noisy Gearbox
When Chris suffered the same problem with his gearbox he used information from this page however after spending some time trying to undo the two 12mm hex output shaft retaining bolts, Chris mailed me to see if I had any advise, I was not able to help in this instance.
Follow up mail from Chris,
Hi Lofty,
After much huffing and puffing, we finally removed these big 12mm hex retainers from the output shaft on the w168 manual box
We found they were opposite left hand thread.
Perhaps you could add this information to johns noisy gearbox section to help other readers?
Many thanks,
Chris
Chris, thank you it is help like this that can save owners a lot of grief when trying to repair the cars rather than scrap which would almost certainly the case if Mercedes Benz labour costs were taken into account which in a number of cases make it uneconomical to have the car repaired.
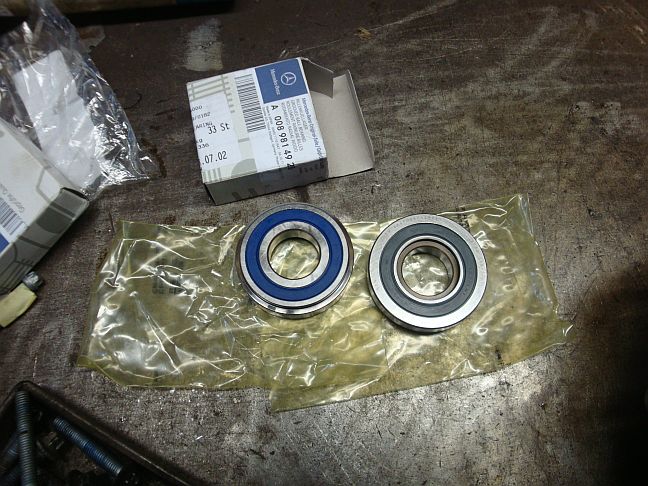
This photo shows the main bearings that were causing the noise in the Johns gearbox,replaced with new and the noise is gone.
Mercedes-Benz claim that the oil in the gearbox does not need replacing, however in my experience it is worth while changing this oil and ensuring it is to the correct level.
With the car on level standing ,top filler plug removed, the oil should be up to the bottom edge of the filler hole.
It is worth measuring the amount you remove if changing the fluid if only to prove that the oil level is low as it was in my own case.
The oil drains easier from the Gear box lower plug removed, if the fluid is warm I.e. following a run.
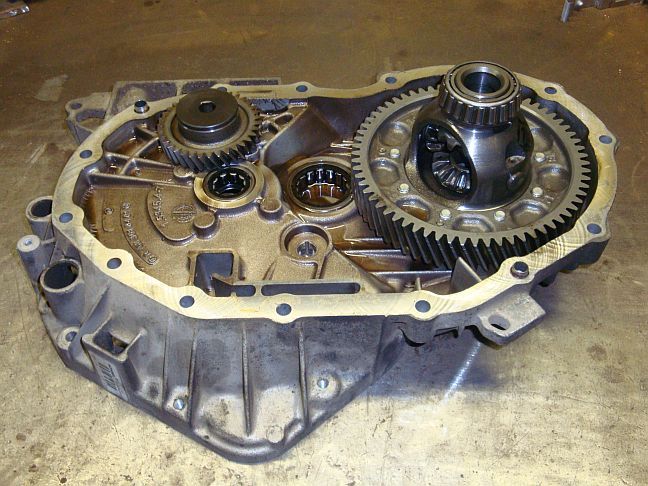
This show the reverse gear and differentional housed in part of the gear box casing.
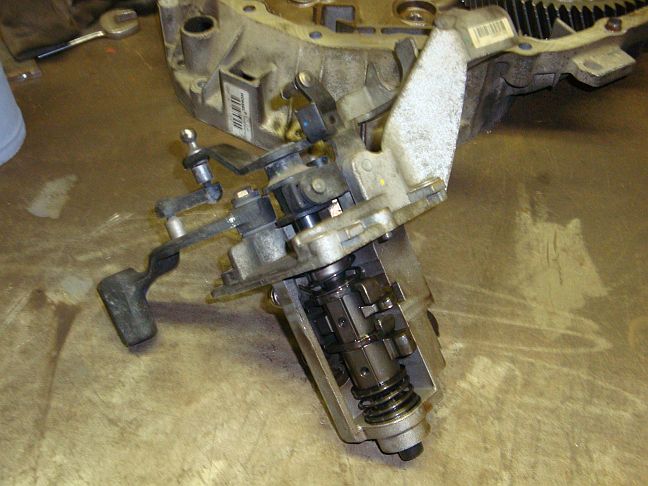
This shows the gear selector removed from the top of the gearbox, it is this unit the houses the reversing light switch. To prevent this unit from being damaged while changing the reversing lamp switch the gearbox MUST be placed into and remain in reveres gear until the new switch is fully fitted.
See above if you have already fallen foul of this procedure.
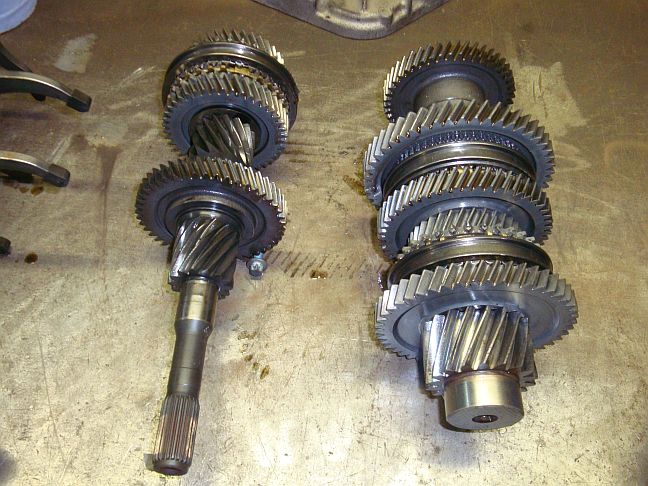
This photo shows the main shafts and gears positioned.
.jpg)
This shows one of the synchromesh rings fitted into the gearbox which allow drivers to move from one gear to another smoothly.
Prior to synchromesh gears being fitted to gear boxes the engine and thus gearbox speed had to be judged by the driver to prevent the gears grinding (Crashing) against on e another as they tried to mesh one to the other.
Commercial vehicles were the last to be fitted with synchromesh, and thus the term crash boxes was used by drivers, an alternative driving feature was to double-de-clutch
the clutch was depressed, the gear lever was moved to neutral the clutch was again depressed and the next gear selected, providing the engine speed was correct a smooth change of gear could then be made with no noise.
These days doubling the clutch is not required many vehicles including commercial, being automatics, all manual gearboxes are now fitted with synchromesh gears.
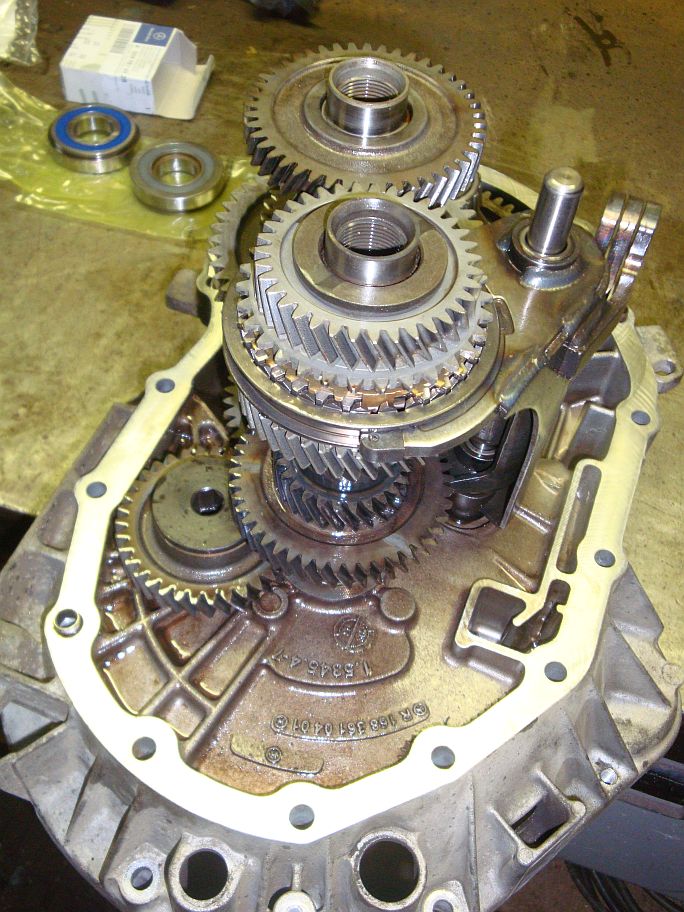
This photo shows the Gearbox partially assembled.
Thank you John Interesting photographs, you saved yourself a fortune.
Just in passing John also discovered that the injectors on this diesel car had been leaking which caused as much work again, however having the engine out of the car made the job easier and he was able to do both repairs at the same time.
The tool made by John for fitting the poly V belt can be seen on page 57. along with an injector re-seating tool on
The sort of Mechanic all 'A' class Models should come complete with!
Next.
Back to Index,
Purchase DVD.
Please Make a Donation.