Generally speaking drive shafts do not present a problem and I have heard of few problems or need to replace these units.
Before making a start on the drop links replacement please spend a minute or two and read the section:-
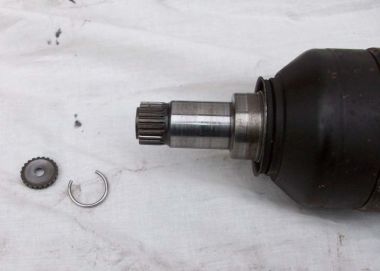
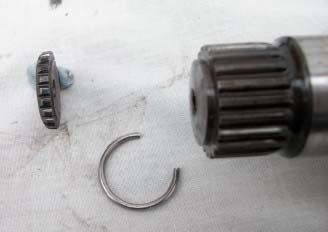
However this week 22/02/2009 I have heard of a horror story which comes complete with photos where the end that enters the gear box end of the drive shaft has sheared off where the 'C' Clip which retains the shaft in the gear box differential and encircles the shaft.
Having sheared it had no option but to fall into the gearbox.
Initially it was thought that the engine complete with gearbox would have to be removed to with all that entails, just to retrieve the coin sized shaft end, however the mechanic involved NOT MERCEDES-BENZ was able to modify his stick magnet and retrieve it without having to do so, saving the owner many hundreds of £££££
This to my mind is a very serious defect and one which could not only end the life of the gearbox but the occupants of the car as well
. If the coin sized solid steel disc 3/8" approx in width had got jammed in the gear mechanism while the car was running at speed, there is no telling what the outcome would have been.
Lets sincerely hope this is a one off and that this defect does not rear it is ugly head on other cars.
So what were the symptoms and how can you avoid such an occurance, well this is the story for the owner:-
Quote
As to how I knew it had gone, I pulled out of a junction turning right, accelerating as traffic gaps not massive but not absolutely flooring it. Got to centre of road and it was just as if car had jumped out of gear, revs went sky high and could not get any drive, coasted to side of road and found I could not get any gear. No crunching or other funny noises. Local garage recovered car and on inspection (after trying your gearbox reset procedure) the mechanic noticed near side, (L/H), drive shaft appeared to be just over half inch further out than it should have been, he removed drive shaft and found the problem, strange thing was the retaining clip was still in view and easily recovered but the end of the shaft had disappeared into the box. As a temporary measure he put the shaft back in place and drove the car down the car park with no apparent problems but obviously not wise to leave the bit in there and drive as consequences could have been severe.
Unquote
Having now had time to consider the full implications of this incident/defect, I do not think that Mercedes-Benz have a case to answer, for a change!.
It is my opinion that at some point work has be undertaken on the car that required the stub axles to be dropped, or swivel joints to be broken, which in my opinion has caused the drive shaft to slip/be pulled from the differential/gearbox.
The drive shafts are like most modern cars are only held into the gearbox by their positioning and the sprung loaded 'C' clip located at the end of the drive shaft. These shafts can be easily and accidentally pulled from the fully housed position, if work on such items as 'drop links' is not carried out without due attention being paid to the position of the shaft. I.e. by making sure that tension is not placed on the shaft's thus pulling them from the gearbox. You will note that on my drop link replacement page Mypage.29. that I have placed a jack beneath the wishbone to ensure the drive shaft is kept horizontal while undertaking the replacement. I now understand from the owner that the drop links were replaced by the garage from which the car was purchased approx five months ago, and it is the wife, a steady driver who normally drives the car and has only done between 1200-1500 miles sinse they were fitted. I am of the opinion that the shaft has been partially withdrawn from the gearbox since that work was undertaken and is the reason the drive shaft, extreme end sheared, that was the only part of the shaft spline engaged with the differential gears (crown wheel & pinion)with maximun torque being applied. Only by chance has the car continued to run without problems, until like so many things circumstances caused it to shear. The owner himself stating that he was accelerating and turning right which would slightly shorten the shaft, and put it under maximum torque, which was transferred to the tip/end of the shaft.
Lessons to be learned.
When ever working on the front suspension, or undertaking work that requires the front stub axles to be lowered , always ensure on completion of the work that the drive shaft's inner stub has not been inadvertently pulled from the gearbox. These are simply a push fit.
If for any reason you deliberately remove the drive shaft or are fitting a replacement shaft's lightly oil the 'C' Clip, which will allow it to slid into the gearbox engaging in the ring recess provided.
When offering the drive shaft inner stub to the gearbox ensure it is fully aligned, thus preventing damage to the oil seal which is housed in the recess of the gearbox location. Failure to do so will result in a damaged oil seal and loss of gear box fluid in the long term.
Drop Links replacement
The drop links on the Mercedes-Benz 'A' Class must be one of the most talked about components on the car, causing the owners to be concerned about the noise which comes from the area of the front suspension and wheel arch. This is most noticeable on rough surfaces when travelling at 20-30mph
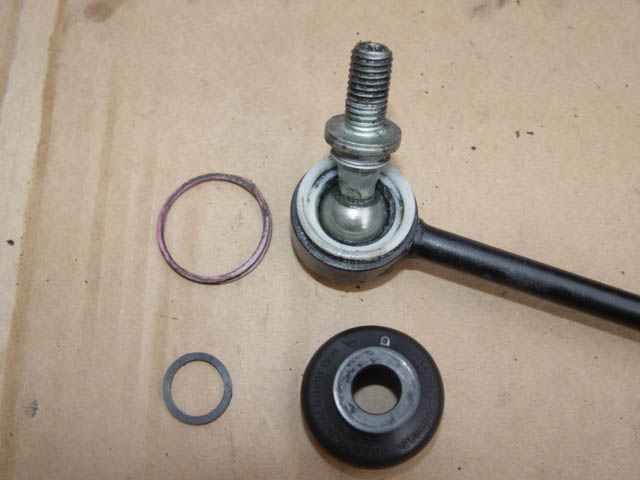
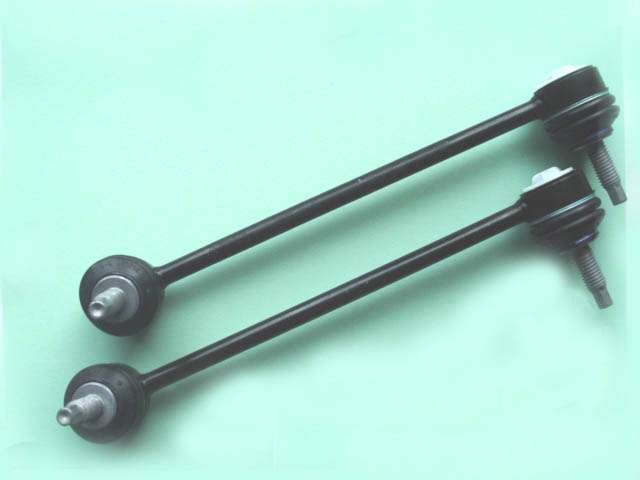
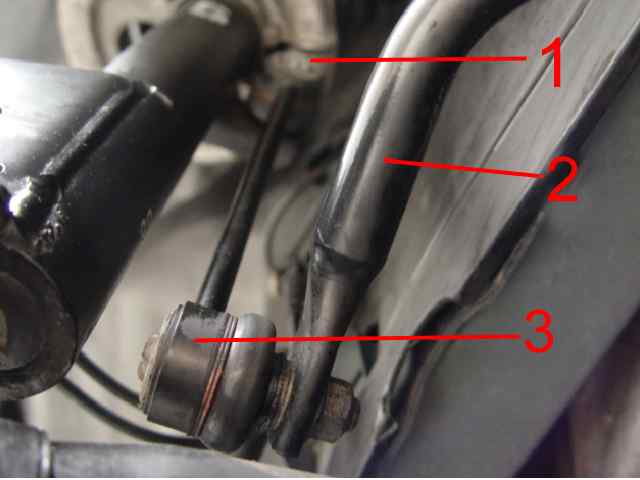
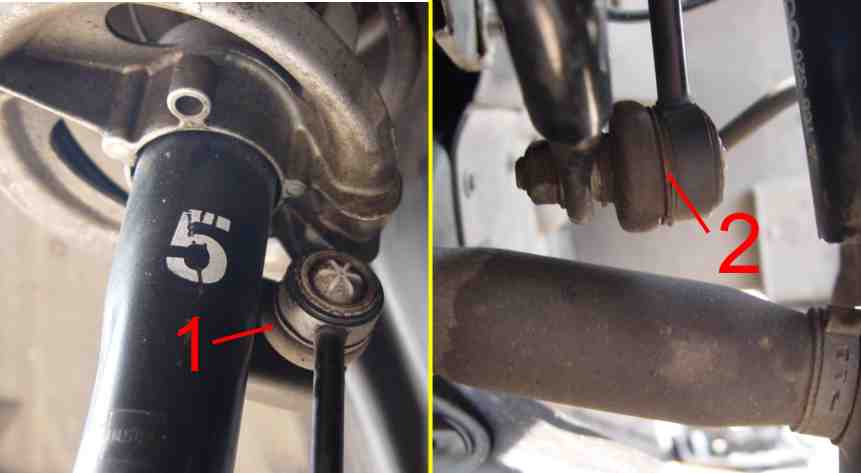
Why is it that this particular item gives so much trouble and gives so much pain to its Owners. As can be seen the rod or drop link as it is more often called consists of a steel ball and man made material socket, and although it is pre-packed with grease the socket eventually wears and we get the rattle caused by the movement of the suspension and components. Humans also suffer the same complaint but suffer greater pain. They would I'm sure gladly pay £100 per hour and £30.00 for the bits to get rid of their pain that's associated with a worn out hip joint, again a ball and socket! So we shouldn't complain. Ironically the bits that form the replacement are not dissimilar to the ones displayed here.
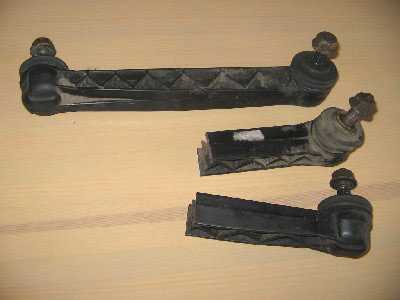 It appears that even DaimlerChrysler- Mercedes-Benz have experimented with the construction of the drop links, in this instance they were removed from John's 1999 model 'A' class, the plastic stay stood the test of time however the moulded balls joints suffered as with the the later all steel units. The plastic in this case didn't fracture it was cut to see if there was a steel insert in the plastic.
So it is the ball joints that let both the old and the new links down, In times past these items would have been manufactured from all metal components and a grease nipple would have been provided in the construction, which allowed service centres and owners to keep the ball and socket well packed with grease, using a grease gun! Any play that appeared or was detected was quickly taken up and this action on my cars became a priority before the early MOT's were undertaken.
In this Modern World car designers think they know better and have done away with that facility, hence you now have to replace the whole unit, albeit on the ones I have just replaced on my car only two of the four sockets were worn.
Drop links can be purchased from Mercedes-Benz parts departments, as well as other outlets, GSF for instance supply what they call "Anti Roll bar Link rods" and although there is no picture in their Car Parts Catalogue, I'm quite sure they are talking about the same component. Theirs are about half the price when you add the VAT. And remember my readers get 10% off list price with GSF. see mypage 95 for details.
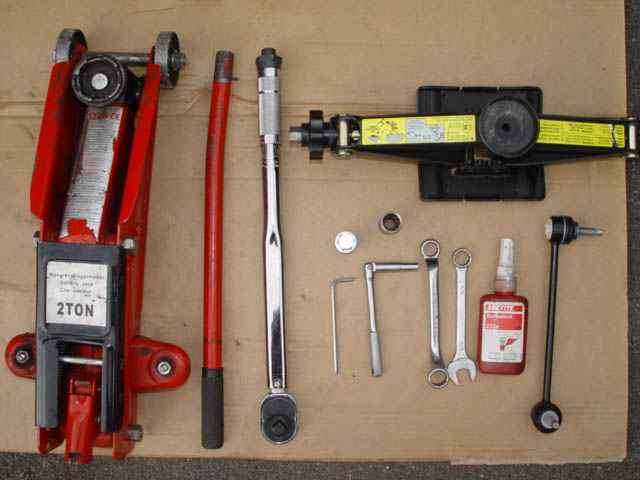
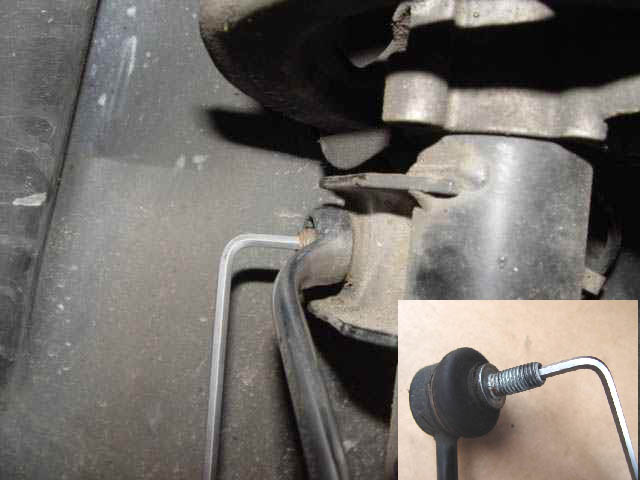
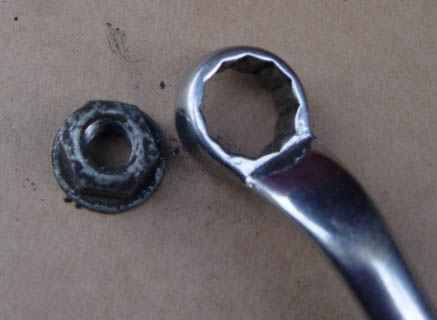 This was to overcome the problems of two metal shoulders fouling the spanner. Whilst removing all (4) four nuts it was necessary to prevent them from turning using the Allen key. However the lower nuts were easiest removed with a flat 16mm ring, so Ideally you need both, as neither is suitable for top and bottom nuts if the job is to be made as easy as possible. Bear in mind that you cannot us sockets, as you need to secure the spindle in each case.
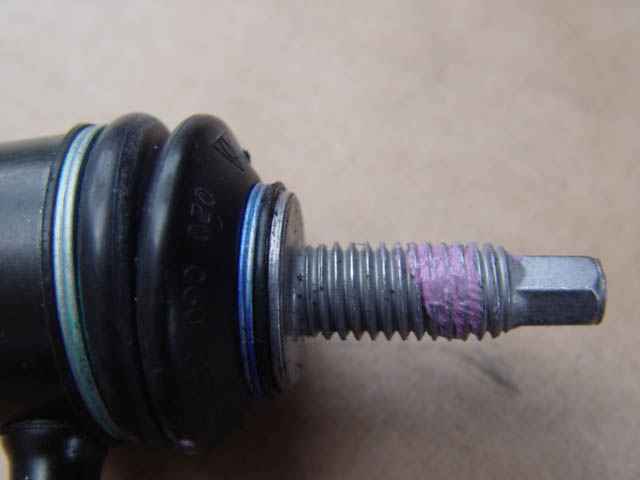
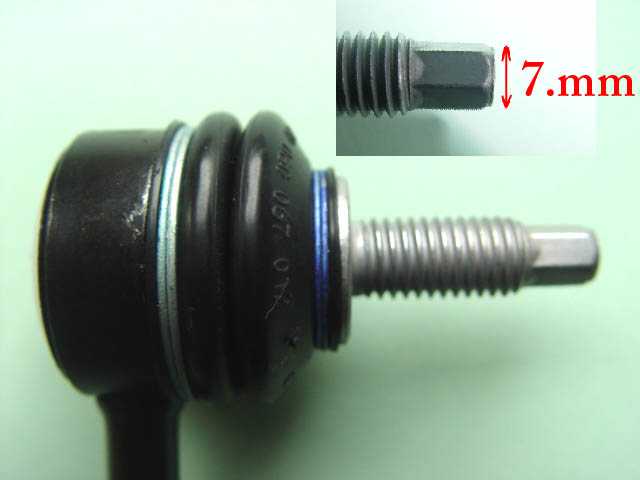
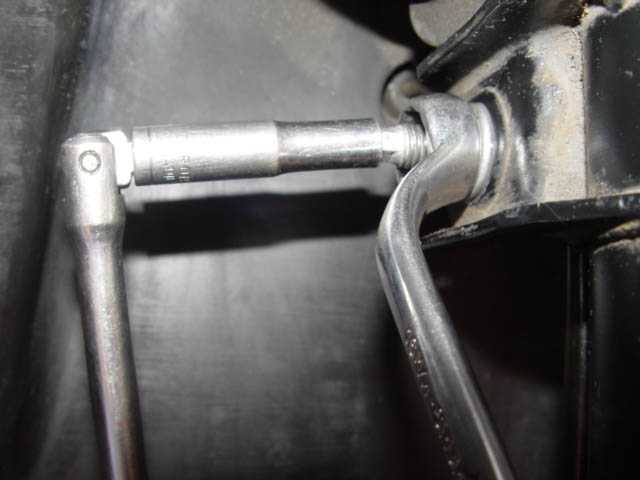 When it comes to fitting the New units applying a small amount of Loc-tite to the thread of the spindle will ensure the nuts are not going to move. Tightening them, Again I found it necessary to secure the spindle from movement by using in this instance a 7mm long reach socket over which I placed the 16mm spanner, again all four nuts required this treatment.
(
if you do not secure the spindle, whether undoing of re-fitting the spindle will turn and the nut will never tighten
)
When it comes to fitting the New units applying a small amount of Loc-tite to the thread of the spindle will ensure the nuts are not going to move. Tightening them, Again I found it necessary to secure the spindle from movement by using in this instance a 7mm long reach socket over which I placed the 16mm spanner, again all four nuts required this treatment.
(
if you do not secure the spindle, whether undoing of re-fitting the spindle will turn and the nut will never tighten
)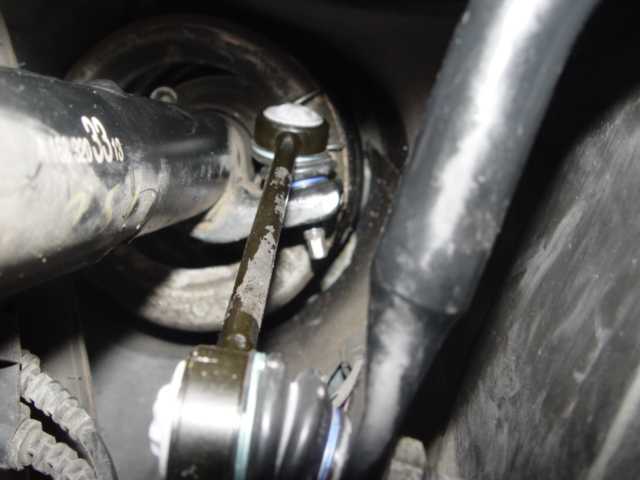
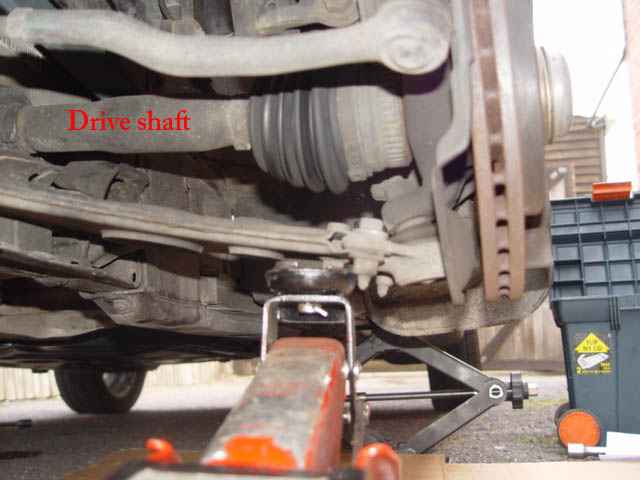 * Using a second jack , place it under the wishbone( i.e. directly below the suspension)Using a plate, or piece of wood as necessary to protect the underside of the wishbone.