Component parts and Assembly
Poly 'V' Belt & Associated Components
In view of the problems experienced by some owners with the genuine Mercedes-Benz crankshaft pulley shedding it is outer bonded surface, it is worth noting that spare parts are available from other outlets. In the case the item is advertised on E-bay and the advert also carries the details of the European rules in respect of servicing and parts, is this case it is claimed that the part exceeds the quality of the original part, some owners may agree in this case it would be a poor product if it didn't and may well be a good substitute for the suspect Mercedes component fitted to early models.
Parts Supplier e-mail:-janet@wunderpartz.plus.com For more details suitability, availability of this component and other mechanical parts for Mercedes-Benz Vehicles including Poly 'V' Belts, Belt tensioner pulley's, Timing chain tensioner, Filters, including Automatic gearbox filters, Brake parts, Suspension parts, Water pumps, Crankshaft and other Sensors etc. You have nothing to loose in asking for a quote and all to gain, make sure your mail includes either your VIN number or the part number of the part you are seeking. Also mention this site 'Lofty's Homepage, or aclassinfo.co.uk, and get free postage on items ordered which are competitively priced and include VAT.
An e.mail received from one very pleased owner in AAlesund - Norway Hi Lofty!
Me and my wife are happy owners of a 1998 A160. Some time ago we heard some screeching noise from the left front of the car, and I supposed it was from the poly v belt. My skills as a mechanic are not very impressive, so I asked my brother in law, which has been working as a mechanic, for some help.
When he saw the tight space in our car, he asked me to use a professional garage to switch the belt. Which I suppose would be quite costly. Then I found your site on the internet... And with your detailed instructions it was with no problem at all changing the belt. It was all done in less than an hour. Again: thank you.
At the same time as the noise occurred, the ABS/ESP lamps came on while driving(they were off until I released the brake). At first I supposed the light came on because of low battery voltage, and that the problem would be solved as the belt were replaced. But
it was not.
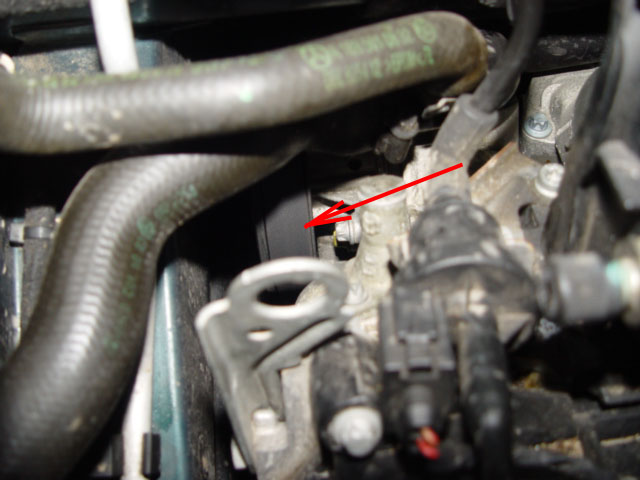
Today I went to our local Mercedes dealer to buy the brake switch(page 18 on your site). In Norway it cost about 25 pounds(yes everything is expensive here...). I was not sure that changing the switch would help, because in my case the brake-light still was working! It did help. So now everything works as it should, and the repair cost for me has been MUCH cheaper than using a
professional garage.
Donation is on its way.
Best regards
J
AAlesund - Norway.
So you see it was worth setting up the site, helping owner to keep running costs down and helping owners all over the world solve the problems on their cars .
And the letter of appreciation and donation was well received. Lofty
The poly 'V' belt is inspected on the 'B' Service and replaced at a specified mileage I'm not aware of any set time or mileage for the replacement of the timing chain.
So why is so much damage caused when the timing chain/devise breaks.
The timing chain as it is name implies maintains the timing for the various components .It ensure that when the piston reached (TDC top dead centre)that the all valves are closed this is done by the timing chain which drives both being driven by the crankshaft pulley turns the chain which turns the cam shaft which in turn being fitted with cams opens the valves at the correct time. When the chain breaks there is nothing to turn the cam shaft and the valves can be left open where upon the piston comes into contact with the open valve, the degree of damage would depend on the position of the valve s when the chain breaks.
Golden rule never attempt or allow others to attempt to turn an engine over (try to start) where the timing devise, Chain in the case of the 'A' Class is believed to have broken, more damage than previously the case can be caused. One theory put forward is that the timing chain tensioner stick allowing the chain to float which then allows the chain to jump the sprocket on the cam shaft this obviously throws the whole of the timing out of sync and multiple valves are bent even though the chain hasn't broken. Owners of early A140 would be well advised to replace the chain tensioner it is a relatively simple job and the cost is minimal.
Poly 'V' Belt That said, the car is fitted with what looks like a standard timing belt(cam belt) which is located on the O/S of the engine, this is nothing more than a power drive belt for the components listed below, and is generally called the poly 'V' belt
The belt runs clockwise when running, as seen from the right hand side /off side of the car.
Belt inspection
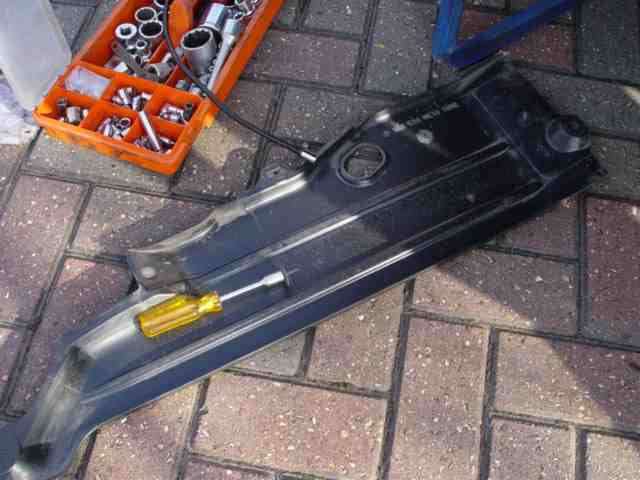
The first thing you need to do having raised the car is to remove the front under-body pan, this serves only to keep the road grim and foreign objects from getting lodged in this narrow space and dislodging the belt. This is supported by 3 X 8mm speed bolts. it is shown as positioned on the underside of the car .
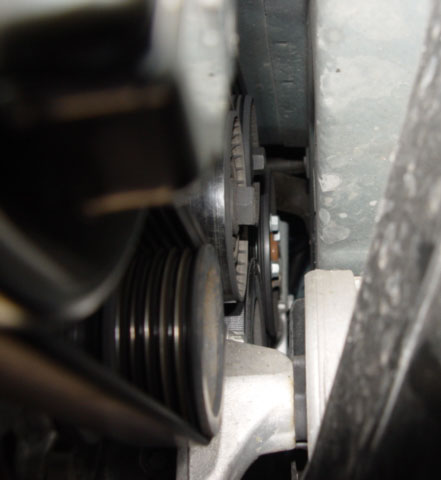
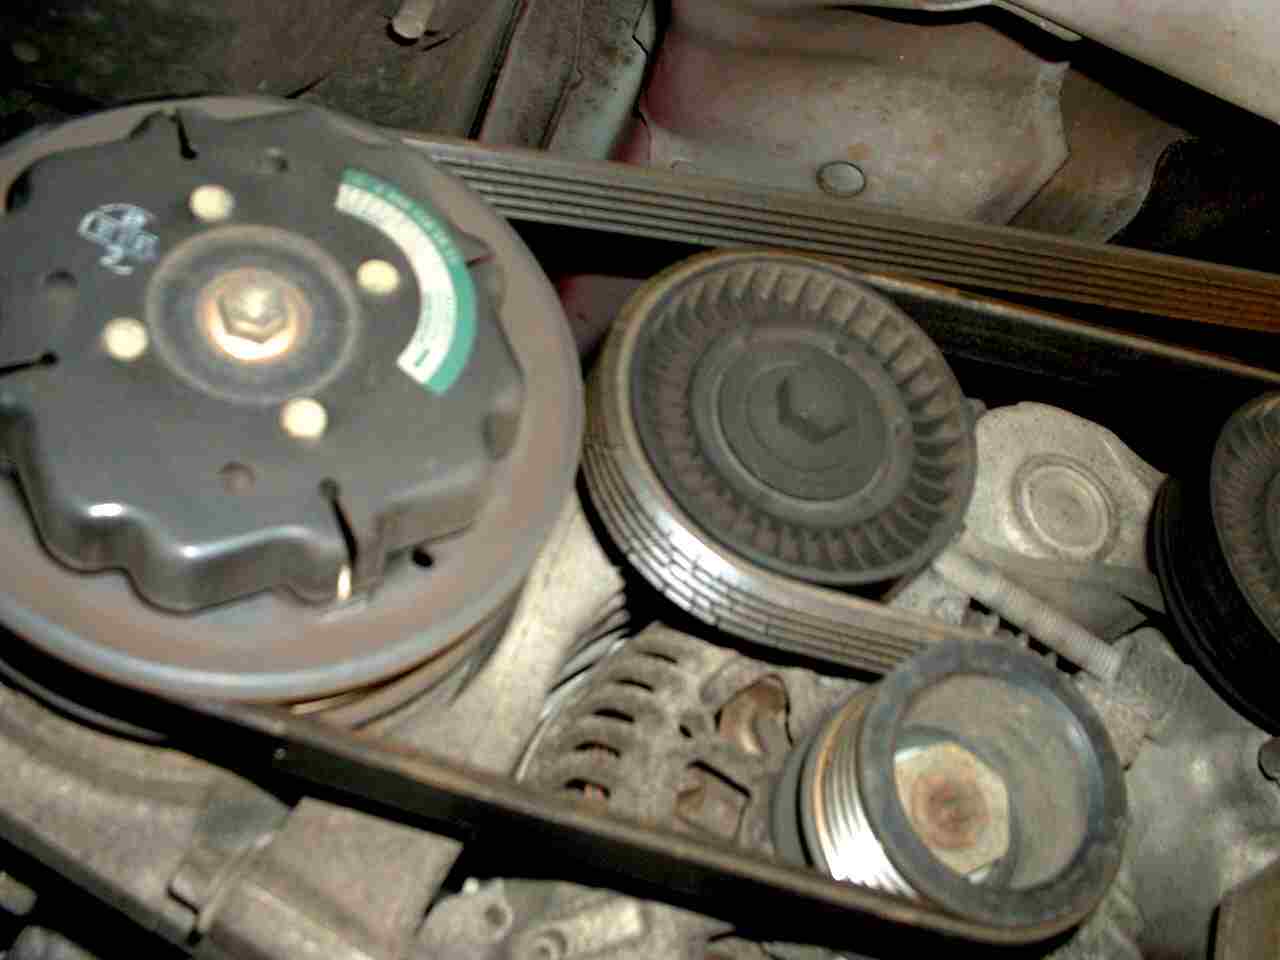
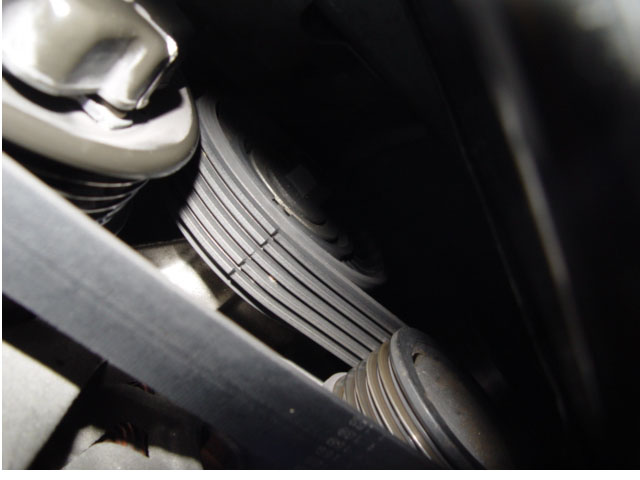
As can be seen once the under floor cover is removed the belt and pulleys can be seen however there is little doubt that the space between the chassis and the poly 'V' belt pulleys is very tight. If you are attempting to replace the belt give yourself plenty of time and be patient because this will not be an easy task. If inspecting the belt this can be done by slowly rotating the air conditioning drive pulley by hand, both the inside and outside surfaces of the belt should be inspected. To ensure I inspected the complete length of the belt, I used the information stamped on the belt as a marker, you could also use a yellow crayon which shows up well on the black surface of the belt.
Interesting to note that when the Air filter housing is removed the poly 'V' belt and water pump pulley can be clearly seen.
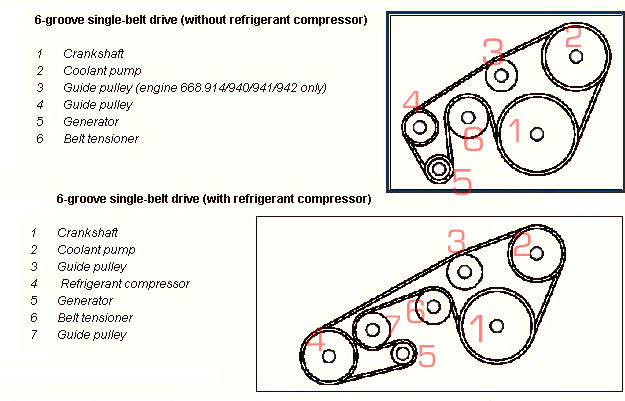
The belt is driven by pulley attached to the crankshaft of the engine which in turn provides power for the water pump, alternator, air conditioning compressor where fitted. Where air conditioning is not fitted on the vehicle the belt is shorter , so if you are purchasing a ('Poly 'V' Belt) belt make sure you obtain the correct one by supplying you Vin/chassis number to the supplier. As displayed in the bottom left hand corner of your windscreen.
As can be seen the running pattern of the belt differs on the cars with and without Air con.
Poly 'V' belt lengths,*With Air con 1750 + 5 mm
.*Without Air Con 1290 + 5 mm
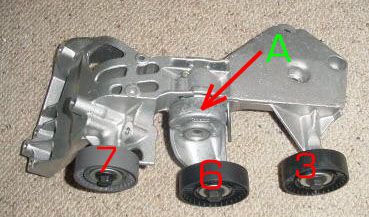
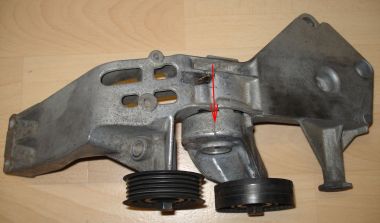
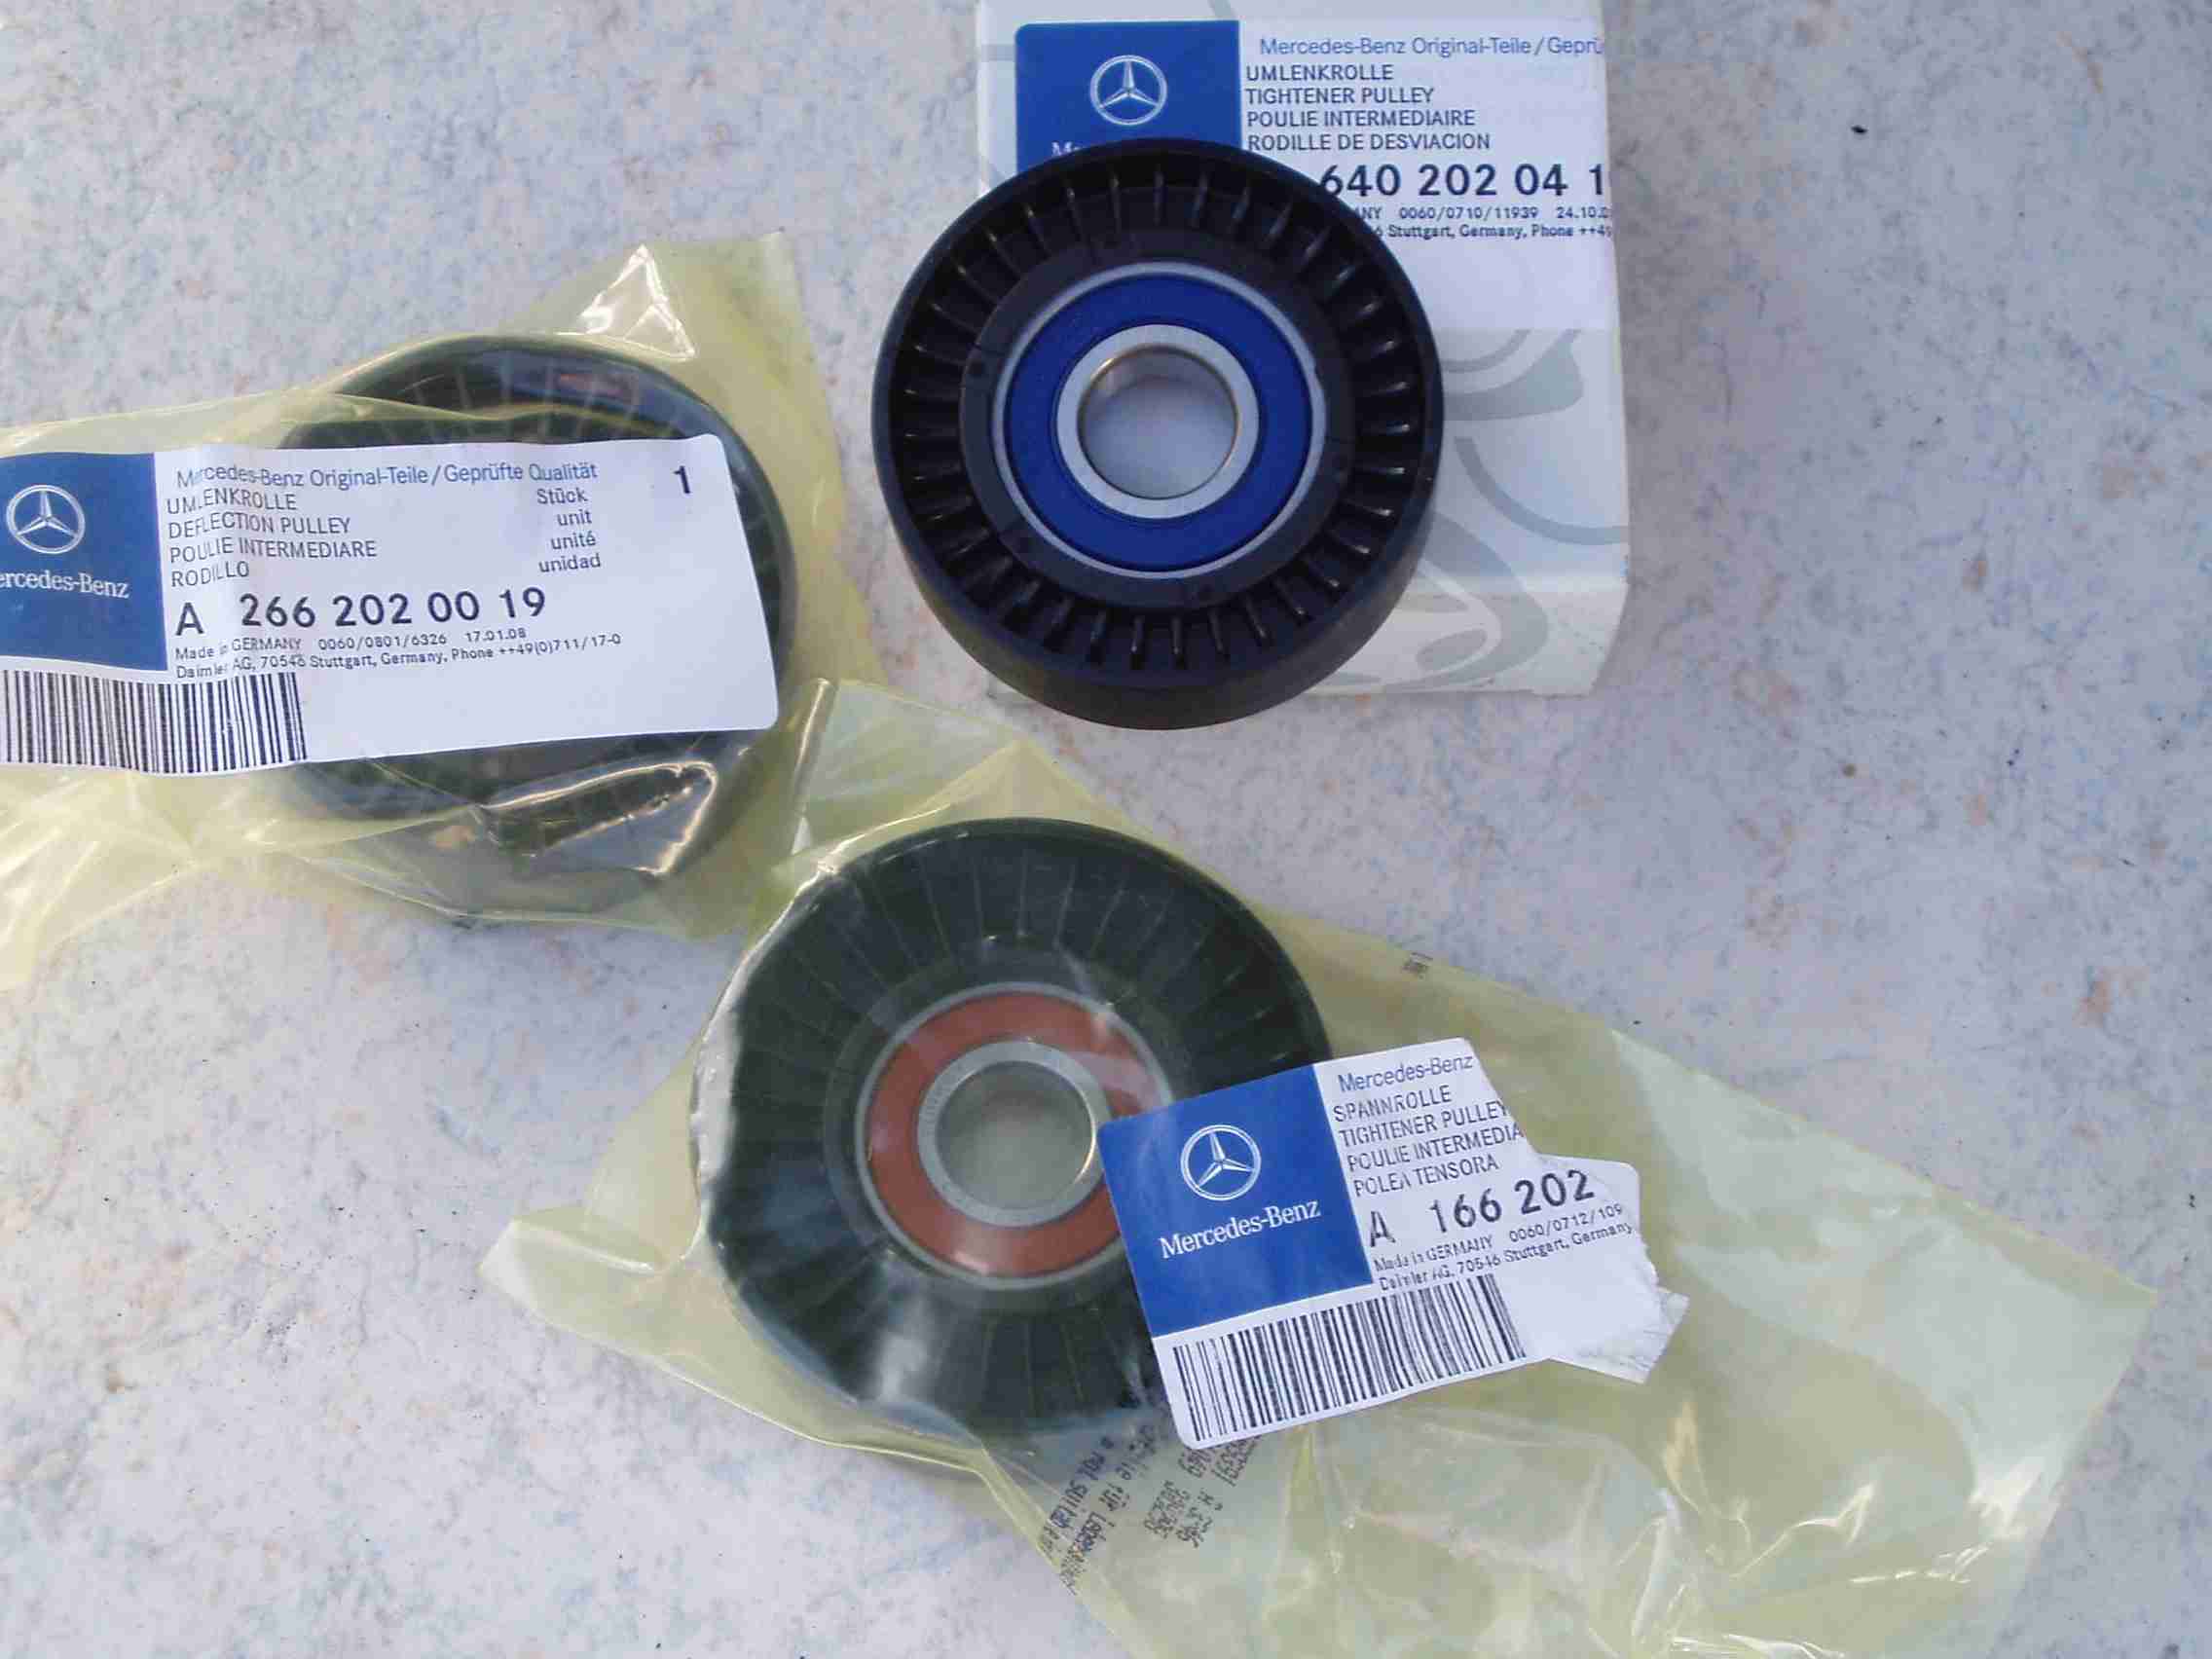
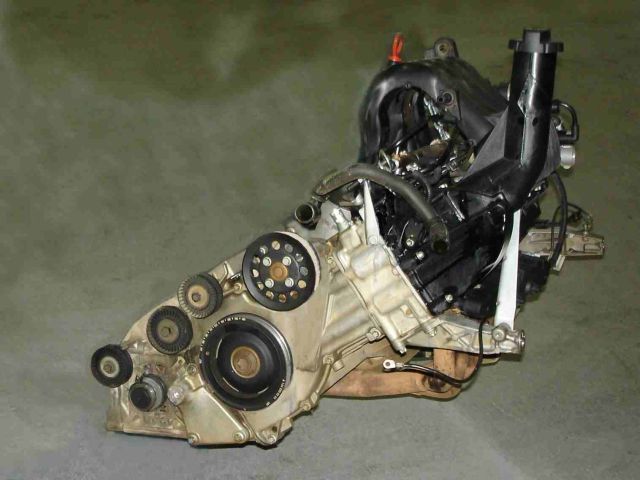
The belt is fitted with an self adjusting belt tensioner which should ensure the correct amount of tension is applied to the belt at all times. It should be noted that this unit cannot be fully replaced without lowering the engine. albeit the pulley wheels can be replaced but space is very tight for working as the belt and pulleys are sandwiched between the o/s of the engine and the body work of the car. The numbers 7. 6 .3 . relate to car with Air conditioning, lower section of the diagram above. A is the sprung loaded arm & pulley that automatically applies tension to the belt. Providing the tensioner spring in the marked arm is satisfactory , (very stiff ) to move then the individual pulley can be replaced thus extending the life of the tensioner complete. Where this is weak or the spring is broken it must be replaced which requires at least lowering the engine. Note that even in this instance the two examples differ slightly in pattern, it is important to have your VIN NO available when purchasing spare parts for your vehicle. In the case of the two tensioner's above the unit on the left is for cars without Air conditioning, the one on the right ,with Air conditioning so make sure you get the right one for your car.
Roy was able to undertake the replacement of the pulley's without dropping the engine but be warned space is tight and you will need to have patience and ensure the car is raised & SAFE as you will be working under the car Please read mypage.5. and apply all rules.
When Chris had problems on his 'B' Class which basically the same power pack he also managed top obtain a belt tensioner from a car parts factors and fit it himself , he also makes the point that space is tight for working so watch you hands and fingers
Chris has also provided the procedure for lowering the back end of the engine to allow the tensioner (Skate ) to be changed:-
It is always a wise precaution to disconnect the battery before undertaking such work, you are then protected if any wires or earthing points connections have to be removed during the job being undertaken. Bear in mind also that this procedure can be used for changing the oil level sensor, and starter motor where in both case the engine has to be lowered.
The process in simple form, is as follows:-
1,Depending on the model of your 'A' Class you would be advised to have a third party available to ensure nothing in the under bonnet area is fouling and thus being damaged as the back of the engine is lowered watch out for such items as the air filter housing coming into contact with the fire wall/bulkhead
2, The amount the engine can be lowered is controlled by the drive shaft location in relation to the sub-frame. Take care to ensure the drive shaft UJ gaiters are not pinched or damaged.
3 Jack and block the car up as high as you can. I used some car ramps under the rear wheels and axle stands under the front jacking points. This gave me about 17" from floor to sills. see mypage 5
4, Remove both front wheels.
5, Remove both front inner wing liners (just the rear part). This gives access to the rear engine mounting bolts.
6, Drop the plastic under engine protection panels (one small centre one and two larger ones). I also removed the long under body panel at the off side as this just gives a bit more room and view at the back of the engine.
7, Detach the exhaust from the manifold (clamp just above the drive shaft tube) and the bracket to the rear of the gear box. Then detach the rubber support near the exhaust flexible joint and the two supports for the middle silencer. The exhaust can then drop down and this allows the engine to move easier.
8, Support the engine on the underside on a jack and undo the engine mounting bolts (18mm socket, one each side of the car).
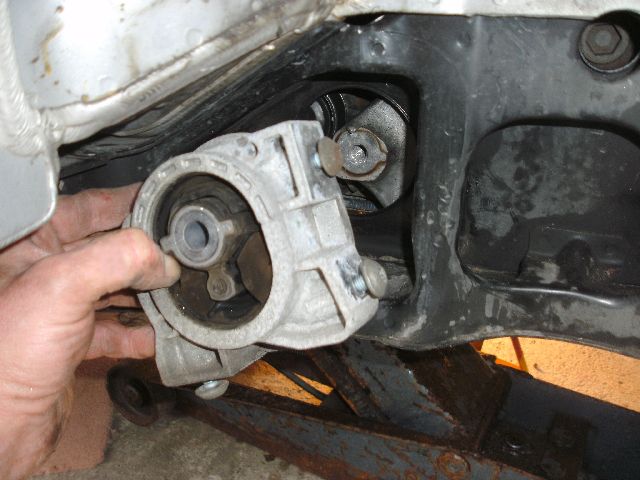
9, Take the large bolts fully out but then also take the engine mountings off the sub-frame. Each one has three Torx headed securing bolts. One underneath and two going in from the front. Both engine mounts can be taken off then.
The reason for this is the engine mounting bracket that is attached to the engine has a small lug that locates on top of the mounting that is in the sub-frame and it prevents the engine dropping until the mounting is out of the way. The pictures should show what I mean.
10, At the back of the engine, check there is enough slack in any cables or wires. I just unclipped a lead to the rear of the gearbox and also unclipped the main battery lead where it is supported at the rear of the sump.
11, The engine can now be lowered gently until the inner drive shaft rubber boots are almost touching the sub-frame. I then just put an axle stand under the bell-housing to take the weight to save the rubber boots being nipped or cut through.
you should now have sufficient space the change the tensioner and may be even the starter. see page 66
When Josh in Australia heard noises coming from under his 1999 A160 he thought the alternator bearing had gone, however further inspection revealed a ceased pulley wheel which after being worn away by the friction of the belt resulted in a failure of all of the services provided by the satisfactory running of the belt. he wisely replaced all three pulley wheels which can be done with the engine in the fully housed position however space is very tight. Close inspection of the bearing shows that part of the bearing cage and ball bearings are missing. Thank you Josh for the photos
Inspection The poly 'V' Belt should be inspected for wear and damage on every 'B' Service. Check the belt throughout the entire length inspect for cracks in the structure of the belt.
Another e-mail that may help you, this owners had noise coming from under the car initially I thought it would be the compressor main bearing but as you can read it turned out to be another case of a pulley bearing:- Hi Lofty,
All sorted now. It was the pulley bearing between the compressor and the alternator. By removing the small nut and end cap off the compressor I managed to isolate the drive to the compressor without taking it completely out.(there is a cir-clip which holds the pulley in place) Then I turned the engine over and the noise still there, so not the compressor. I had a quick look at the alternator pulley which seemed firm and OK so I removed the 1st pulley bearing and 'hey presto' a clicking sound and slight abrasion felt from the inner bearing (though visually OK). Up to Merc Benz and £20 lighter had the car back together and much to my relief the whining completely gone. Amazing how much noise generated from this bearing !
If anyone not sure if compressor is the noise problem this would be a useful tip for them. Make sure they are careful when removing the outer cap off the compressor is as it can bend on the edges. A bit of penetrating lube where in the bolt hole would help. and obviously first check the main pulley bearing with belt removed to ensure this is OK
(I have a spare compressor available if anyone interested)
Many thanks for your help
Rod
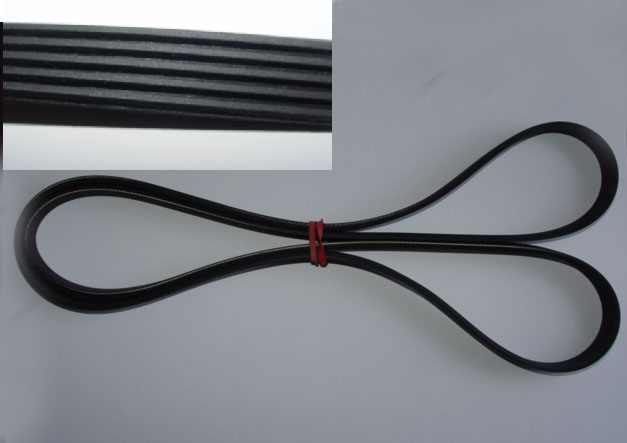
The belt in the photo clearly shows cracking, indicating that it will want replacing at the next service or sooner if possible, although the failure of this belt is not such a catastrophic event as a broken timing belt on other vehicles it does still render the car un-drivable, due to no power from the alternator and no cooling due to the water pump not running.
In this case this belt is fitted to my own car, as can be seen the pitched groove section which runs on the pulley wheels has split, although in my opinion this is not going to cause failure of the belt, I have purchased a new one which I will keep available for when it is needed.
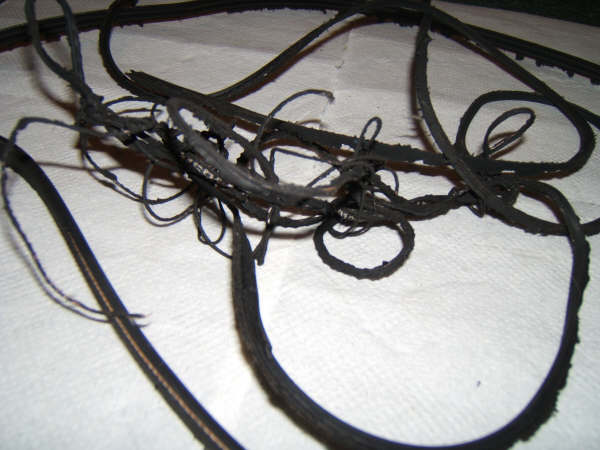
If you look and the structure of the belt there are 18 separate cords moulded into length of the belt which is what gives it its strength. The pitched moulded ridges are merely rubber. The cords can be seen in severely damaged belt below. Note despite my earlier comment I have sought professional advise from John Haynes, www.mercedesj-a-haynes he advised changing the belt which I have now done, see details at the bottom of this page.
10/01/07 In recent months problems have started to show on the early 'A' Class models, In at least two cases pulley wheels have come off the tensioner causing the belt to throw off the remaining pulleys resulting in no drive to the other services. One owner having replaced a pulley suffered a second belt failure, this was possibly down to the wrong replacement pulley wheel being provided by Mercedes Parts which resulted in the belt rubbing a guide on the pulley wheel adjuster causing the belt to shred. In another case an owner suffered real problems and considerable cost implication when having suffered a belt failure he was told he needed a new belt tensioner unit.
He had the work done at a garage at considerable cost and picked up his car only to find that the second new belt shredded to pieces within a very few miles. He then faced a second large bill as the cause was not associated with the original repair.
In this instance the belt is on it is last legs and will fail within a short space of time depending of course of the car's use, this certainly wants replacing as soon as possible. If you have facilities for getting under the car, or have the access to a car ramp or lift the job is quite simple, failing that you will need the services of a garage, in this case Mercedes workshops Quoted 100€, that would of course be plus parts ,plus vat so not a cheap repair. Print off this page for guidance and any garage can undertake the work, no doubt a lot cheaper than Mercedes Workshops although I would provide the part to Vin number to the garage in question and always get a quote for the work.
The new belt looks just a little bit different, Cost of belt with Air con £15.06.. 7/02/07. part number 013 997 15 92 This was not however marked Mercedes as with the original belt, albeit came from a Mercedes Independent parts dept. The old belt removed was marked Mercedes-Benz A0139971592 / 5K1750 SK 532A
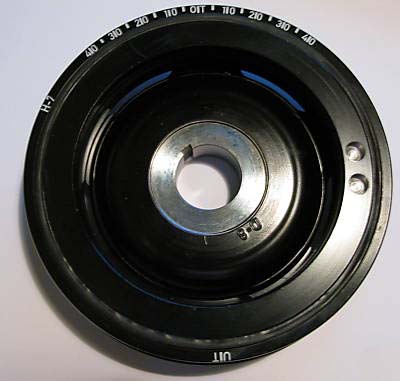
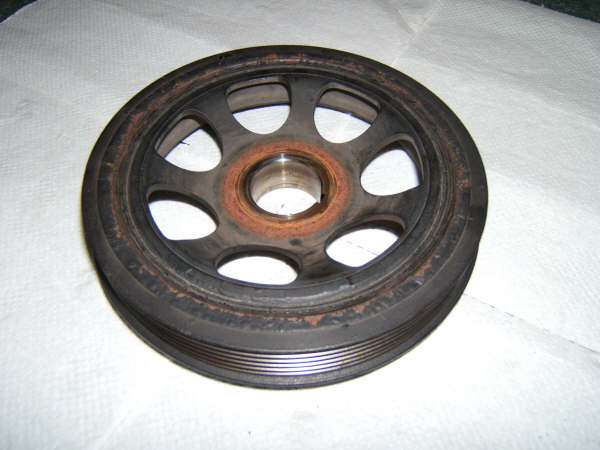
Although this pulley wheel looks ok, the cause was this pulley. The drive surface of the crankshaft pulley had shed from the inner metal wheel, a very poorly designed pulley was the problem. This owner got little change out of £800 pounds, just to replace a poly 'v' belt and crankshaft pulley wheel. I have since be told that this failure is well know in Mercedes Workshops. I was always told that to drive a Mercedes-Benz was a real luxury! I now know why, you need money in every pocket and the Bank to keep a car running with built in faults like this!
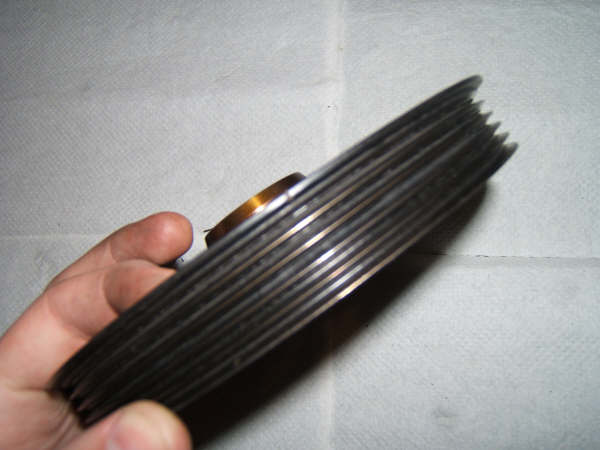
As can be seen the bonded section of the crankshaft pulley wheel has become detached from the centre of the pulley a mechanical disaster and a very expensive repair.
If you are unfortunate enough to suffer a belt failure, then either inspect the pulleys thoroughly before fitting the new belt or ensure the garage you are using are instructed (in writing) to do this as part of the contract, if they then fail to carry out the tasks itemised you should not be faced with a second bill. It is better to pay a bit more on the first bill that to have to pay the total bill twice!
What really concerns me about this latest discovered fault is that it appears the inner section of this pulley has been turning without full traction being applied to the belt, this in itself could bring up faults on the car, limited charging by the alternator for instance, and in all truth who would have suspected the crankshaft pulley was turning without turning the poly 'V' Belt? one would I suspect consider changing the alternator or at the least getting it 's voltage output checked.
Thank you to Charles for some of the photos and information available on this page. But surely this is a one off situation ? Sorry no, I have heard of two such incidents where this problem/fault has arisen, the symptoms are the poly 'V' belt be shredded, not once but the replacement belt as well , where this happens you must inspect the crankshaft pulley wheel, the bonded outer surface on the pulley separates from the metal wheel and causes the belt to run our of align with the other pulleys, whereupon the belt will be shredded as it is guided against the metal tensioner. Cost to correct this defect /fault in the region of £700.00, £450 for labour alone in this last case, and that wasn't a Mercedes Garage where it would have cost even more. A sorry state of affairs when you think you are doing the right thing by buying a Mercedes-Benz, take great care when purchasing from a private seller or sale room. Make sure you have a service history and look for problems because believe me they are there and they are costly to fix. If purchasing from a retail garage /outlet ensure you have at least a 3 months warrantee.
For replacement parts see the information at the head of this page.
Note that in the above owners case, the garage concerned charged for re-gassing the Air conditioning, adding a considerable sum to the already large bill, as this photo shows the flexible pipe work going to and from the air conditioning compressor is such that the engine can be completely removed without de-gassing or removing the compressor although I'm no advocating that this is best practice. if the engine only has to be lowered there is even less reason to remove the compressor from the car so make sure if you are faced with this situation that your garage are aware of this and do not be conned for extra cash in this way. It goes without saying that all components removed and left attached to pipe work cables etc MUST be fully supported throughout the repair and until reconnection. Note, the welding rods supporting the brake calliper and the air conditioning compressor.
'V' Belt layout 1. Engine fitted with Air con. 2. Engine not fitted with Air Con. TP. Belt adjustment/tensioning pulley. having applied a suitable spanner (Move in Clockwise direction to slacken the tensioner to remove the old belt. If the belt has snapped/missing apply a spanner to the tensioner pulley and move it in a Clockwise direction this applies pressure on the tensioner so take great care, the units spring is very strong. Apply the new belt to the pulley's according to the layout direction for your car (with Air Con, without Air Con) and then release the tension on the tensioning pulley. This will take the slack out of the Poly 'V' belt take great care not to get your fingers pinched between the belt and pulley wheel surfaces.
Remember when replacing the belt to ensure is fully aligned with the pulley's and that they are in good condition, failure to check this point and the new belt will quickly become damaged. (The pitched drive pulley's must engage fully in all the 'v' slots in the belt.)
Remember when replacing the belt to ensure is fully aligned with the pulley's and that they are in good condition, failure to check this point and the new belt will quickly become damaged. (The pitched drive pulley's must engage fully in all the 'v' slots in the belt.)
One owner who has had problems with the tensioner adjuster pulley wheel coming off which caused the car to throw the belt has managed to obtain via Mercedes-Benz parts, the wheel in question along with the appropriate bolt and washer,
so there is in this instance no need to drop the engine for that pulley at least.
I also add these comments received from WIM a fellow owner ,quote- Be very careful of the uppermost pulley wheel (the one in the middle on
the upper end between air conditioning compressor pulley and water pump pulley). It is almost
invisible, you can only see it when looking at the air conditioning pulley wheel from the
back. it is definitely an invisible killer wheel, because the span is large
and the belt is easily put in the wrong track; this goes almost
unnoticed once more because of the span between pulleys on the upper link of the belt.
I suspect some crushed belts are due to this This is an e-mail received from one owner who had problems but with help from this site managed to deal with it himself:-unquote(
As I mentioned earlier a lead lamp positioned below the coolant reservoir will illuminate the area and make the job easier. lofty )
quote
Lofty,
Just a mail to say thanks for your extremely informative and vital A-CLASS web site. My wife drives a 99 A160 and we love the car, however we hate it when something goes wrong as Main Dealers charge so much for parts and labour. Just last week the V-BELT snapped off and left us stranded. I got quotes form garages and main dealers to replace the belt and the ranged from 300 Euro to 750 Euro and a couple of guys wouldn't even quote. So I decided to go looking for info/pics etc on the pulley system and found yours. With these pictures in hand and a 15 Euro belt from my local motor factors I decided to try it myself.
I did it, took one hour and most of that time was spent trying to get my hand back out. It is a lot easier than it looks very little tools needed just some patience. Sorry I didn't take pics of the progress but wasn't sure that I could have managed it. Anyway thanks for the website its a credit to you...if only MB were more informative.
Best Regards,
Paul Unquote
It makes my day to receive e-mails such as this. All the time taken to get this information together is rewarded by knowing that an Owner has saved ££££ doing the job him/herself and the kind words that follow make it all worthwhile. However not all the e-mails I get are good news , Charles who was one of the effected owners mentioned above, mailed me initially he had suffered a broken belt on his car, the cause was a seized pulley wheel on the belt tensioner which cost him £350 + to fix. Having had it repaired he then suffered the second belt breakage and had to spend out yet more cash, the crankshaft pulley wheel failure was the cause of his second incident. So if for any reason you have your engine lowered either yourself or garage get the (3) three pulley wheels on the belt tensioner checked for mobility, it is understood that the bearings are sealed, so if the pulleys are stiff running get them replaced as soon as possible avoiding problems in the future.
Well today I took the ball by the horns and changed my poly 'V' belt having got it off I'm pleased I did because it was weak where the cuts were and the last thing I wanted was a broken belt, there was also small area's of damage in other places, so John Haynes www.mercedesj-a-haynes was right it saying that it was best changed. If you decide to have a go at replacing your belt ,when the time comes, Be aware of the extreme risk of crushed fingers DO NOT PUT YOUR FINGERS BETWEEN THE PULLEY WHEELS AND THE BELT .The tensioner is so strong that it will crush you fingers.
So what sort of a job was it? Much easier than I thought it would be, the worst part was trying to find out what size the nut on the skate tensioner was, then finding a spanner that would do the job, having done that, changing the belt took no more than 20 mins.
Tools required,
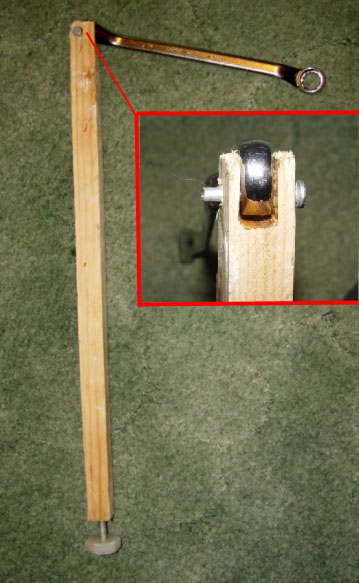
John of France and Nick from Australia both made tools up by cutting of the head of a spanner and welding it onto and extended bar which provided the necessary leverage to enable removal and re-fitting of the new poly 'V' Belt.
The tool Mercedes Workshops use is made by Hazet, tool ref. number 2714-1 (see www.hazet.com, on catalogue page 128 www.haset.de/eng/katalog/
Nick said, "I did see your reference to this 600mm long tool with a 15mm spanner at one end being available from a manufacturer in Europe, namely Hazet. I did locate this tool on their website, but flinched slightly when I calculated that it would cost me over $A100 including postage to get to Australia.
I then saw your innovative suggestion about making your own tool so I embarked on doing precisely that. Firstly buying a 15mm ring spanner with an open spanner one end and cut it in half. Then purchased a length of threaded steel around 15mm in diameter and found a local outfit to weld the half ring spanner on to one end for $10 !
I attach a picture of my efforts and have found a length of hollow red plastic which acts as a sleeve for the tool and makes it easier on the hands when levering.
Where to get it:
Nick you made a professional job of that tool, having spent time making it I quite sure you cannot wait to use it again, good job you have two 'B' Class, you will get more use from it. Thank you for your input.
My only comment to the single length tool is that you may need top raise the car more to be able to get the movement.
The manufactured tool can be purchased from:- Order by mail in Germany, at approximately 25 Euros (£22), from
www.weiner-autoteile.de you can write to them or order by email at e-mail: weiner@weiner-autoteile.de>
I got it from them. From the Hazet distributors in UK, pricing and delivery terms are unknown: www.torque-tools.co.uk
However Wim, does stress if using this tool the car must be high enough off the ground to to able to use this tool as intended, bearing in mind that garages/professionals have car lifts allowing plenty of clearance for working. Many thanks Wim, for this information and help.
*I used a 15mm ring spanner 9 inches long, the main problem was that the tensioner is so strong that you need extra length on the spanner or tool to get the pressure required, so what I did was attach an extension in the form of a 18inch piece of hard timber shaped to hold the spanner with a stout nail 3/16 dia trimmed and fitted through the other end of the ring spanner which allowed me to apply the pressure required to free off the tensioner ,which is very strong indeed. It worked fine, but if you follow my method take care there is a lot of tension behind the tensioner. .
*As well as a large screw driver a foot long for pushing the belt over the water pump pulley wheel and top pulleys. Incidentally do not worry about the fitting at the bottom end of the timber , that performed a task on another job indoors some time ago. The next task was to thread/site the belt,
*Do make sure you have printed the photo/diagram of the belt layout on this page
before you start, because once you take the old belt off applying the new belt can be quite a puzzle.
* IT IS Absolutely ESSENTIAL that you follow all the safety rules on mypage.5. the car must be stable or you will finish up seriously injured or possibly dead, no consolation but you won't be the first. I threaded the belt over and under the various pulleys starting with the highest pulley ,the water pump then applied the belt to the other pulleys leaving the Air compressor pulley wheel to last, I then fully slackened/positioned the skate tensioner, using my improvised tool so as to allow me to apply the belt onto the Air conditioning compressor pulley wheel, as I slowly turned the wheel the belt positioned correctly.
I did try putting the belt on to one of alternator pulley wheel a couple of times but failed because there is no means of turning the pulley wheel. I was pleasantly surprised that the space available was fine and presented no problem, lighting is essential, I placed a lead lamp in the engine bay O/side which adequately lit the area in which I was working. Do make sure the belt follows the correct path or the belt will be quickly damaged on a projection which sticks out by one of the pulleys. I turned the belt through one complete revolution by turning the Air compressor pulley wheel, before starting the car; all was well. Having stopped the engine I re-fitted the under tray and backed the car off the ramps , job complete and saved £££ as well as the having the satisfaction of knowing I can still undertake these jobs with the right outcome. For those wishing to undertake this task Mercedes-Parts do have a tool, part number 166.589 00 03 00. I have no idea of cost or availability. knowing MB they won't sell it to owners!
Hi Lofty,
All sorted now. It was the pulley bearing between the compressor and the alternator. By removing the small nut and end cap off the compressor I managed to isolate the drive to the compressor without taking it completely out.(there is a sir clip which holds the pulley in place) Then I turned the engine over and the noise still there, so not the compressor. I had a quick look at the alternator pulley which seemed firm and OK so I removed the 1st pulley bearing and 'hey presto' a clicking sound and slight abrasion felt from the inner bearing (though visually OK). Up to Merc Benz and £20 lighter had the car back together and much to my relief the whining completely gone. Amazing how much noise generated from this bearing !
If anyone not sure if compressor is the noise problem this would be a useful tip for them. Make sure they are careful when removing the outer cap off the compressor is as it can bend on the edges. A bit of penetrating lube where in the bolt hole would help. and obviously first check the main pulley bearing with belt removed to ensure this is OK
(I have a spare compressor available if anyone interested)
Many thanks for your help Hi Lofty,
All sorted now. It was the pulley bearing between the compressor and the alternator. By removing the small nut and end cap off the compressor I managed to isolate the drive to the compressor without taking it completely out.(there is a sir clip which holds the pulley in place) Then I turned the engine over and the noise still there, so not the compressor. I had a quick look at the alternator pulley which seemed firm and OK so I removed the 1st pulley bearing and 'hey presto' a clicking sound and slight abrasion felt from the inner bearing (though visually OK). Up to Merc Benz and £20 lighter had the car back together and much to my relief the whining completely gone. Amazing how much noise generated from this bearing !
If anyone not sure if compressor is the noise problem this would be a useful tip for them. Make sure they are careful when removing the outer cap off the compressor is as it can bend on the edges. A bit of penetrating lube where in the bolt hole would help. and obviously first check the main pulley bearing with belt removed to ensure this is OK
(I have a spare compressor available if anyone interested)Many thanks for your Many thanks for your
photo of A Class compressor showing ribbed pulley and end cap removed
Rod
Photo of A Class compressor showing ribbed pulley and end cap removed


 9, Take the large bolts fully out but then also take the engine mountings off the sub-frame. Each one has three Torx headed securing bolts. One underneath and two going in from the front. Both engine mounts can be taken off then.
 11, The engine can now be lowered gently until the inner drive shaft rubber boots are almost touching the sub-frame. I then just put an axle stand under the bell-housing to take the weight to save the rubber boots being nipped or cut through.
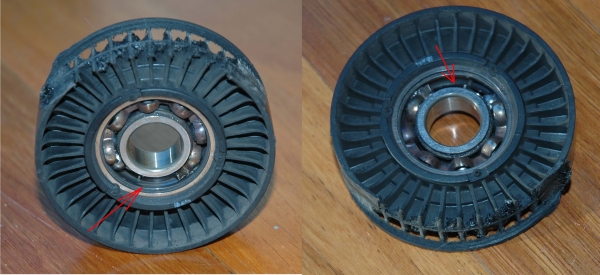 When Josh in Australia heard noises coming from under his 1999 A160 he thought the alternator bearing had gone, however further inspection revealed a ceased pulley wheel which after being worn away by the friction of the belt resulted in a failure of all of the services provided by the satisfactory running of the belt.
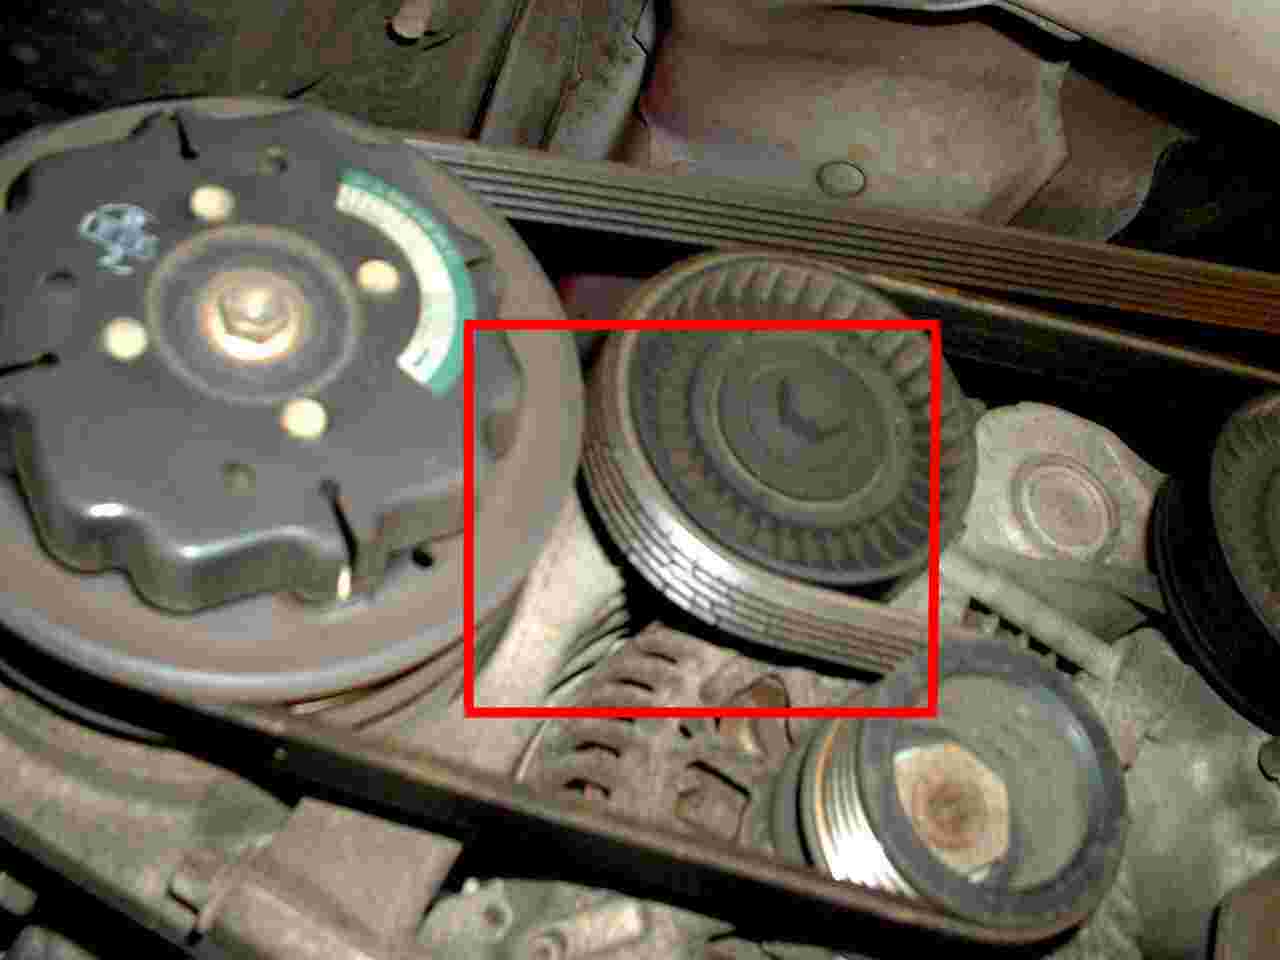
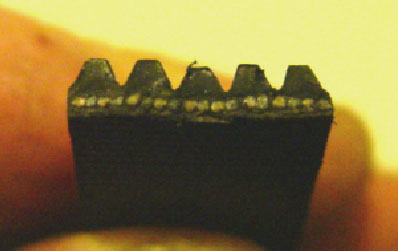 If you look and the structure of the belt there are 18 separate cords moulded into length of the belt which is what gives it its strength. The pitched moulded ridges are merely rubber. The cords can be seen in severely damaged belt below. Note despite my earlier comment I have sought professional advise from John Haynes, www.mercedesj-a-haynes he advised changing the belt which I have now done, see details at the bottom of this page.
 10/01/07 In recent months problems have started to show on the early 'A' Class models, In at least two cases pulley wheels have come off the tensioner causing the belt to throw off the remaining pulleys resulting in no drive to the other services.
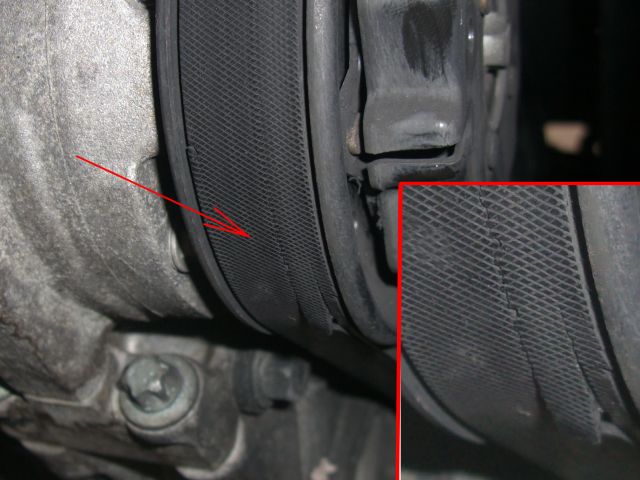
 Although this pulley wheel looks ok, the cause was this pulley. The drive surface of the crankshaft pulley had shed from the inner metal wheel, a very poorly designed pulley was the problem. This owner got little change out of £800 pounds, just to replace a poly 'v' belt and crankshaft pulley wheel. I have since be told that this failure is well know in Mercedes Workshops.
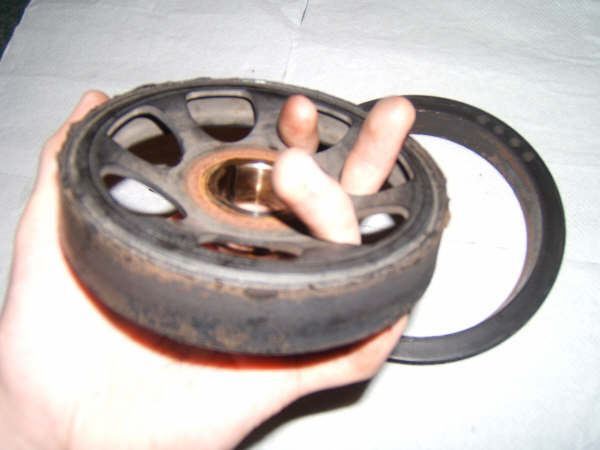
 If you are unfortunate enough to suffer a belt failure, then either inspect the pulleys thoroughly before fitting the new belt or ensure the garage you are using are instructed (in writing) to do this as part of the contract, if they then fail to carry out the tasks itemised you should not be faced with a second bill. It is better to pay a bit more on the first bill that to have to pay the total bill twice!
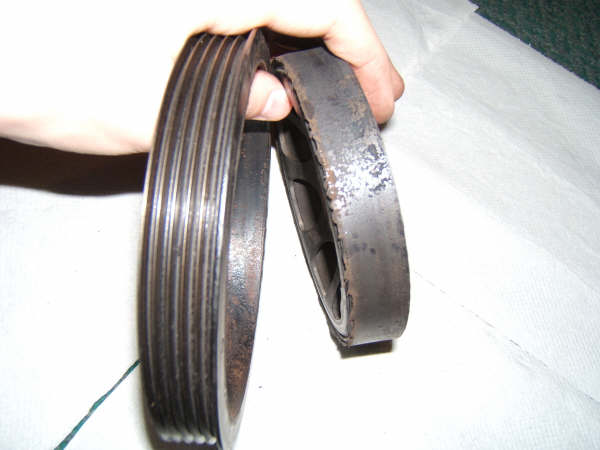
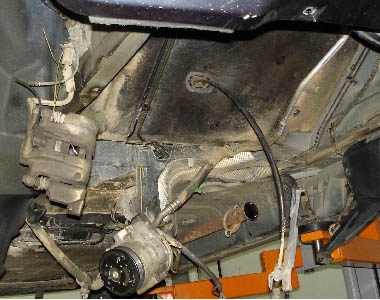 Note that in the above owners case, the garage concerned charged for re-gassing the Air conditioning, adding a considerable sum to the already large bill, as this photo shows the flexible pipe work going to and from the air conditioning compressor is such that the engine can be completely removed without de-gassing or removing the compressor although I'm no advocating that this is best practice.
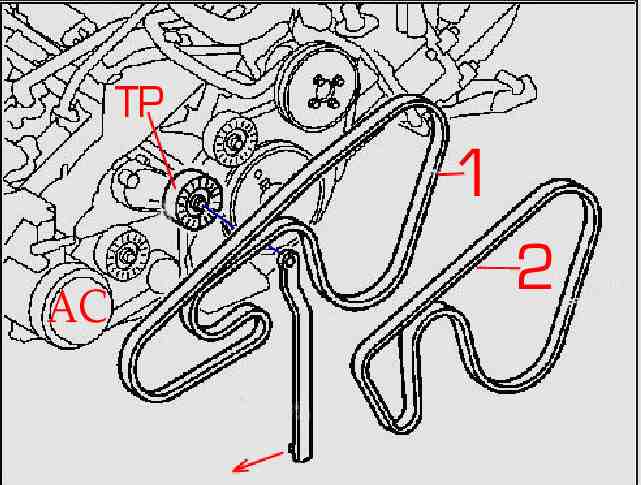
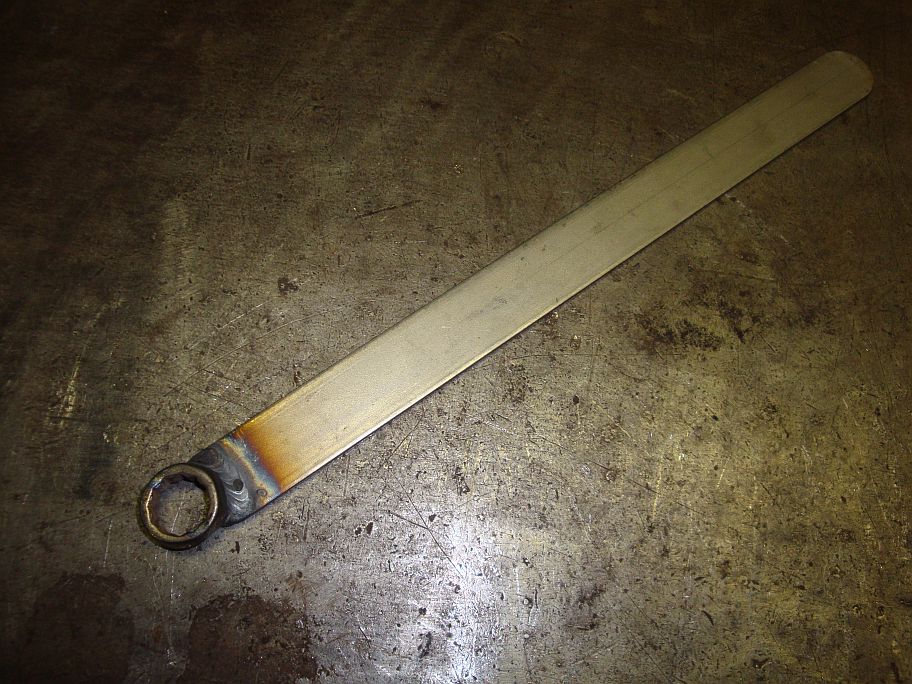 John of France and Nick from Australia both made tools up by cutting of the head of a spanner and welding it onto and extended bar which provided the necessary leverage to enable removal and re-fitting of the new poly 'V' Belt.
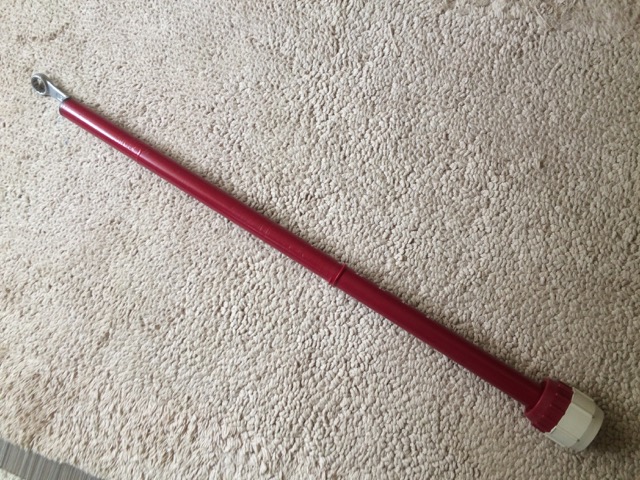
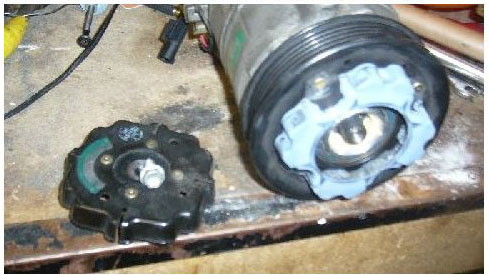 photo of A Class compressor showing ribbed pulley and end cap removed
Rod
Photo of A Class compressor showing ribbed pulley and end cap removed
photo of A Class compressor showing ribbed pulley and end cap removed
Rod
Photo of A Class compressor showing ribbed pulley and end cap removed