Starting problems? Please read this information before going further. If you have starter motor problems on your vehicle please read this page through before going out to buy or even phoning the garage It may save you a lot of money and heartache.
Even if having the work undertaken by a garage make them aware of this information/content. Many garage operators will not be aware of the situation in respect of starter motors on this car.
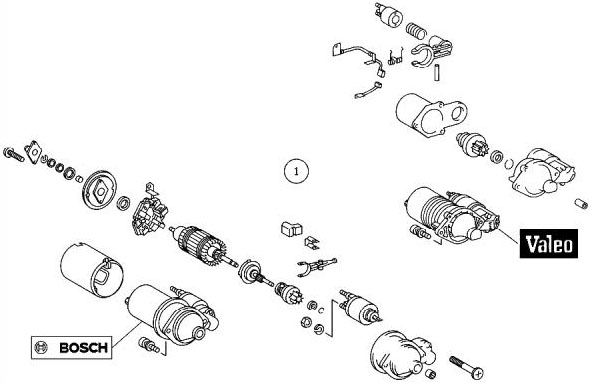
The A class is fitted with 4 different starters and so going to an car accessory outlet may not produce the correct starter for you particular car
Two of the Starters as different purely by brand name 'Bosch' , and 'Valeo' these are standard motors and operate in conjunction with a lock out relay situated under the bonnet of the A class.
However the other two are NOT standard and have built in immobilisers .
The only way you can find out the correct starter for your car is to use your VIN number/chassis number and purchase from Mercedes.
Mercedes Parts system will detect if your vehicle is fitted with a starter with built in immobiliser and if so which of the two variants should be fitted. If as indicated below the paper work on the last page of your service book displays an 049 in the range of codes displayed then your car does require a starter with a built in immobiliser.
Fit the wrong starter and your car will not start using the Starter Motor, in fact the starter motor will not even operate.
There is no doubt that with this car you live a learn and best learn fast or you will grossly out of pocket. This e-mail was received from an owner in South Africa and I'm pleased to see she did her home work and saved on the ESP/ABS problem and also saved money when it came to dealing with a defective/suspect starter motor. I ask you this question if this motor has been replaced in a Mercedes-Benz workshop would they have owned up to the failure being caused by over lubrication? I think not, You would have paid a fortune for the work and the replacement motor not knowing the true cause. Thanks to this owner you have now been made aware of another possible cause for the starter motor failure, so for those of you and I include myself if you have problems. Ask for the old starter back , as far as I'm aware they are not exchange they are a straight replacement which makes the old motor your property, it got to be worth taking a look.
:-quote Thanks for a great site, had a problem with ABS/ESP/BAS light
showing while driving with the car going into the infamous limp home mode.
Your advice regarding the brake light switch solved it! ( mypage 18)
Some other info: I had intermitted starter problems for two years, agents only resolve was to change it at enormous cost!
Eventually I removed it and the only problem was that there was too much lubricant in the bearings that spilled on the commutator. Cleaned it, and it has been perfect for two years now!
Went to the agent and found 5 starter motors they have replaced with same problem. Regards from South Africa Unquote
Prelimary check
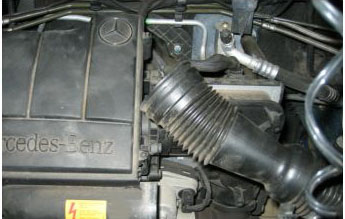
Is power reaching the starter motor?, Unlike most cars when the starter fails one would hear a click, on this car it is usual to hear nothing at all You will therefore not know if power is reaching the starter motor and solenoid.
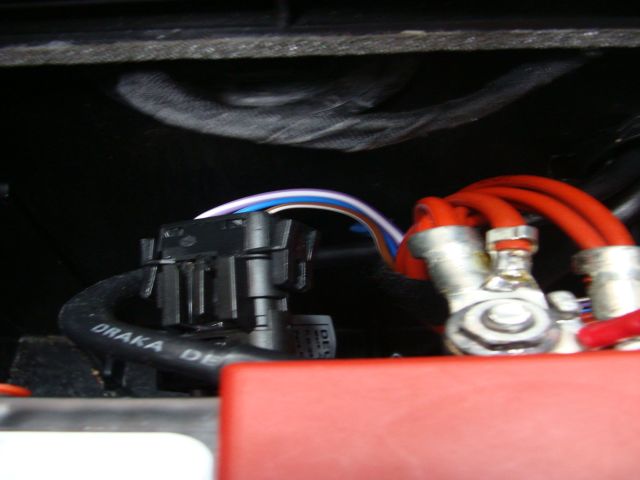
You can however check this by opening the battery/fuse board access hatch in the floor, disconnecting the triple pin socket and plug situated towards the far side of the battery compartment, (shown above) put the red cable probe of your voltmeter into the socket carrying the Mauve & White cable, (this is the thickest of the three cables going to the triple socket and plug) the black(earth probe onto the battery earth connector.
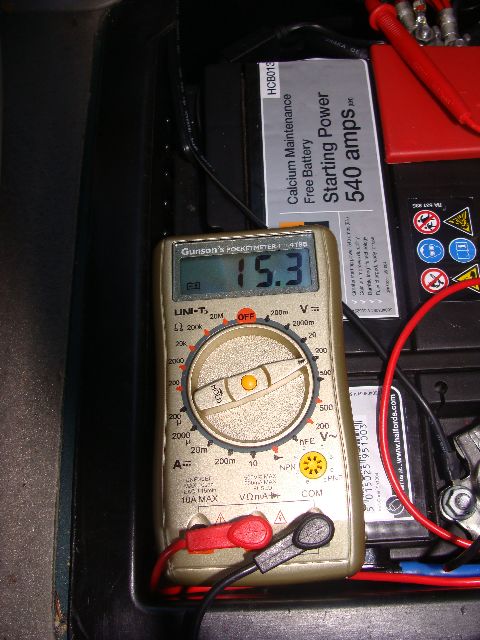
With the volt meter turned ON , No power will be registered when the ignition key is in either position one or two,
However when the key is turned to the start position and held the volt meter should read the voltage You can however check this by opening the battery/fuse board access hatch in the floor, disconnecting the triple pin socket and plug situated towards the far side of the battery compartment, (shown above) put the red cable probe of your voltmeter into the socket carrying the Mauve & White cable, (this is the thickest of the three cables going to the triple socket and plug) the black(earth probe onto the battery earth connector. With the volt meter turned ON , No power will be registered when the ignition key is in either position one or two, However when the key is turned to the start position and held the volt meter should read the voltage going to the starter motor, this will at least confirm that power is reaching the cable feed to the starter motor, if no power is recorded on the meter then I would consider the starter cutout relay suspect. Note the voltage available for the starter from my battery which is fully charged. This car will not start if the battery is sub standard/defective going to the starter motor, this will at least confirm that power is reaching the cable feed to the starter motor, if no power is recorded on the meter then I would consider the starter cutout relay suspect. Note the voltage available for the starter from my battery which is fully charged.
This car will not start if the battery is sub standard/defective
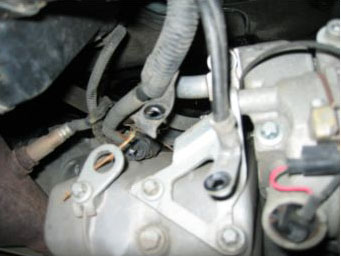
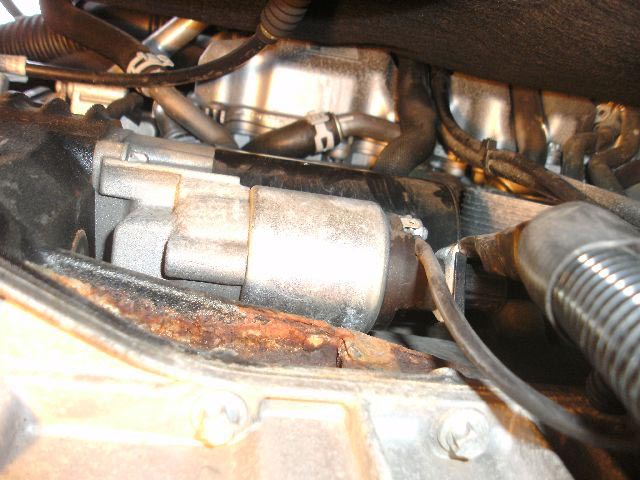
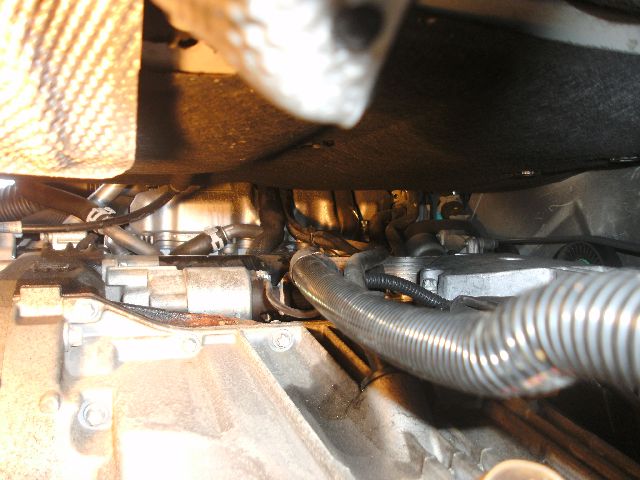
This photograph from the rear shows us where the starter motor A and solenoid are located in relation to the engine. And of course if sitting on the workshop floor as seen here, no problem of access in fact it couldn't be more straight forward. you could in fact change the starter with in minutes, rather like the olden days with fords ,Morris minors and so on.
However when as is normally the case the engine is in this car it is a very different story as the engine lays at a 45% angle and the starter motor is tightly sandwiched between the underside if the floor and top of the engine, in fact it is impossible to even touch the starter let alone get at, so even such things as the starter motor contacts/wiring cannot be checked. To get at the motor to remove or check it, the engine must be lowered, this provides just enough space to remove and replace the motor as necessary. So knowing that a starter motor can be one of the more troublesome components on the car, why didn't the designers simply place a removable hatch in the floor!
That would have been far to easy and anyway where would the after sales income come from if every thing was that easy? No sorry if you can't do this job yourself it is going to cost you hundreds and that's before you pay for the new starter and the VAT Oh and yes it could gets worse!!!
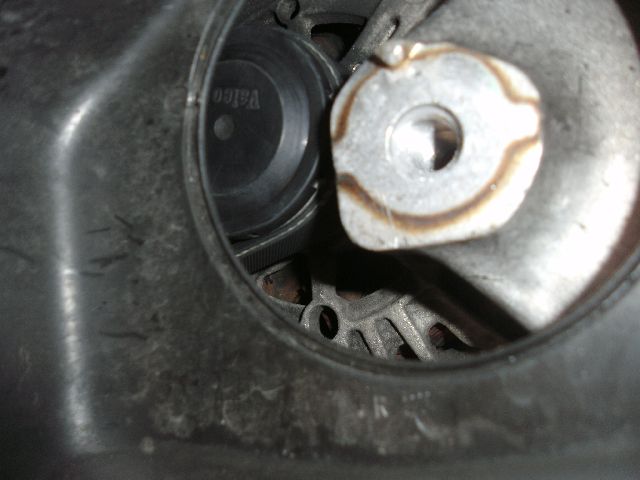
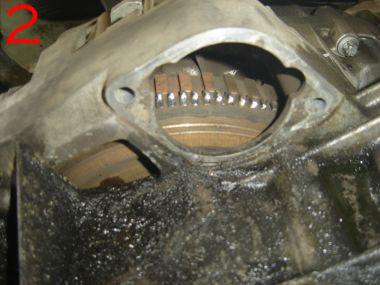
If this is you first starter problem on the 'A' Class and the car has done a high mileage 80000+ then it is most important that the ring gear is checked , the geared ring situated on the fly wheel. This can be done by inspecting the ring gear through the port into which the starter motor is normally housed. Ideally the engine needs to be turned through 360 degrees so that the whole ring is inspected and the ring gear tends to wear at particular spots rather than even wear over the complete circumference of the ring. This can be done by putting the car in 2nd or 3rd gear and turning the drive shaft, while you or a third party inspect the gear as it passes the starter port. However because of the very limited space available you may have to use a mirror to view the ring gear teeth. Being aware now of the starter location one could be forgiven for believing that it is secured to the engine with bolts, well it is BUT they are technically screws in that you need a mail Torx bit to remove them. However from this photo it appears the electrical connections to the solenoid are standard If this is you first starter problem on the 'A' Class and the car has done a high mileage 80000+ then it is most important that the ring gear is checked , the geared ring situated on the fly wheel. This can be done by inspecting the ring gear through the port into which the starter motor is normally housed. Ideally the engine needs to be turned through 360 degrees so that the whole ring is inspected and the ring gear tends to wear at particular spots rather than even wear over the complete circumference of the ring. This can be done by putting the car in 2nd or 3rd gear and turning the drive shaft, while you or a third party inspect the gear as it passes the starter port. However because of the very limited space available you may have to use a mirror to view the ring gear teeth. Being aware now of the starter location one could be forgiven for believing that it is secured to the engine with bolts, well it is BUT they are technically screws in that you need a mail Torx bit to remove them. However from this photo it appears the electrical connections to the solenoid are standard bolts. bolts.
PLEASE NOTE Having removed the starter, I would mark the tooth central to the starter port with white paint, this will enable me to not only ensure that the engine is turned through 360 degrees but also ensure the starter is fitted back to the car as found. This action will delete any remote possibility of the crank-case and cam-shaft sensors detecting a change in the engine set up. (It is worth noting that the engine is much easier to turn over if the plugs are removed first although this would need to be carried out prior to lowering the engine as you cannot get at them once it is in the lowered position.)
The ring gear is the gear wheel attached to the flywheel on which the starter motor gear wheel (starter Dog) engages every time the car is started. If this is heavily worn then you are wasting your time putting in a new starter motor, with out assessing whether to take the risk of damaging the new motor.
Big decision time! Because if you do decide by necessity that the fly wheel ring gear should be replaced, then the engine has got to come out of the car and the gearbox split from the engine , only then can you get at the flywheel and replace the ring gear.
There was a time when the ring gear alone could be changed , this was done by drilling off the old gear, heating the new ring and then placing it over the flywheel and allowing it to cool whereupon it became fixed to the flywheel.
In today's throw away World I suspect you will have to purchase the complete flywheel with the ring gear pre-attached, I have no idea if this is the case nor am I aware of the cost. What I am however aware of is this this is a very different job to lowering the engine and replacing the starter, it will be costly and the car will be off the road I suspect for at least couple of days dependent on who you employ to do the job, unless you have a means raising the car and dropping the engine out, down below the raised car it is not a DIY task. If this task does have to be carried out and you car is a manual gearbox, then it is a wise move to replace the clutch at the same time, although adding to the cost it will pay in the longer term.
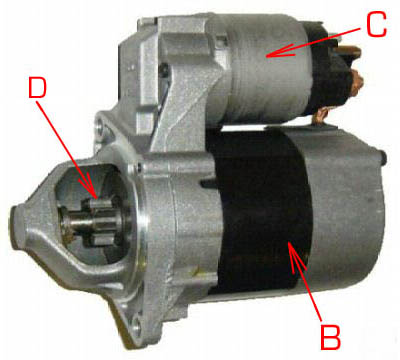
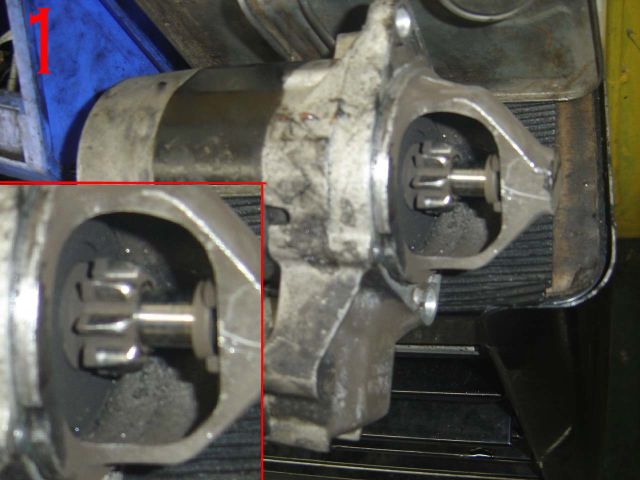
B The starter motor C The starter solenoid, the unit which engages the starter dog and passes power to D Starter motor dog, the cog which engages on the fly wheel ring gear and turns the engine over to start. Take a good look because you won't see it or get at it on the car, it is sandwiched between the top of the engine and the floor. One just hopes that it never fails! which sadly they do.
It is most important that when replacing the starter that you ensure the starter Dog (Cog) is identical to the one on the starter being removed from your car .
After market starters may be cheaper BUT they may not be identical and will cause more problems when fitted , in one case the new starter damaged the ring gear which then required the engine to be removed and the ring gear replaced.
Ring Gear The ring gear fitted onto the flywheel can be purchased alone , this can then be fitted by the owner or a garage , BE WARNED, if the ring gear is not fitted 100% correctly you will have problems and both starter and new ring gear will need to be replaced.
MY Advise purchase the flywheel complete with new ring gear fitted, Yes it will cost more but when fitted it will work and you will not need to get the engine removed again to replace them both at of course extra cost and inconvenience. Mercedes Parts can cost more but if supplied to your Vin Number By mercedes Parts, then they should be correct for your car
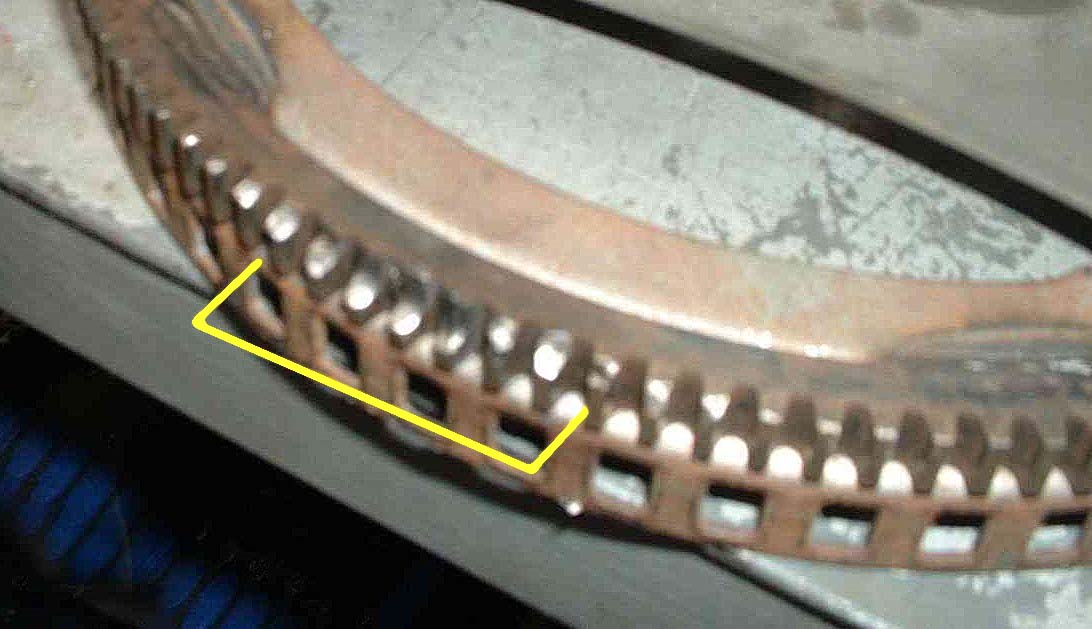
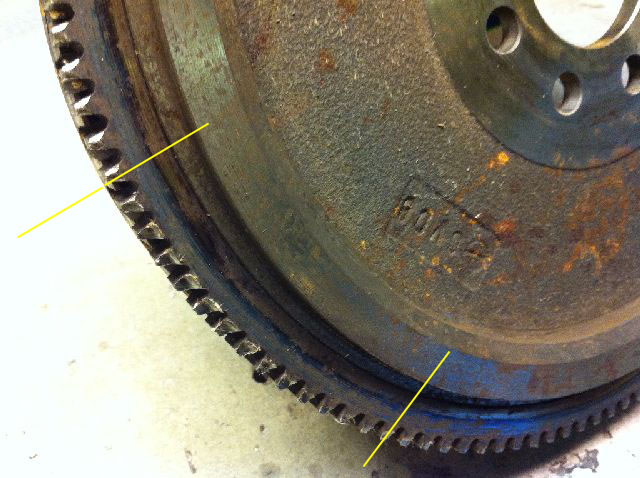
The flywheel and ring gear in the photo on the right has been removed from an automatic 'A' Class and is not therefore solid. The photo on the left is off a ACS model which has the same solid flywheel and the manual version in both cases they show the damage caused by wear which is inflicted on the ring gear over many years of use. This damage can be seen through the starter port (location point ) as the flywheel is turned. In high mileage cars this damage should be looked for before the new starter is fitted.
The teeth between the yellow sector are badly worn with the result that when the new starter dog (gear) tries to engage at this point it may be damaged or even fail to turn the engine. On a used flywheel the tips of the teeth and certain places on the flywheel will be slightly worn, this is acceptable but where they are badly worn as indicated between the yellow marker it is advisable to replace the flywheel or ring gear should be replaced.
If you have facilities to heat the ring gear alone then the gear only can be replaced on the flywheel certainly on the manual version, I do not know if this is the case with the automatic . where the flywheel is scored (Grooved) or you do not have full workshop facilities it may pay you to replace the flywheel complete with ring-gear
Why are some teeth worn more than others ?
This is due to the compression of the cylinders which causes the engine to stop in one of four points on the flywheel . Inevitable wear will arise at these points over time. Removing the plugs prior to commencing work to replace the starter Motor will enable you to turn the engine with ease, thus inspecting the complete ring-gear
Two Types of Starter Specification Just when you think your getting to grips with all the little intricacies of this vehicle something else crops up that reminds you of the vehicles complexity and variation between not only different models but years of manufacture. There are apparently two types of starter motor, yes we now that the Russian site shows a 'Bosch' and 'Valeo' starter motors. But now we hear, and it is confirmed that there is one starter fitted with an immobiliser feature and one not, at present I cannot find out any more accept that one is £80.00 more than the other, and that the immobiliser version was fitted to the last of the pre-face lift models W, Y, Reg. vehicles. Following an e-mail about a car not starting after having had a new starter fitted it came to light that a 2002 'A'140 W168 also had the starter with the immobiliser, so this variant is not it appears restricted to late pre-face lift W168s It should be noted that where the car is fitted with this variant of starter motor, the car will not be fitted with a starter lock out relay. see details below.
If I get more information I will post it .
In the meantime if you have starter problems ,make sure you purchase your new starter using your Vin number ( Vehicle identification Number ) Number or you could well find yourself with more problems than you started and you will have to repeat all the work to get the new starter back off the car!!!! Buy it from the Car Breakers or E-Bay and you could have the wrong component for your car. Fitting cheap or even second hand spares where they can be got at is one thing, fitting them in obscure locations like this starter with all the work entailed is quite another.
Please read this information Q & A extracted from
my page 3 it really makes the point about starter motor replacement problems, and this happened after I published the information on my pages, what a pity Mercedes- Benz Mechanics and Management aren't aware of the problems we owners high-light
128.. I still have starting problems even after replacing the starter motor!! Hi Lofty
I could not find the email address for asking questions about A class mercedes. I was so pleased to find your forum as I have been searching the internet for a solution or explanation to my problem.
I have an A 140, 2002 that has done about 85000 miles. It has always been reliable but now has a starter problem.
I have read through all of the questions/answers related to this but have not come across my exact problem although it sounds very similar to many of the e-mailers.
Like many of the other, one day it would not start. Left it for 5 minutes and it started no problem. About 3 weeks later, same problem. Left of 5 minutes and started ok. 2 weeks later, wouldn't start and couldn't get it to start. Next day started first time. This then started happening on a weekly basis, and you had to leave it for at least half an hour.
Took it to my local garage who said they thought the started motor had gone. Booked it in to be done the next week. Replaced the starter motor and it will not start!!!!!!!!!!!!!!!!!!
They have phoned Mercedes who say that it must be the computer, over £1000 for the part and must go the MB as it needs to be programmed to the car?
The garage has told me that as an alternative, they could fit a button on the dash that connects to the starter motor so that it can be started.
I am very worried.
What do you think??
Appreciate your advice.
'R' (female)
'R' Hi Forget what MB say for a start, even if the ECU does want a repair we have a company that can repair or replace the ECU and re-code for a max of £350 less 15% if you mention my site .see mypage.38.
BUT I'm sure it won't come to that
Have you tried replacing the starter lockout relay?
it is situated under the bonnet in the black box secured to the bulkhead left hand side.
you have to search carefully in the box because the relays are deep in behind the loom wires, you can get at them from the passenger side by pulling the carpet back but I have never removed one, they are held in by small clips see my page fuses and relays
There is every chance that's the cause of your problem
When you turn the ignition on do all the instrument cluster lights come on as normal every time?
I wouldn't have a modification done as you may well cause other problems, gone are the days when you could just stick in an extra switch, the 'can-bus' system is all interlinked and one item affects another when they go wrong.
Did you get a diagnostics test done before you started any work?
Come back to me if you want further information but in any case the car does not want a £1000 new ECU
lofty Feed back Hi Lofty Finally a conclusion to my problem.
I took all of your information to my garage regarding the starter lockout relay and gave him your website address. The starter relay was not where you had described, even the fuse and relay diagram with the car said it was. He phoned MB, they said it should be there!
Anyway, to cut a long story short, there are 2 types of starter motors fitted to my model A140. One has a starter lockout relay as described and the other has it built in to the starter motor. The new starter motor MB supplied was one that has a separate relay and the one they should have supplied was the one with it build in. The starter motor was replaced yet again and now it is working.
If you hadn't planted the idea in their heads that they need to locate the starter relay, I do not think this problem would have been solved and they would have gone along with MB thinking it was a problem with ECU. thank you. 'R'
Lessons have got to be learnt from this owners experience, I'm not aware what information was supplied to the Mercedes-Benz Parts department supplying the New starter motor, BUT it is essential that the VIN number not only be supplied but that the MB parts use that VIN to find out what spares are appropriate for the car, if you purchase parts using the Van, and they turn out to be, as in this case, the wrong parts for the car, seek damages from MB for the costs incurred in the installing and removing of the incorrect part. They might then take more care with the next customer. This is the experience of another owner who didn't initially go to Mercedes:- Hi lofty
My Vin no is WDB1680312J560***, the starter motor no is A00515121080. My
partner went to 'Euro-Car Parts' before contacting Mercedes-Benz, they had two starter's but didn't know which one was for my car even though they were given the Vin No!
They also said that one had an immobiliser and one didn't. What they did say was they needed to see the old starter.
As I mentioned in my last mail, mine doesn't have an immobiliser in the starter motor, it does have a lock out relay, although this is pretty hard to find.
Anyhow the main thing is, it is now working again, thanks again for all your help M.
There is a warning on this very page about the different starters, only you and the supplier can ensure the correct starter is supplied and fitted, lowering the engine twice to fit and remove the starter is no joke. do not GET CAUGHT OUT BY THIS MISTAKE, take my advise, get MB parts to write 'Vin checked on the sales invoice, then you have real come-back So which starter have you got?
I have managed with the help of the above owner and two MB Dealerships, one of which is a very good independent garage to find out a bit more information in respect of deciding if you have one of these dreaded starters, with in-built relay/immobiliser?
At the back of your service book you will find a data card in German, along with a considerable amount of information.
This is an example of the information on two such data cards, one from an affected car and one from my own. This information is also available to the MB parts department on the EPC (electronic parts catalogue) when the Vin number for the vehicle is entered , this then decides the type of starter appropriate for your vehicle.
And yet another identical incident. When will Mercedes Parts ever learn??
Yet another starter problem, code 049 starter required
When Marc phoned me with a starter problem I pointed him in the right direction, he came back and confirmed that his service book had the 049 code in it, I warned him of the problem, he subsequently warned the garage. they like the incident above have fitted the starter but couldn't get the car to start, they were insistent the the correct starter had been ordered & fitted.
This is marks last e-mail to me on the subject:-Quote. Hi Lofty,
Here is the latest update: The starter motor they fitted was indeed the wrong one and it took them 2 days to find out.
In the end they had to order one directly from Mercedes Benz and re-fit it, they will not charge me for the extra labour though.
The car was ready on Friday afternoon but when I called to arrange collection I was told there is a noise coming from steering wheel now!
The guy who worked on the car told me he thinks it is related to the steering angle sensor and that it will need replacing for the noise to disappear.
Just to make it clear, there was no noise on the steering wheel when I took it to them and this only happened because they removed the wheel to check the ignition switch when they couldn't find what was wrong (after they fitted the wrong starter!) and obviously they damaged something in the process.
The lad that worked on the car admitted that as there was no noise when I took the car to them and that the steering wheel would not have been removed at all if the correct starter motor was fitted in the first instance.
The garage owner is arguing that he will not pay for this but I do not understand what his argument is, it was clearly their fault!
More arguments to follow tomorrow morning, can you believe this saga? my advise unless they correct the fault they have caused? Cheers, Marc
My reply to Marc, If they do not play ball :- www.Consumerdirect.gov.UK, this is consumers direct line to complaining to Trading Standards who will not take the case unless you have first taken the matter up with Consumer Direct. when you contact them and give details they will give you a case number inform the garage of you intention I suspect the problem is as simple as to be that the short screw one of three has been re-located in the wrong hole and is fouling as the steering wheel is turned.
So you have been warned
So do not just go off and buy any old starter you could be completely wasting your money as well as, either money having it installed or your own time installing it. and it is not a quick job! In either case it will have to be removed because it will never work.
Examples of data cards, Some digits have been removed to protect the vehicles identity .
Then below are a whole line of numbers:
049 292 330 431 441 461 533 551 580 613 668 669 723 803 880 882 925 984 989 U46
In the details of one of the car's affected you can see the ref code 049, according to my informant this indicates that there is a 'discontinuation of the central gateway', from what I can gather, which is very little at present, the electronics of the vehicle is set up differently, the affected cars will not have a starter lock-out relay fitted, K3 that will be incorporated in the starter . In the case of the information on the photo no such code appears, so all things being equal , my car would take a standard starter motor.
FURTHER INFORMATION FOR CARS WITH O49 CODE IN SERVICE BOOK. Hi Lofty,
The part number is MA1661510101/87 and it costs £234.50 + VAT from Mercedes Benz + an £80 surcharge refundable upon return of the faulty unit. This starter motor is for a 2002 W168 1.9 Ltr Long Wheel Base.
I have been advised by the MB dealer that this particular starter motor was only fitted to certain variants and only for a relatively short period of time (only for 1 or 2 years).
I will certainly buy your CD, you have been extremely helpful to me during this difficult period and for that I thank you whole heartedly once again.
All the best,
Marc, thank you for you continued feed back on this problem, Your duplicate problem to the one above highlights the need for the supplier of the starter to double check the details before selling you the replacement motor, it will save the person/owner installing the motor a lot of heartache if his she doesn't have to remove the new starter just because they have been sold the wrong one. Use you Vin when purchasing you replacement starter motor and high light to the MB parts department that you have 049 in your service book that will a least prompt them to double check that you are being sold the correct t unit.
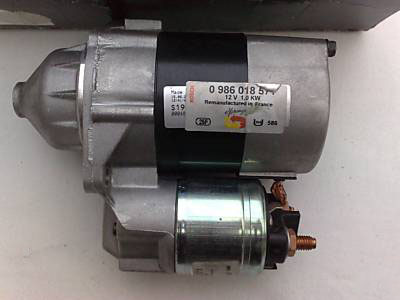
This unit is a Bosch rebuilt unit and is exchanged for your defective unit , I have no idea of cost but having been rebuilt by the manufacturers or their sub contractors it should be as good as a brand new unit from Mercedes-Benz. Certainly worth making an enquiry, but make sure your Vin number year of car etc cross reference with this motor.
Starter motor reconditioning
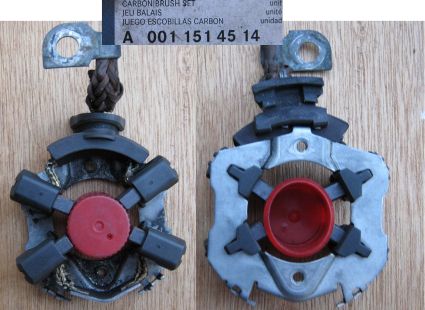
Starter motors generally are reliable, they do how ever become unreliable when not provided with the voltage required due to flat or poorly charged battery, where carbon brushes are worn or where the bushes in the motor allow the armature to contact the motor windings integral of the motor unit, and although you can purchase a brush kit because of the different starter motors in type as well as the two variations of built in immobiliser and relay operated it make it difficult to pre-determine what spares will be required .for the job, Because of those difficulties I would replace with a new or professionally reconditioned unit. Replacing Starter Motor
Before you even think about tackling this job, take a deep breath. This job is not for the average owner or indeed for the inexperienced DIY mechanic, it will test your skill and patience but never the less can be done given time patience and the availability of the correct tools and equipment. You will also need to work under the car and therefore need to not only have a means of getting the car up and off the ground but also the discipline to ensure the car is 100% safe before you even consider risking your life by getting under an unstable vehicle.
Symptoms of starter motor defect
All symbols illuminate on the dash as normal but the engine does not turn over (start) when the ignition key is turned to the start position. Do not confuse this situation with a flat or defective battery. All modern cars require a good well charged battery and anything other can cause all manner of problems as well as false signals on the instrument cluster warning display. The battery condition can be checked by putting on the head lights, make sure they are bright and remain bright for 30 seconds or so, if the intensity of the lights reduces then you battery may well be the problem
Having eliminated the battery See information towards the bottom of this page kindly provided by Richard, re battery voltage, new verses old. Check that the earth leads going from the negative terminal of the battery are sound. In view of the work changing a starter motor involves it is even worth double checking the earth continuity by using a battery jump lead from the negative terminal of the battery to any clean metal part of the combined engine and gearbox, if the car then starts the problem is the earth. if your car is a manual and it will start when bump or tow start, that will almost certainly eliminate other causes for the car not starting and points more directly at a starter motor.
There are circumstances where due to wear on the starter dog and flywheel the starter will jam, no further response can be got from the starter.
(Jammed starter, in effect the solenoid has thrown the starter dog, the small cog on the starter which engages in the ring gear to turn the engine over, start the car and has jammed in the teeth of the ring gear on the flywheel.
If a manual gearbox car, then put the car in a low gear, Ignition OFF and bump the car backwards and forwards this action more often than not allows the sprung loaded dog to disengage/clear from the flywheel, however it will happen again in the long term so be prepared for a large bill because in this instance the engine will have to come completely out of the car, the gearbox split form the engine and the flywheel and starter replaced, a £1000 + Job.
Be aware that because of the location of the starter motor, which as stated earlier is situated between the under floor and top of the engine, the engine will need to be at least lowered to allow you to remove the starter motor, even then space is tight.
Obtain the replacement starter motor, if it is an exchange unit/item then make arrangements to return the old unit once removed. Ensure you get the correct starter for your particular vehicle, Use your Vin number to confirm the type of motor fitted,
It is my understanding that there are two types of motor fitted to the A class, Bosch & Delco, I was also told that on some A class the starter motor is fitted with an immobiliser so it is most important that you get the right one.
Also while you purchasing the starter buy yourself two exhaust suspension rubbers, if your car needs a starter it is very likely that the rubbers (ring A168 49 201 44) are original and will be best changed at the same time.
see page.34.
Also situated between the catalytic converter and the main silencer box there is a seal, (seal A168 49 201 181) This may well need replacing have split the two boxes in which case at least order this item, your Mercedes Parts dept will mail this to you when they have it in stock)if needed it can then be fitted at a letter date, All of these parts have a part to play and are checked on the MOT/UK (Annual vehicle inspection)
Now you wonder when the list will end BUT when was your poly V belt last changed or even inspected, they are not expensive and it is certainly worth considering changing it at the same time as replacing the starter , because the engine is lowered it will also be easier. The last thing you want is a poly V belt shredding soon after your starter motor replacement. for details see page 57.Remember these jobs you are about to undertake would cost you well over £600.00-£800.00 plus vat so do not short-change on doing that little extra work, it really will pay and be worthwhile in the longer term.
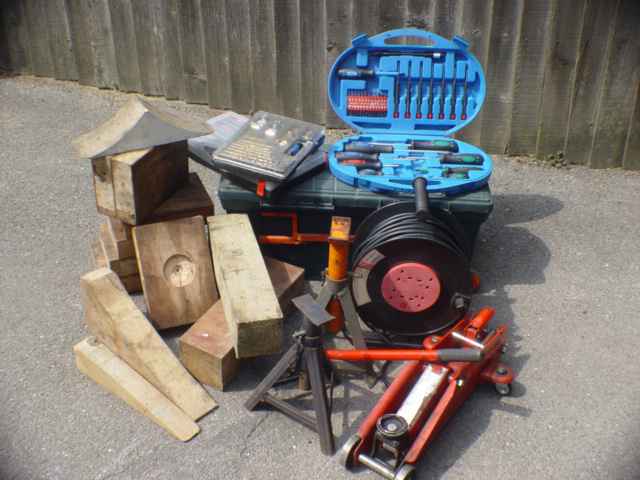
Our first major problem is getting the car to the working area, If you have caught the problem with your starter early enough ,you may still be able to start the car even if it takes several attempt, if your starter really is dead then you will have a greater job getting the vehicle into the position for working beneath the car, this may mean using the hydraulic jack and raising the car one block at a time, if like me you have two jacks then you can alternate front ,rear until the required height is reached, please use wooden blocks DO NOT USE HOUSE BRICKS OR BLOCKS AS THEIR CONSTRUCTION CAN BE UNSTABLE, CAUSING THE CAR TO COLLASPE.
Safety while at work Please follow all the rules on my
mypage 5 your life depends on safe working, not a lot of use fitting a new starter if your not here to use it!
Now you are going to need to work below the car so if the starter is still usable before you disable anything get the car to the position where you intend working, on ramps, rear of car raised etc. If you have a vehicle pit then even better. Ensure the handbrake is firmly applied and rear wheels are firmly chocked front and rear.
Pre requisites
I for my part use a plastic seed trays for putting the various screws etc in this makes sure the at least remain in one place and when you get back to the job you haven't got to hunt around for the bits. Having positioned the car to the working area :- If you have a coded radio remember by disconnecting the battery you will loose the code and will need to replace it before the radio will work. Disconnect the negative (-) terminal of the battery secure in such a way that it cannot contact the negative pole of the battery.
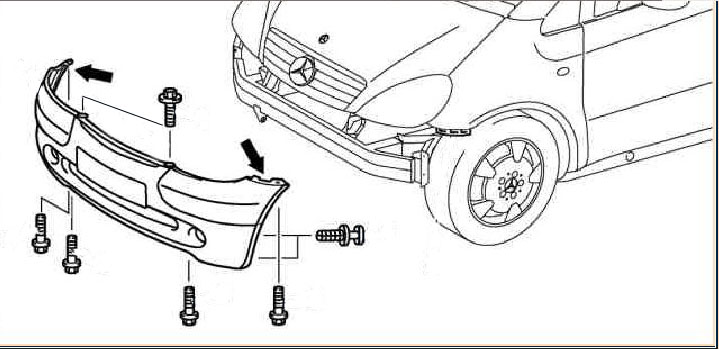
The first job to prevent damage to the paintwork of the vehicle and to allow monitoring of the lowering process, is to remove the front bumper /spoiler assembly. (If you have my CD 'Lofty's Homepage' copies Feb 2008 please see the file 'Starter lowering engine', as a reference.)
Now remove the ignition keys and gently move the steering wheel slightly in either direction until the steering lock engages
Remove the ignition keys and do not replace until the steering column has been re-connected to the steering rack.
Because the starter motor complete with solenoid is sandwiched between the floor and the top side of the engine you may well, like Pete a fellow owner want to work from the engine bay as well as under the car, if this is the case then it is necessary to remove the screen wash reservoir Simply siphon out the fluid into a clean container for further use. Release the screen wash reservoir from its fixing, lift and remove the washer pump complete with hoses from the side of the reservoir, the pump assembly is simply retained in the container by a spigot which houses into a rubber grommet, just gently ease it out. This will allow you to completely remove it from the engine bay.
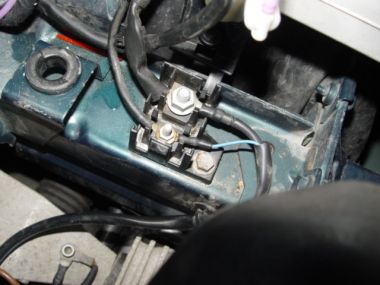
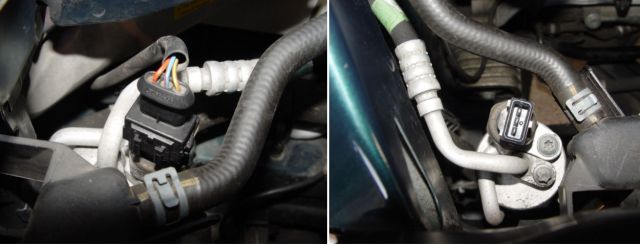
Disconnect the electrical connections to the power steering the lid of the protective black box has been opened to display the connections located on the bodywork N/S front lower engine bay. see page.49.
Pay particular attention to releasing clips and cable ties , the last thing you want on lowering the engine is to damage wiring ,looms etc where possible secure these items up out of the way of the moving assembly, a few extra minutes spent looking for these fixings will save you hours of labour and heart-ache later on, note some black clips are not that conspicuous!
Remove the two 'Scart' like plugs that are located at the back of the ECU, along with the wire going to the windscreen washer heaters this will prevent any stress being applied to the loom wiring and casing see page 38 for detail Cut /release any cable ties securing the loom to the engine (replace on completion to prevent abrasion of the cables)
Disconnect the air intake hose from the air filter housing, as it is a fragile item, I would also remove it from the front cross member again it will not handle being crushed or damaged and to be able to see what else is going on as the engine is lowered and thus prevent damage. While in the engine bay area I would Remove the Air filter housing a simple task along with the ECU, although this sounds a lot of work most jobs only take minutes. The ECU is a very costly item and should be stored safely a replacement will cost you in excess of £1000.it have to come from Mercedes-Benz Germany
Now the steering column lower UJ can be easily got at and can be disconnected from the steering rack, take care not to damage the gaiter. mypage.16.>
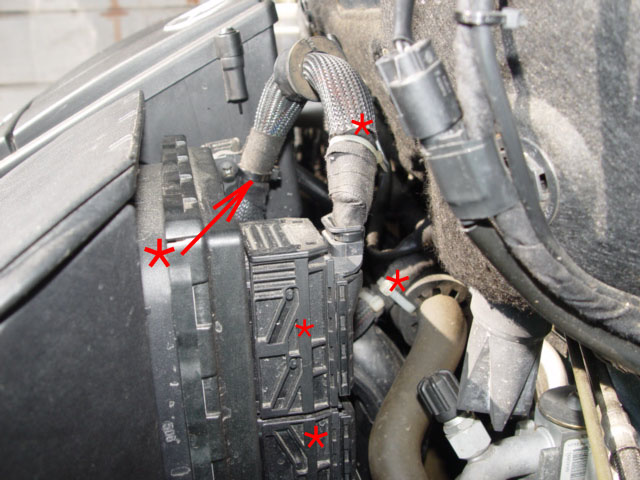
Remove the two radiator fixing clips. there removal allows the radiator to move with the whole assembly.
Disconnect the electric fan, you will see I have passed the cable through to the front of the car and secured it with red tape , this is one connection you cannot not afford to forget to re-connect, leave it in the engine bay and if it doesn't get damaged it will be forgot!
Air conditioning filter dryer electrical contact , will only fir one way again secured to the front of the car out of harms way, the metal pipe going to the dryer has a flexible high pressure section in it but watch this to make sure it is not put under any stress,
DO NOT ATTEMPT REMOVING ANY AIR CONDITIONING PIPE WORK OR HOSES THESE ARE UNDER PRESSURE AND THE SYTEM CONTAINS REFRIGERANT GAS/LIQUID. see page31.
Remove both front wheels ensuring that axle stands or support (remember you will need your trolley jack for lowering the engine)using the front two jacking points.
Wheel Arches It is necessary to remove the plastic lining from the front wheel arches. This is to allow you to access the rear Torx Bolts. Release the clamp on the air conditioning pipe located within the o/s wing, ( While you there check for signs of damage to this pipe! In at least one case it was damaged by abrasion due to ill fitting and was the cause of a failure of the Air conditioning facility) Place the plastic wheel arch linings somewhere safe, they will not take kindly to being trampled on! Both front wheels will need to be removed before the lowering process can begin
The air conditioning pipe enters the engine bay lower off/side, ensure the pipe is released from the securing clip there also . This will allow the engine movement without damaging the pipe.
Under the vehicle The exhaust will need to be disconnected
Release the clamp between the catalytic converter (front Box) and the main silencer, retain the seal which fits between the two sections , replace as necessary when re-fitting(seal A168 49 201 181) Remove the silencer/rear box complete with rear pipe from suspension rubbers. Replace rubbers as necessary before re-fitting.
Remove the plastic under-tray located beneath the engine bay.
You may find it necessary to lower the other under floor pans however remember they cannot be removed completely unless working over a pit and the car is carefully positioned in the first instance.
During the preparation stage for lowering the engine we need to look for anything that is going to be damaged if put under stress by stretching or contact with other components like the air conditioning pipe in the front o/s wing, when in doubt detach it from the engine which is what the owner has done with the major earth connection onto the engine There is also a good side of this action, the earth contact can be inspected and if necessary cleaned before re-attaching on completion of the job thereby ensuring that a good earth connection is made. Release the cable tie securing on the oxygen sensor which may be obscured by the arched tunnel
Rubber hoses are another example where damage will cause you even more work, make sure they are unclipped and free to move with the complete engine and sub frame. Also having completed the job again make sure that none of the hoses are contacting other component parts that will cause wear and eventual major loss of coolant and other fluids, or in the case of wires/looms that they are in contact and will suffer abrasion.
The engine has to be lowered complete on the sub frame I have a 2 ton trolley jack and that will be sufficient to do the job, make sure the relief valve works easily and the the jack does not drop while under load. Ensure the jack is situated so as to take the load evenly. If available have axle stands or blocks positioned so as to stop the combined load engine and gearbox from being lowered more than 80mm, set these up prior to commencing the lowering process.
When this job is undertaken by a Mercedes-Benz garage the car is elevated on a car lift , using a special jig which fits into the sub-frame recess ports the engine can then be lowered while under complete control. If you are undertaking this task you are unlikely to have such equipment however the method you use must be safe from the working point of view and also be such as to prevent damage to the engine and ancillary components. Using this procedure the engine should not be lowered more than 80mm(3.25")MAX. Where air conditioning is fitted particular attention should be paid to flexible and other hoses.
This photograph was kindly supplied by Chris which clearly shows the starter location while under the car, when the back of the engine is lowered . Do bear in mind that his car is a 'B' Class which may have slightly more room than the 'A' Class
While undertaking a task such as changing the starter will in most instances reveal other problems , in this case rusting of the sub-frame, a good spray with duck oil or even a coat of rust treatment would be well worth while both of which will retard the rusting.
Chris is of the opinion that there is sufficient room for removing the starter from below PROVIDING you have the correct tools and equipment to raise the car to a safe working height.
Please see page 5 before even considering working under your car
The point is made that the engine mounting needs to be completely removed to allow the engine to drop , failure to remove the mounting will result in it jamming on the projecting lug.
Remember to do this job you will require a range of tools and other equipment, including Torx Drive sockets and torque wrench. You just cannot afford to take chances when working under the car! And to do so would be irresponsible.
You will also need a piece of substantial timber, preferably hard wood, 1.1 meters long Approx (3' 9" inches long, this allow for overhang either side of the sub frame.
the piece I have in mind is (10cm x 6 cm approx.
This will be placed beneath the sub frame and will take the weight of the complete engine and gearbox (power pack)while lowering, so do not short-cut on the quality of the bearer, timber you use/purchase. A metal bearer would be Ok providing is was sufficiently robust but timber is less likely to slip than metal on metal.
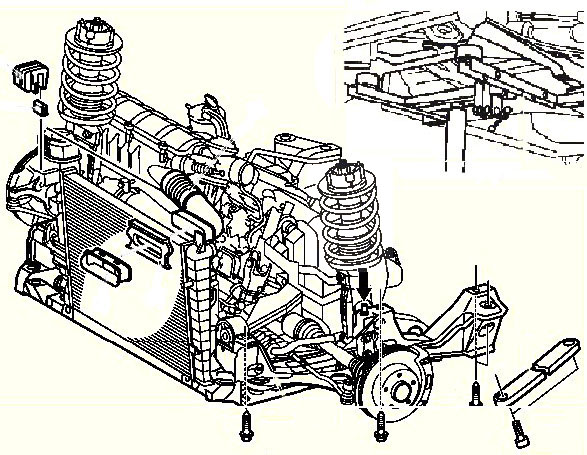
Although this photo shows the car at an angle it is purely to show the sub frame layout the car would need to be higher for working under and also level or jacking the sub frame would be more difficult.
Having placed the bearer beneath and central to the sub frame supported by the trolley jack, we are now ready to slacken the sub frame securing bolts,
from the diagram above we can see there are 4 each side,
While the trolley jack supports the sub frame remove the Torx bolts both sides, When released slowly lower the combined unit , Pay attention to all hoses pipes and electrical cables while doing so DO NOT LOWER MORE THAN 80)MM (3.25 inches)
Air conditioning compressor Where it is foreseen that the amount lowered exceeds 80mm it is necessary to remove the Air conditioning compressor , DO NOT disconnect any hoses or connections , simply remove the 'Poly V belt' < href="mypage.38,htm"> see page 38 and release the compressor from it is fixing it should then be secured to the under floor in such a way as to avoid putting any stress on hoses and pipe work, being replaced when the necessary work has been undertaken and before the engine is fully restored to it is working position.
>
The space created should allow you to remove the starter motor, you may like Pete decide to do this from the the engine bay(Top) or from the bottom (under the car)(Please note I have not done this job myself) Do remember that there is an electrical connection that needs to be disconnected from the starter. I suggest that the securing nuts would be best loosened before slackening off the starter securing nuts.
Withdraw the old starter motor
The manufacturers do advocate inspecting the flywheel ring gear for damage, However if substantial damage /wear is apparent on the teeth of the ring gear the flywheel may need replacing, only you can now decide what action to take .
To replace the flywheel as stated earlier the engine will have to be completely removed and the gearbox split from the engine a very large job which may well be out side the scope of DIY.
This diagram shows the location of the starter securing Torx Bolts
Note when removing the nut from the larger of the two cables there should be a protective insulation cap, this will prevent you locating the spanner until removed , ensure it is replaced following re-connection of the cable.
If you suspect that there is damage to the flywheel, the starter can be heard to run but does not engage, i.e. turn the engine sufficiently to start the car, then you would be best advised to get the work done a garage, UNLESS of course you have full access to garage facilities.
As mentioned earlier dependent on the miles driven, it may be wise to replace the clutch assembly complete with thrust bearing at the same time as replacing the ring gear. More expense and work this time but saves removing the engine again in six months time when the clutch goes! see page 58
Torque settings
Bolts starter to transmission-------------------Nm20
Cable to starter circuit ---------------------------------------6
cable to starter terminal-------------------------------------9
Bolt exhaust to catalytic converter-----------------25
Bolt steering shaft to rack-------------------------------20
Front axle carrier screw on to the body-------120
Strut screw on the front-axle carrier--------------60
Replace all components in reverse order paying attention to detail and ensuring both hoses and cables are secured as found to prevent abrasion and damage in the longer term.
Retain all receipts for warrantee purposes & service history purposes, enter replacement starter into your vehicle service history file along with any other replacement parts fitted.
I would to thank Pete & Emad fellow owners of W168, 'A'140 and 'A'160 for a number of the photo's on this page and some information, without there co-operation the page could not have been extended to include such detailed information and photographs . Thank you
The following are mails and photographs received from Emad located on the other side of the World.
Hello lofty,
I thank you for putting this CD up for sale, I look forwards to getting it soon.
Before seeing the CD I could tell that a lot of effort is put into it.
Your site is very helpful and deserves a great support.
I came across your site when searching for how to change engine oil/filter on my wife's A160.
Thanks to your site, it made my life easy because my knowledge is limited in petrol Mercedes cars.
I drive a diesel 1991 300D and it runs on diesel as well as used cooking oil.
At the moment, my wife's A160 1998 is in need for a starter motor either reconditioning or new.
Do you think I can replace the starter motor on this car myself or do I have to take it to a workshop?
I thank your for you time and efforts in helping other A class owners.
Highly appreciated
My reply
Emad,
Hi pleased you found the site, many of your country men have purchased CD & tools for changing the plugs I'm sure MB make it as difficult as possible so that you feel you have to go them for the service & plug Change. 1The toothed drive wheel on the starter motor is well worn the car have done 16800km.
Starter motor ,
This is a big job because the engine has to lowered to get at the starter, it really does depend on how DIY you are and what tools you have as well as facilities for getting under the car.
All the procedures for lowering the engine will be on your CD.
Having said that if you are competent with working on engines then there is no reason why you shouldn't undertake the job but it will take several hours as the starter is trapped between the engine and the underside of the vehicle floor.
If you have a good workshop handy with a vehicle lift that would be of a great help, but few of us have facilities of the nature available.
I had one guy who managed to remove it from the engine bay but it is so cramped that it is near impossible to even locate the motor. If you locate the oil filter housing at the rear of the engine the starter is inline with that on top of the engine, see my page 33,& 66,
One thing I would say is before you condemn the starter look at the age of the battery 3=
-4 years and it would pay you to replace it the 'A 'class is a car that really must have a sound battery anything less the 98% and it causes all sorts of problems. ideally 13 volts plus and I know we all think of these cars as being twelve 12 volt but a new battery will provide 13v plus and the car enjoys and runs well with a fully charged battery so much so that I trickle charge my battery about once a quarter, but in fairness I am these days doing g few runs.
Hope that helps
there is all sorts on info on the CD that's not on the site, but for the supplementary files run the free program http://www.irfanview.com/ it is ideal for reading and scrolling these files where as a lot of program's are slow.
best wishes Feed back from Emad
Thank you for sending the A160 CD.
I feel stupid for not ordering the tool together with the CD. I will do that soon.
I have not used the CD yet. However, I was trying to buy the starter motor before doing anything.
While talking to a Benz parts place at www.mbspares.com.au the sales person said something about the ignition switch.
He told me that the ignition switch may have become faulty and advised to replace it first before changing the starter motor.
This sales man did not try to sell me anything "he actually does not have the switch in his stock" but offered an advise.
I thought I'd seek your opinion too!
Now for the last three days our A160 started ok without a miss. However there is that kind of a rough noise at the end of every crank right before the engine kicks in.
As you know, I do not wish to run around spending money on something that is not the actual cause.
What do you reckon?
My reply
Emad,
One thing you need to do to try and eliminate the switch is when you start the car ensure the key is supported square to the slot, many of us me included carry bunches of keys on the same bunch as or ignition keys this in time wears the switch and it then needs to be replaced
2 Shows Emad's Flywheel and worn starter ring gear, To replace the starter without replacing the rear gear would be a waste of time and the new starter would soon be damaged. However the amount of wear on the ring gear will be relevant to the mileage of the car, with any high mileage car 100,000 miles + you would be well advised to replace or at least thoroughly check the flywheel The cause of the waste oil contamination should also be investigated, Should this get into the bell housing (location of the flywheel and clutch assembly) then the components will become contaminated with the oil and will need in the short term to be replaced due to the clutch plate slipping on the flywheel (clutch plate not driving the gearbox.) Pressure washing the engine can not only cause electrical problems but also drive this sort of contamination into the bell housing.
I do not know what mileage you car has done ? but if it is high 10000+ then there is every chance that it is the starter but from what you say you would need to examine the flywheel ring gear as well as it may be that that's causing the noise when you start your car, the engine has a habit of stopping on four points on the ring gear which means that those four points teeth on the gear wear and causes problems it that the starter turns but does not engage fully on the ring gear.
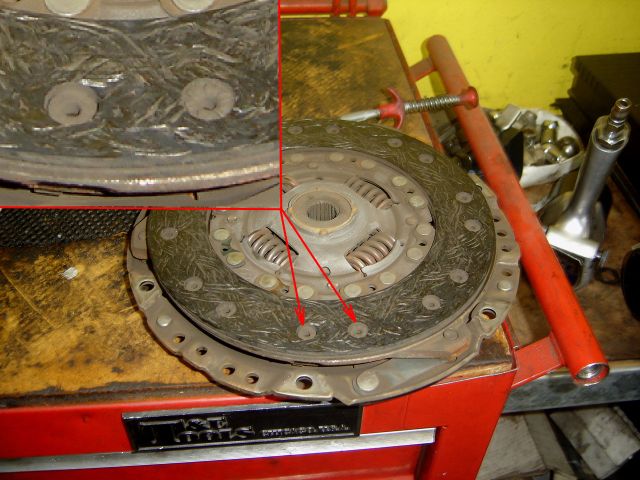
3 These photos show Emad's flywheel and worn clutch plate, the wear being detected by the thickness of the remaining clutch plate relative to the securing rivets . If removing the engine to replace the starter flywheel complete with starter ring gear then it is also advisable to replace the clutch plate assembly as was done in this case.
The ignition switch is not straight forward to change but it is easier than the starter motor, the other thing you must bear in mind is that there are two starters and you must get the right one for your VIN No or the car will not start or even turn over if the wrong one is fitted.
Try supporting the key or even detach it from your other keys see if that helps if yes then the switch is suspect, if no then it could still be the starter but equally do not forget that battery condition will effect very dramatically the staring performance of your car .
If the battery is 4+ years old get it tested that may well cure all your problems.
Feed back from owner
I finally got the job done on our A160.
A friend of mind owns a workshop so I gave him the job to do.
Ring gear was badly worn out at 1/3 of it is diameter "see photo"
I also got the starter motor replaced - He managed to source second-hand part but in near new condition.
Starter motor, fly wheel and clutch disc.
When fitting everything back together the dash showed some error codes
My friend managed to get a mobile mechanic to come and delete the errors.
Now the car starts easer and smoother than ever.
I thought it would be nice to share some photos with you too.
Regards
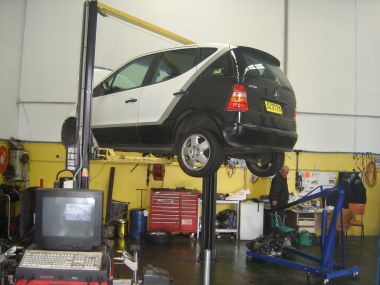
4 Emad's car in for repair. We could all do with a friend who owns garage equipped like this one photographed, obviously a mechanic from the older school, using his hands and with the skills to do a good job. Sadly too many so called mechanics these days do not have the experience, knowledge or in some cases the right tools to do the job, relying far to much on diagnostics which can cause more problems that it cures.
We can if we study this page learn quite a bit we have owners changing their own starter motors at low mileage because the motor fails, that fine but do remember that if your car has a high mileage on it then as I predicted with Emad's car the ring gear will almost certainly need replacing and if the engine is being taken out then use the opportunity to change the clutch plate assembly it is false economy not to do so, that way you know you the car is in good condition as far as starter plus ring gear and clutch are concerned.
Many thanks Emad for the information and photos, they will I'm sure help other owners understand the car better and also make them realise the amount of work involved when starter problems develop on their Mercedes-Benz 'A' Class.
This information was received from Richard and I have incorporated in the page because it is typical of the starting problems encountered by owners. Some of the content is relates to various electrical measurements / recordings while testing the car for faults these may be of interest to readers who have a volt meter and can test their own car if they suffer the same problem as Richard. quote Dear Lofty
Thanks for sending the CD and tool so quickly, very impressed , the additional material on the CD looks very good.
I have a bit of a question for you, or at least would like your opinion on something from your experience with the A Class.
I have just brought (private) a 2002 A140 manual , I am very pleased with it , drives great , no horrible noises or worrying lights (touch wood).Full service history.
Unfortunately five days after I brought it I could not get it to turn over.
Immediately I thought starter or ECU or relay?
On the A140 there is no relay in the ECU box for the starter inhibit, I have checked and its not there , understandable for a manual car with a clutch.
The symptoms where as follows.
Turn key to position 1 and the SRS light comes on , then goes off after a few seconds.
Turn to position 2 and all the rest of the lights come on.
Turn to position 3 (crank) and nothing, although a lot of clicking from the engine and the fuel pump/purge can be heard.
I called out the AA who said that my battery volts where low, we tried to jump start from his portable power pack but just the same, so we gave it a bump and started straight away.
I drove the car home stopped it on my drive and it started straight away on the key.
Following morning it wouldn't crank again so I went to Halfords and brought one of their batteries for the car ( it comes with holes to take the vent pipe , on the correct side now but you need to pull the old plastic joining piece from your old battery and reuse it. On removal my old battery was a MB unit dated 02.
Anyway the car now starts when it should. Out of interest I rang a couple of local independent garages and was told that its quite common for the ECU to not even turn over the starter if the battery is low. I had not heard of this but as I work in the electronics sector this seems quite possible. I have always found that if the battery is getting old then the starter just turns over slowly, obviously I must be a bit out of date as with the A140 it just does not crank.
I have taken some voltage readings before and after the fitting of the new battery just in case you can use them to help someone else out.
In the battery box there is a single connector with 3 wires , these wires are connected to the starting circuit (or two of them are at least from my findings)
The way the start sequence seems to work is thus:-
Turn key to crank position ----> ignition switch sends 12v to the ECU----> ECU then checks everything is ready to start and that key is the correct one (immobiliser) then sends 12v to the starter solenoid via the white/purple wire on the connector for about 1 second along with telling the ignition and fuel injectors etc to get going!
As I said with the manual gearbox there is no extra relays , not ones I can find anyway although I did read on the web that there might be one on the starter , I believe this may be being confused with the solenoid its self.
Measurements of voltages OLD Battery door open interior light on , ignition key removed
Volts across battery terminals 12.15V
Lights on low beam 11.88v
Battery removed from car 12.34v
Measurements of voltages NEW Battery door open interior light on , ignition key removed
Volts across battery terminals 12.38V
Lights on low beam 12.30v
Battery removed from car 12.68v
Voltages on the Connector Old Battery when the starter would not turn
White/Purple Pos 0 =0v Pos1=0v Pos2 =0.81v
Pos 3 (crank) 10v - 12.3v it varied, only there for about 1 sec
Blue......Pos 0 =0v......Pos1=0v.....Pos2 =1.33v......Pos3=1.34v
Brown/White.....0 volts on all positions.
Voltages on the Connector New Battery
White/Purple.....Pos 0 =0v.....Pos1=0v.....Pos2 =0.81v......Pos3(crank)12.4v, only there for about 1 sec
Blue.....Pos 0 =0v.......Pos 1=0v.....Pos 2=1.33v......Pos 3=1.34v
Brown/White.....0 volts on all positions.
Voltages on the Connector New Battery with engine running
White/Purple.....Pos 2 =0.94v
Blue......Pos2 =14.55v
Brown/White......0 volts on all positions.
New Battery Volts with engine running
Volts across battery terminals 14.55v
Hope this info may help someone with their problem
Kind Regards Richard
Thanks Richard, one of the most common faults on the 'A' Class but remember a new battery from a good outlet like Halfords will cost something like £75-80(8/5/2010) which is the minimum amount you will be charged for a garage breakdown call-out.
Think in terms of your battery lasting four years max and get it tested soon after that period, when cells start to fail or do not hold their charge replace the battery. Gone are the days when you could get out of trouble by starting the car with the starting handle, but by mentioning that I'm only confirming my age because starting handles have been missing from cars for many many years, albeit they were always a good standby and got many an owner out of trouble, typical was the practice of turning the engine over with the starting handle to get the oil moving and the engine lubricated on a cold mornings which made the job easier for the battery now we simply rely on the battery with little thought for it is condition or age until of course it fails.
Alternative method of dealing with starter Motor problems.,
Although I'm now aware of a number of owners who have replaced their starter motor from the top ( Engine Bay) I'm not convinced that this would be the easiest route for owners of manual & ACS versions where additional items such as gear selector cables may obstruct the starter location.
Having looked at my manual A160 I suspect they were both owners owned automatics, one certainly was.
With the Manual gear box & ACS versions the gear selector cables may obstruct access to the starter and therefore need to be released from the gear selector situated on top of the gearbox as well as moving the cables to get at the starter, In addition to that it also appears they may have been earlier models, due the number of coolant /heater hoses that would need to be moved /disconnected on my later model Certainly it involves a lot of work, if you have the expertise, yes it can be done but great care would need to be exercised to avoid loosing the present gear selector/box settings.
That said I received this information from Bob in Australia who replaced his Valeo starter from the top, he took his time and the job was very successful.
Bob's e-mails are below, they are worth a read and may help you decide if you can tackle this job:-
Hello Lofty,
I have attached some photos of my starter motor change, I bought the genuine article through the UK from Poland, its a Valeo motor.
You will see in the photo of the engine bay, the manual cables which run over the top of the starter. these did not really present a problem. The thermostat housing has to be removed to make it easier to get the starter out, that black plastic water pipe and the oil filter housing stayed, I could juggle the starter out with the solenoid passing under the pipe and the rear of the starter coming out towards the thermostat housing area.
The two securing bolts I can confirm are torx T40 although a Allen key would probably fit but not the best fit if they are really tight.
Its best to fit the rear bolt into the starter first, then juggle the starter nose first and then under the gearbox linkage cables then into its mounting position, fit and nip up the top bolt first. Its possible if you have long slim fingers to slide your fingers over the top of the starter, feel the bottom bolt which you placed in the starter earlier, then slide it into its mounting hole and its possible to roll the head of the bolt with your fingers to start it a few threads.
Tools I used were a combination of various extension bars, 1/4 and 3/8 and universal couplings.
The tricky part was getting the solenoid terminal nuts back on! So I cut a small piece of paper masking tape and jammed it into the socket and then pressed the terminal nut into the socket to make a nice tight fit in the socket so it would not fall out.
This worked extremely well.
I found that the gearbox rubber breather hose was rotten and split and broken at the inlet manifold. I just capped the manifold port, left the breather hose lying on the block, it can breath to atmosphere.
I also found the rubber fuel line hose from the injector rail to the firewall pipe had many splits along it length and sooner or later would burst so I replaced that along with the rotten engine breather hose.
A fresh oil change and filter was done 5w-50, the engine starts and runs perfectly now, got rid of that lazy lifter rattle, the car has been sitting for about 6months with little use.
Hi Lofty,
Yes you are right, MB would change a fortune to replace the starter. Valeo starters can be purchased in Australia locally from $663-$750 which I am sure are the Chinese version! The genuine Valeo starter I purchased came from:-
He is a wonderful person to deal with, very professional. (I hope he does not mind me mentioning his company here).
This cost me 152 pounds($231) including freight to AU. He gets them thru Holland from the factory in Poland. A
big difference. He also sells the Chinese cheaper ones but I was not interested.
So if you have the time and patience to do this job it really is worth it.
It could be done in 1 day but I took my time and did it methodically and carefully in 2 days. If I were to do it again it would take less because I know now what combination of extension bars and universal swivel joints to use and what angel to go in at etc.
One thing I forgot to mention is that black plastic water pipe which is bolted onto the block to the left of the starter you have to be very careful not to put any pressure on it and force the starter past it. It is plastic and I am sure could crack and that is the last thing you
need happen. Its quiet impossible to remove without lowering the engine because there is a section which goes down into the water pump and there' is no clearance between the car body to get it out. Also there is a bolt behind the water pump pulley which attaches this pipe and
that's also impossible to get out. Easier just to left that pipe alone as I did and it was no problem to get the starter past it with patience, that is the key word.
Cheers,
Bob.
Thanks Bob, all information helps when it comes to DIY.
One of the most interesting aspects of Bob's experience was that the actual starter motor like at least one other case I have heard of was not the cause of the starter failure. It was in fact the fork which is activated by the starter solenoid which had broken, this has the effect the the starter dog or gear is not forced against the flywheel ring-gear, and although the starter activates the dog does not engage in the teeth of the ring gear, hence the starter runs but does not turn the engine with the result that the car does not start.
the annoying part is that the fork does not appear to be available as a spare part which means fitting a new starter.
Method used by Mercedes Benz workshops
One of the major problems with starter motor problems /failure on the 'A' Class is that the engine has to be dropped to get at the starter motor which is sandwiched between the under floor on the passenger side and the top of the engine.
Lowering the engine for changing the starter motor is the method used by Mercedes-Benz Workshops and a bill for close on £1000 would not be out of order with VAT currently being at 20% 04/01/2011.
The question comes when the car is still very serviceable and in good general condition but the replacement of the starter exceeds the value of the vehicle.
Well Tom it appears has come up with the answer, and forwarded the procedure in the hope that it will assist other owners faced with the same predicament, provided you are prepared to do the work yourself or can find a mechanic who will undertake the work or assist you with the job, it can be done without raising the car or dropping the engine albeit there is still quite of lot of work involved and mechanical knowledge skills are required.
However it is advisable to have a good understanding of what you are undertaking before commencing work and to obtain not only the correct replacement starter for your car but also other spares which might be required during the procedure.
In the first instance I recommend you read fully mypage.43. with emphasis being on this page 66.
Also make yourself familiar with the photos on mypage.33 in respect of the precise location of the starter Motor.
Also be aware that the starter motor you install must be matched to your Vin number, failure to do this and there is every chance the starter motor although not coded to the individual car when fitted will still not operate, not because it is defective, but because it is the wrong type motor for your particular 'A' Class' car's electronics set-up.
There would be some advantage to having lofty's CD to hand as it includes files of information which would be useful when undertaking tasks of this type. Purchase CD now
 link, Starter lockout relay information.
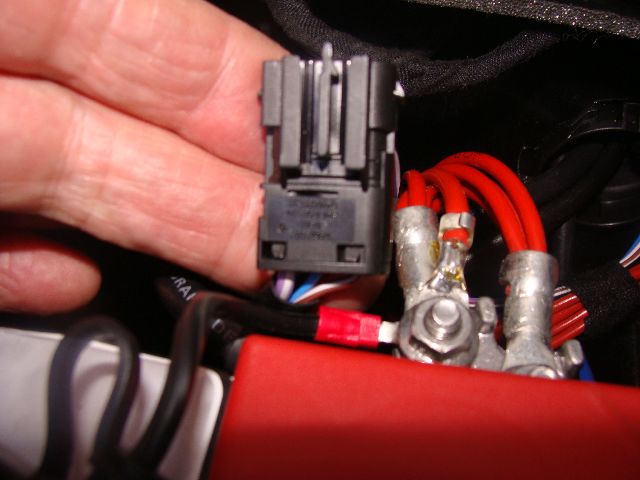
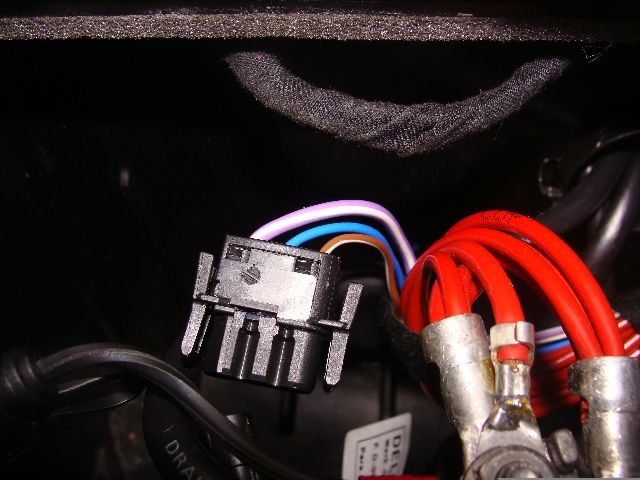
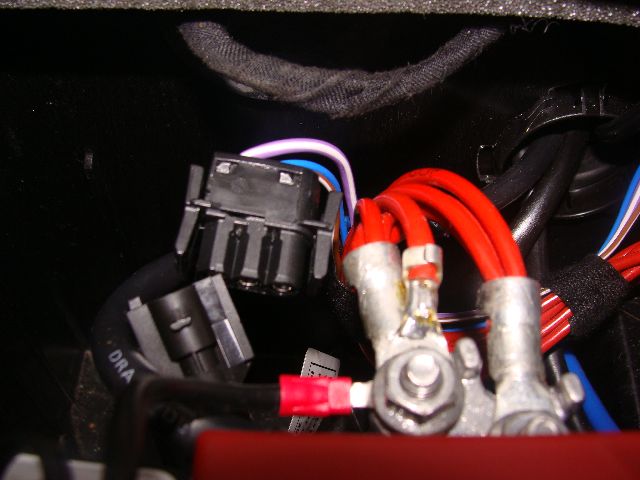 You can however check this by opening the battery/fuse board access hatch in the floor, disconnecting the triple pin socket and plug situated towards the far side of the battery compartment, (shown above) put the red cable probe of your voltmeter into the socket carrying the Mauve & White cable, (this is the thickest of the three cables going to the triple socket and plug) the black(earth probe onto the battery earth connector.
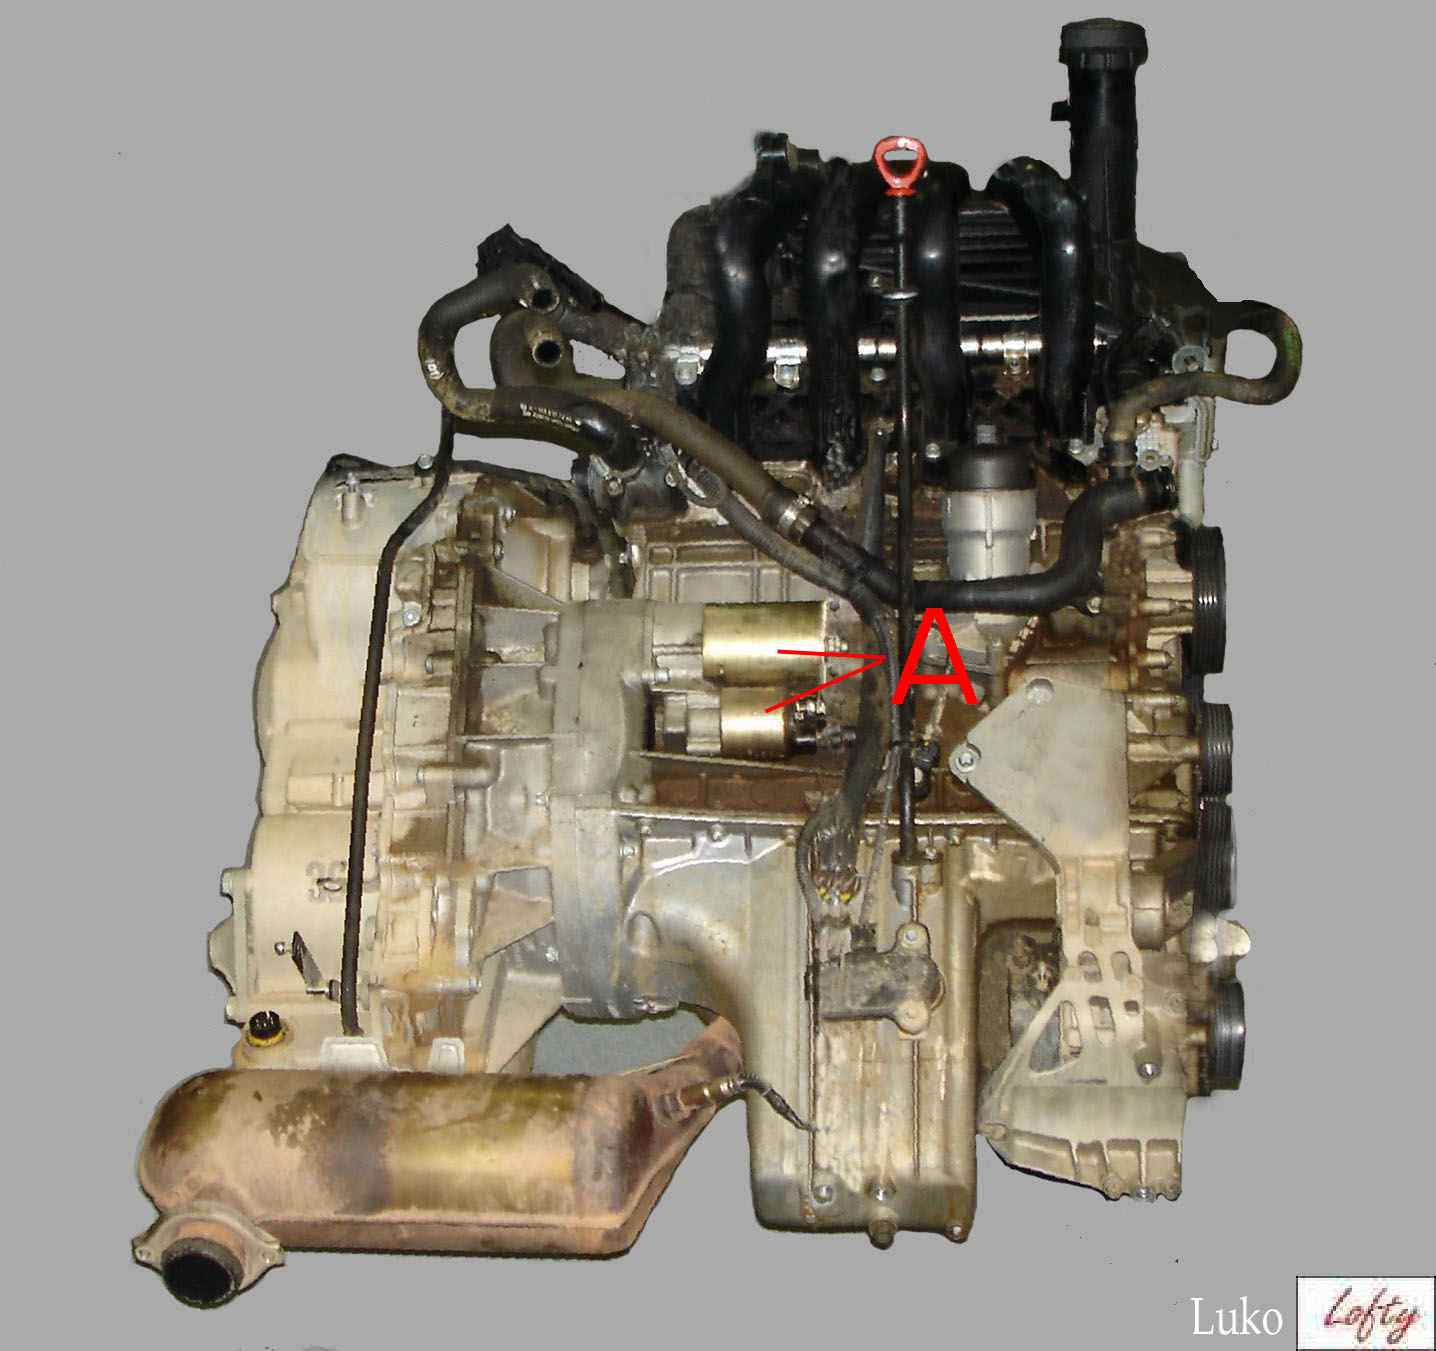

 Two Types of Starter Specification
 Starter motor reconditioning
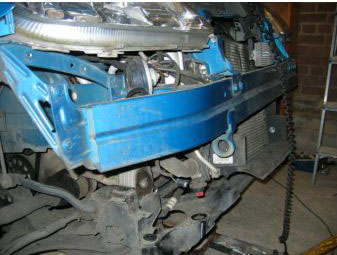


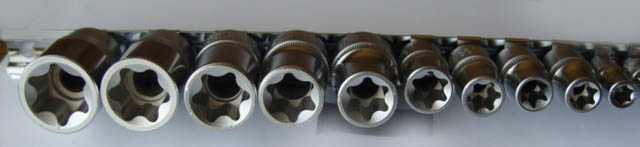 Remember to do this job you will require a range of tools and other equipment, including Torx Drive sockets and torque wrench.
 You will also need a piece of substantial timber, preferably hard wood, 1.1 meters long Approx (3' 9" inches long, this allow for overhang either side of the sub frame.
the piece I have in mind is (10cm x 6 cm approx.
You will also need a piece of substantial timber, preferably hard wood, 1.1 meters long Approx (3' 9" inches long, this allow for overhang either side of the sub frame.
the piece I have in mind is (10cm x 6 cm approx. 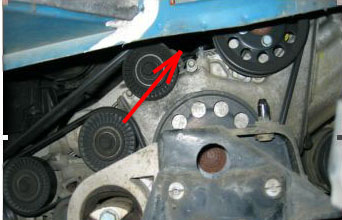 I suggest that the securing nuts would be best loosened before slackening off the starter securing nuts.
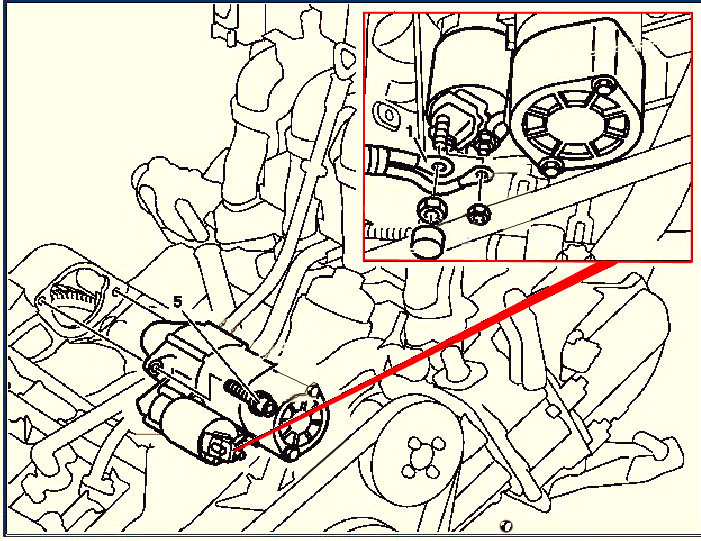
 Measurements of voltages OLD Battery door open interior light on , ignition key removed
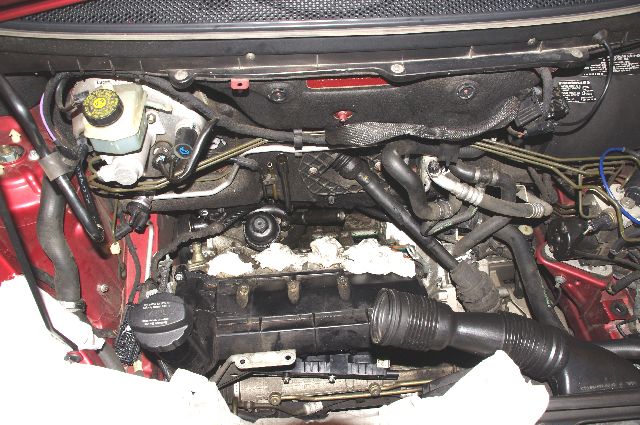 I have attached some photos of my starter motor change, I bought the genuine article through the UK from Poland, its a Valeo motor.
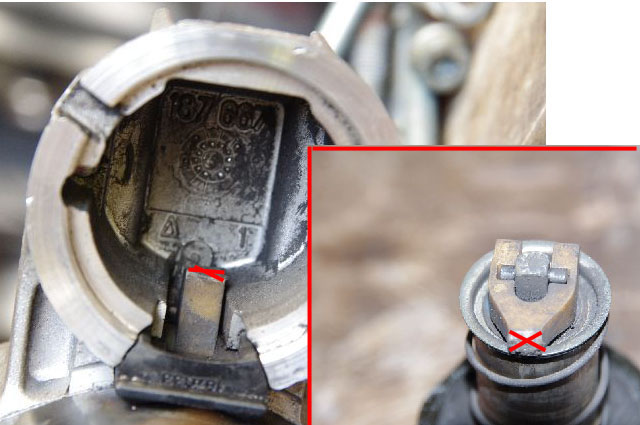 One of the most interesting aspects of Bob's experience was that the actual starter motor like at least one other case I have heard of was not the cause of the starter failure.