Component Parts & Assembly
Battery Location, Removal, Charging, Replacement.
Note
If you disconnect the battery for any reason or the battery goes flat, when the battery is re-connected or recharged the alarm may sound all indicators lights will also flash, this may also be accompanied by the alarm horn sounding.
To stop these features re-set the alarm using either the ignition key (See scorpion Re-set Alarm) or use the alarm key re-set key in the glove box socket, near side.
Note. The small 12volt aux battery in the rear offside of the car Powers the Eco /Start when switched ON as well as some feature resets on the dask display which could not be reset until a new battery was fitted
Please read this through complete page before attempting to remove your battery
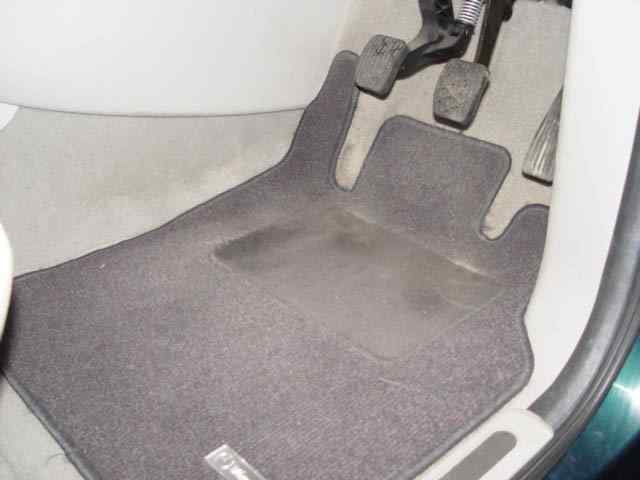
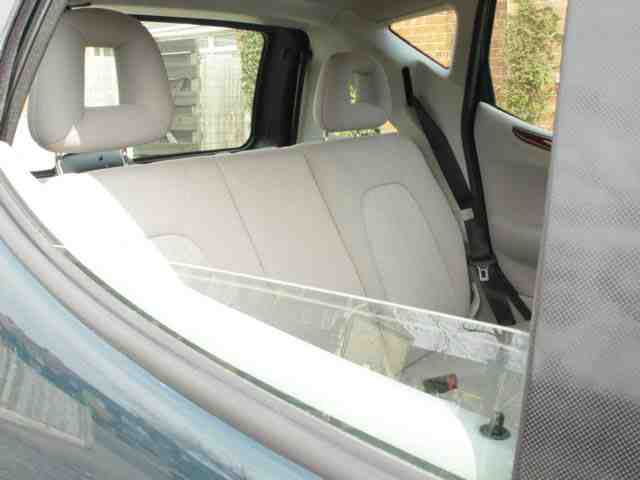
Battery Location. Not in the most conventional of places, and not easily spotted if you have floor mats. Remove the floor mat and all will be revealed.
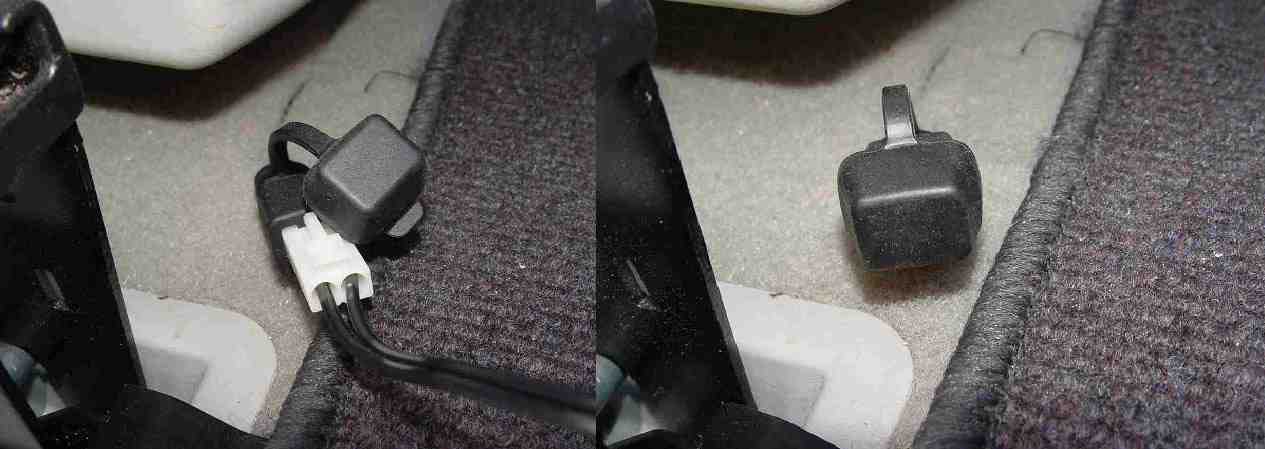
Having removed the mat, look for the black turn tab laying flat on the floor pan, flick up one side of the tab and undo anti-clockwise, easing the pan up at the same time, do not panic if the screw section comes out ,there will be a plastic washer which you can re-place when you re-fit it. Lift the floor panel out sliding from beneath the edge of centre bulkhead.
Remove the plastic covered foam cushion, this will expose the battery Housing and main fuse box.
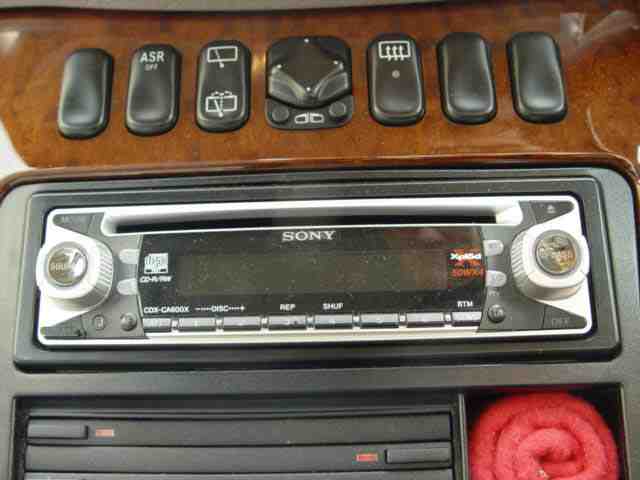
Now before going further! If you intend removing the battery for any reason have you got a radio that requires a radio code to re-start it? If yes have you got the code? If no you will need to back the electrics up from another battery or 'Code Saver' before removing the fitted battery. This will preserve electric window as well as ESP/ABS settings
* A devise which is plugged into the cigarette lighter socket which maintains 12 volt power to the electrical circuits on the car thereby preserving the settings , Radio-Code, ESP/ABS & window settings. one such product. Even if you have the radio where the facia lifts off you will need to remove & refit before the radio will work.
* Before attempting to remove the battery pull the breather tube from the end of the battery, remember to connect after refitting the battery.
* DO NOT disconnect the battery connections from the battery while the engine is running.
This could damage the electronic components (e.g. the alternator ) beyond repair
* Switch off all electrical consumers
* Loosen and remove the negative terminal first followed by the positive terminal.
NOTE when the battery is removed the ignition lock Cannot be turned Reconnecting the Battery
* All electrical consumers must be switched OFF? This is the mercedes-Benz Hand book directive. However It has been found that when fitting a new or fully charged battery that the spike of power being feed/hitting to the ECU can cause the engine management light to come on and stay on.
To reduce the possibility of this happening on your car, turn the light switch to at least the side light position before connecting the battery , remembering to turn the light switch to off when when the battery is reconnected. If this happens on a pre-March 2001 A class you only way you can get the light deleted is to go to Mercedes-Benz workshops who are likely to charge £50 as the 'star' diagnostics tool has to be used to delete the light, should it occur on later models fitted with EOBD spec cars can delete the light using OBD2 or EOBD hand help diagnostics tools.
* Connect the positive terminal first followed by the negative,
*MAKE SURE THE BATTERY TERMINALS ARE NOT ACCIDENTLY INTERCHANGED
After reconnecting the battery the following operations will be required.
*Re-set the clock.
*Where appropriate enter the radio code.
* Reset the side windows
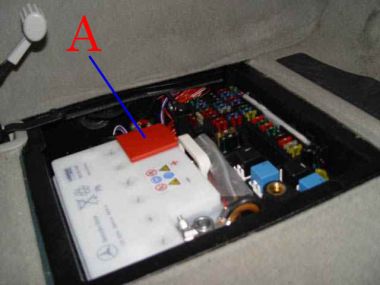
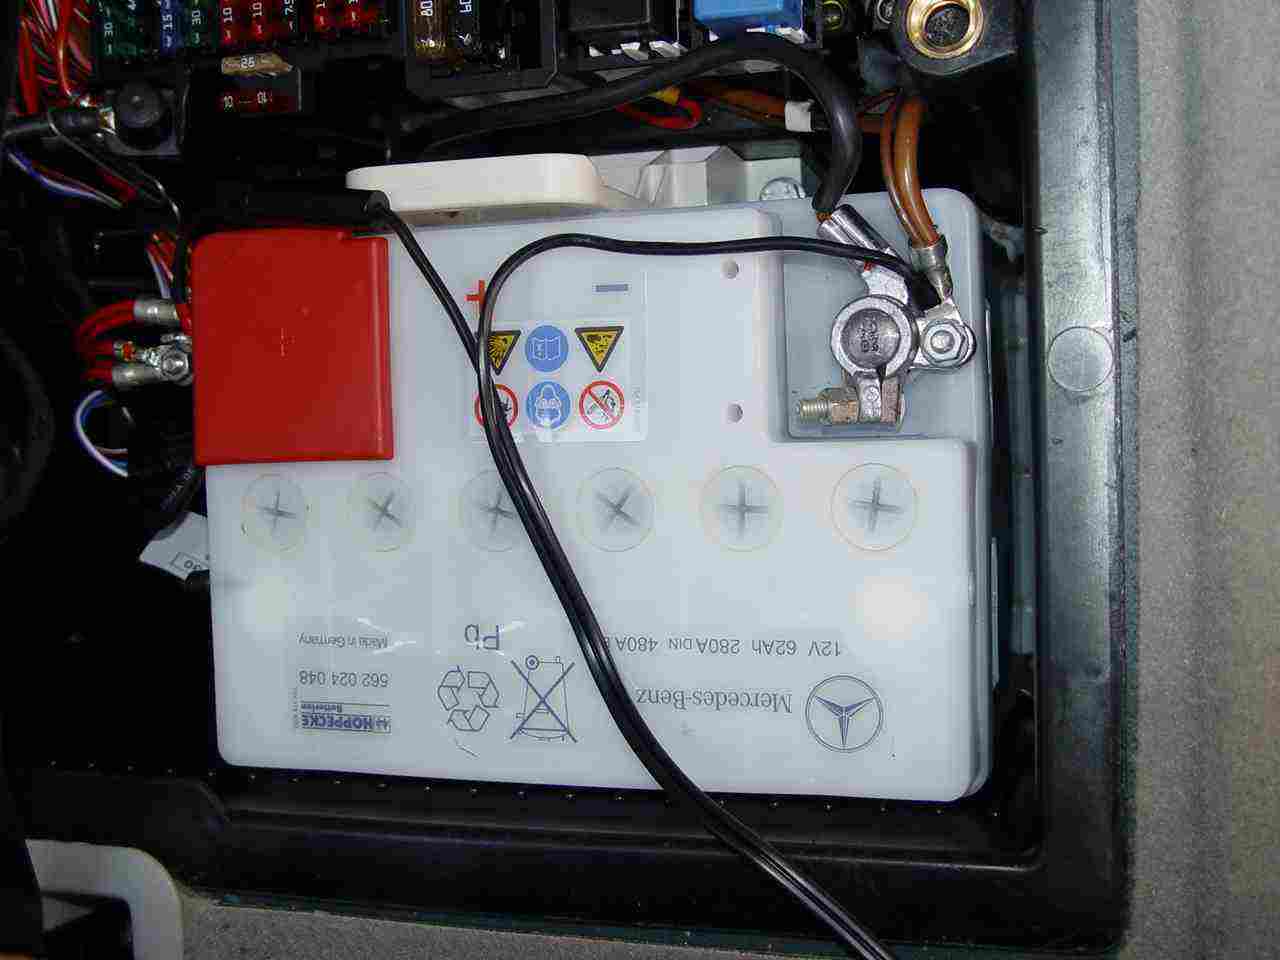
*Reset the ESP system Note the red plate
'A'
that covers the Positive terminals, mine has a facility for one over the negative- terminals as well but it is never been present. This is removed to expose the positive
+
terminals. Mercedes-Benz do recommend removing the battery for charging,
Damage may occur to the alternator if the battery is charged in the car with the terminals connected.
Undo the battery terminal using a 10mm spanner these clamps should be tight, BUT NOT OVER TIGHT While removing the terminals note that the negative terminal is smaller than the positive terminal (which is on the left in the picture).
Owners have in the past connected the Battery the wrong way round with disastrous results. Ensure the battery terminals are next to the fuse display. It is apparently possible, somehow to get it wrong!
Using a 13mm socket and extension bar undo the battery clamp fixing bolts (Anti-Clockwise)These bolts on my car were not tight the socket and bar on it were required to remove them, When replacing note that these bolts tighten into the plastic of the battery compartment
DO NOT OVERTIGHTEN.
Before attempting to lift the battery
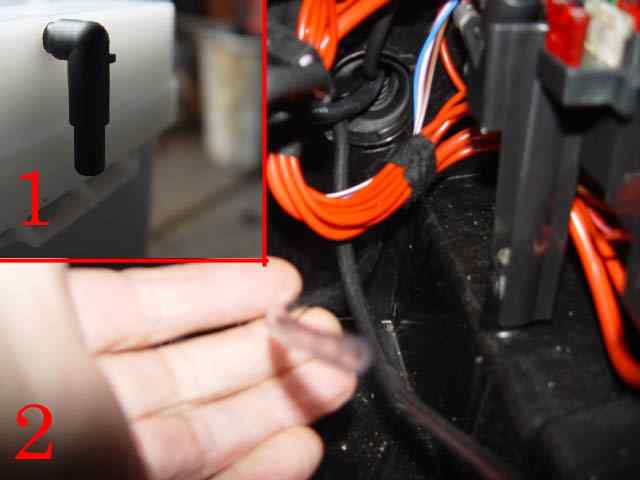
from it is housing, remove the plastic vent/over spill tube
2
from the tube connector which is situated on the far side of the battery on R/H/Drive cars. Failure to do so may damage the connector.
1
Remember to reconnect on re-installation of the battery.
NOTE BEFORE ATTEMPING TO REMOVE THE BATTERY, IT IS HEAVY,
35LBS OR 16kg. DROPPING THE BATTERY COULD CAUSE IT TO SPLIT OPEN, SPASHES OF SULPHURIC ACID CONTAINED WITHIN THE BATTERY WILL CAUSE SEVERE BURNS TO THE SKIN AND DAMAGE EVERYTHING IT CONTACTS.
FIRST AID TREATMENT FLOOD THE AREA OF CONTACT IMMEDIATLY WITH COPIOUS SUPPLIES OF WATER, DO NOT RUB THE SKIN, SEEK MEDICAL HELP ASAP. REMOVE ANY CONTAMINATED CLOTHING IMMEDIATLY even though at the time it does not appear damaged .
Battery Disconnecting the Battery Before attempting to remove the battery pull the breather tube from the battery, remember to refit after refitting the battery.
DO NOT disconnect the battery connections from the battery while the engine is running.
This could damage the electronic components (e.g. the alternator ) beyond repair
Switch off all electrical consumers
Loosen the terminals, remove the negative terminal first followed by the positive terminal.
NOTE when the battery is removed the ignition lock Cannot be turned
Reconnecting the Battery (All electrical consumers must be switched OFF)? Although that is the advise in the owners handbook, there is good cause for putting the lights on when connecting the battery and in my opinion when connecting jump leads to the cars battery for jump starting, this action prevents a power surge going to the ECU on your car which can cause the engine management light to remain on when the car is started and worse, in one case is thought to have been the cause of the ECU failing. Extract from e-mail received.
Quote NOTE:
This car has had 2 ECU's - first one at about Mar 04 under guarantee, second one Jan 05 ( battery went and they say I blew it when jump starting), Ian 16/09/07 Unquote.
Connect the positive terminal first followed by the negative,
Using Emergency Battery Packs
If using an emergency battery pack follow the directions normally diplayed on the pack to the letter, The positive connection going to the cars battery and the negative connection going to an alternative earthing point on the car. In the case of the 'A' class, because the battery is in the car a seat runner is a convenient earth point on which to clamp the Negative connection. see page 92 for further details .
MAKE SURE THE BATTERY TERMINALS ARE NOT ACCIDENTLY INTERCHANGED
In a number of cases, it has been reported that following the battery change /charge the ECU management light comes on and stays on . This is caused by not following to the letter the procedure above. This happened to this owner who following the deletion of the light by his MB independent garage posted the following mail Quote
Lofty
Just to let you know that I have got the problem fixed. I took it to an independent MB engineer who put it on the diagnostic tester and within seconds showed a fault 'Low voltage terminal'. This clearly had been caused by the way that I had charged the battery i.e. with it still connected to the car. He emphasised what you say in that you must not charge the battery connected to the car and that this is not emphasised by MB. The order for removing then replacing the terminals (- then + and + then -) is as you say. He also said that as you replace the battery terminals before you put the final (-) terminal on put the side lights on (to produce a load) and put the terminal on firmly so that it does not have a chance to spark between the battery terminal and connector. Unquote Getting your ECU management light deleted by a garage may cost you more ,so take care and follow the guidance ,which is in you hand book.
Some owners are under the impression that special battery chargers have to be used with lead Calcium, and jell filled batteries, this is not the case standard 12volt battery chargers can be used , Also if buying a charger Halfords inform me that they have a battery charger suitable for all types of 12 volt battery including calcium and jell filled. Their ref for this charge is 181750 at a cost of 339.99 8/7/07
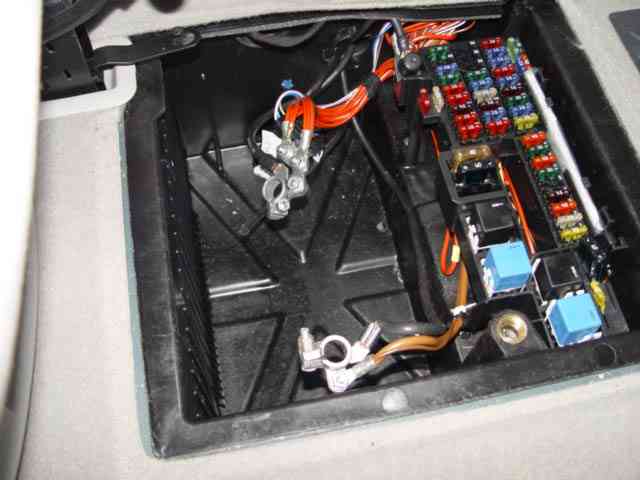
Having removed the battery to your charging area, make life easy for yourself by anchoring back the cable connectors in the battery compartment, so they do not foul the battery when you re-install.
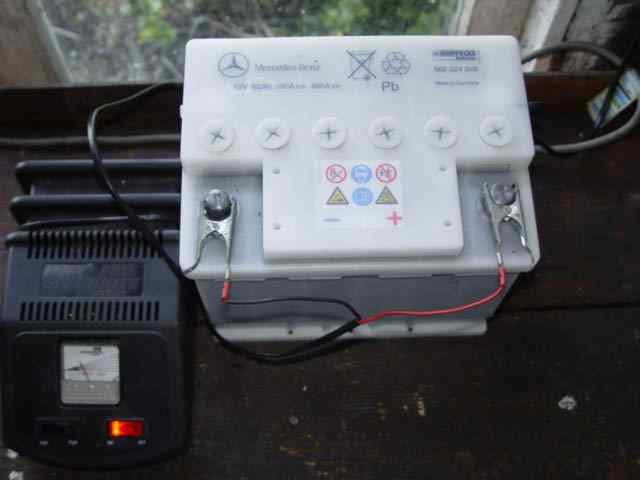
Before connecting your battery to the charger, check the acid/water fluid levels, Each of the six cells are separate units so check them all. If topping up is required use distilled water, top up to the min level,(i.e. only just above the plates, the bars within the battery that can be seen if you look into the cells of the battery.)Leave the screw caps loose but over the filler holes this will stop acid plashes from damaging anything in the near vicinity.
Connect your charger to the battery.
making sure to get the connection round the right way
(positive) + to +
and (Negative - to - If your charger is a duel high and low charge switch to low, a trickle charge is less likely to buckle the plates and so do less harm to the battery than a rapid charge.
Connect your charger to the mains,
switch on the charger and ensure the charging indicator shows that current is being passed to the battery.
This battery has been on charge for 18 hours ( trickle)
LOW
and is for all intents and purposes is now fully charge. In 'A' it can be seen that the needle is only just off the start position with only only a very small charge is being passed to the battery. Switch the
HIGH
position to fast charge and the needle moved by about an 1/8 of an inch on the gauge. If the battery was discharged, then a higher current would be passed on to the battery by the charger, decreasing as it becomes charged.
Having now charged the battery, re-check the fluid levels which may be found to have risen slightly, replace the caps, wipe off all eternal surfaces of the battery with a disposable cloth, ensure the drivers door of the car is open.
I found it easier to pick up the battery with the terminals away from me, when I reached the car they were then in the correct position for placing the battery straight into the car.
Terminals towards the fuses. they are marked + & -Check before you connect , The terminals are also different sizes, the larger of the terminals is the positive
+.
Reconnect the vent /overflow pipe this is easiest done by turning the connector to the horizontal position the hose can then be attached.
ENSURE YOU HAVE YOUR KEYS HANDY AS THE ALARM WILL START WHEN YOU CONNECT THE TERMINALS
Re-connect the battery terminals, do not over tighten. When re-fitting the battery clamp ensure the large lead from the positive terminal is not trapped below the clamp. tighten firmly using the extension bar and 13mm socket only. Replaced the plastic covered foam pad re-place the floor pan. Before doing anything further take the precaution of washing your hands even the smallest amount of battery acid will damage the upholstery and trim.
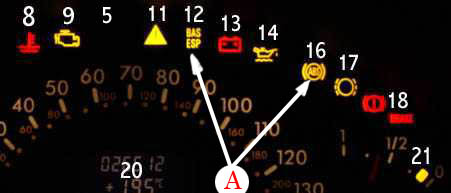
When starting the car for the first time after fitting the Battery, it will be seen that the two warning lights remain on, BAS/ESP & ABS, moving the car, turn the steering wheel fully to the left, and then the right, both lights will be seen to go out.
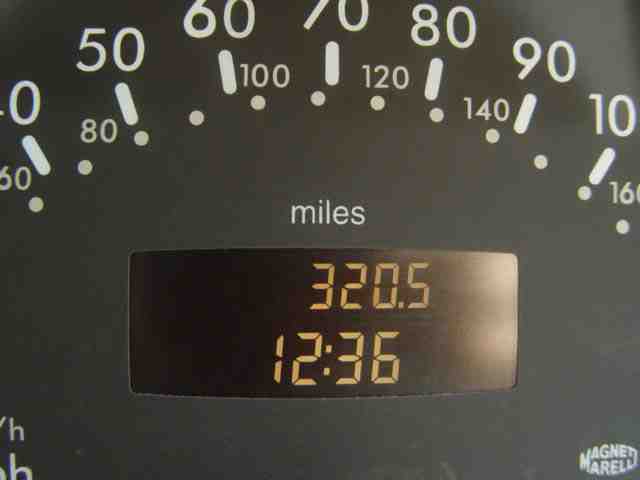
do not forget to set your clock it will not have worked during the period that the battery was disconnected!
You will also have to re-set the windows, turn the ignition switch to number two, or middle position. Using the individual window switches set each window in turn to the fully up position. following which fully depress each switch for about one second. Note that each switch has four positions, Lightly pressed in either up or down direction, window goes up or down and stops when the switch is released. Fully depressed and released the window will move fully up or down in one movement. Having reset your windows test using each switch, reset as required
Record you trickle charge in your DIY records, Where trickle charging becomes necessary at regular intervals a new battery will soon be required
The topping up with distilled water of all wet cell batteries is an important part of the car servicing. doing it yourself is not difficult and it can save you ££££££££££ over the years.
The importance of good earth connections When Justin e-mailed me about his mini disasters which cost him dear Oh how I wished he'd found my site sooner, fitting the spare wheel without using the steel bolts provided is a fatal mistake and can cost a great deal of money to correct the problems caused, in Justin's case it meant leaving the car at a garage for them to remove the damaged wheel and bolts which is not an easy task, enough said on that problem. Go to my page 62 for more details. An even greater shock was when the garage having completed the first task contacted Justin to say his car wouldn't start and that they thought it might be the starter motor problem. If this was the case then this was another big job and on top of the first was really going to cost big bucks as the engine and gearbox, as a unit have to be at the very least lowered to replace the starter.
Hooray! Good garage, Good news the mechanics have managed to get the car to start, so what was the cause of the scare?
The main earth lead which services the starter motor had corroded away and although it appeared OK on inspection when it was touched and moved about it simply crumbled away. Only the expertise of the garage in question had saved the day by simply carrying out a physical examination of the car to try and locate the cause of the non starting Had this been a Mercedes Garage it would without doubt have been put on the 'Star' Diagnostics with all the costs that involves and the chances of the fault (Defective earth ) being picked up would have in my opinion be remote.
SO if you have problems starting your car, before you blame the battery or indeed condemn the starter check that the earth connection from battery onto the engine is tight and in sound condition, these will terminate at the negative terminal. I'm aware that there are large earth connections almost directly below the battery box attached to the engine and gearbox assembly. In the case of the starter this will be the point at which the starter motor picks up the earth terminal do not get caught out, poor earth connections cause more problems than enough on modern cars.
To make a comparison, it was common practise for Domestic premises to use the metal water pipes as an earthing point for lighting and power. However now that water pipes are being rapidly replaced by plastic alternative earths have had to be provided, which now indirectly terminate at the power station. In the same way where earths were connected to the metal wings and body work of older vehicles much of that now is also plastic and so the wire providing the earth point becomes even more important as they likewise find there way directly or indirectly back to the negative terminal of the power station (battery)
An extra tip provided by Justin's email: it is also useful to check the engine earth link(s) at this point. On my 1.7 Diesel (year: 1999) there's a braided steel 'cable' under a cover beneath the engine that may be corroded, even if it looks OK. Try waggling it about. You could temporarily connect a good jump lead between battery negative and the engine block, and if this improves things it is a sign that the engine earth may be defective, maybe because the braided cable is damaged or because it is not making good contact at one end. The symptoms of a bad earth can be similar to a weak battery, except that the lights (which do not use the same earth connection) should be fine."
Justin (W168 - 1999 - A170CDI)
Thank you Justin for raising this important matter .
Special Battery Chargers.
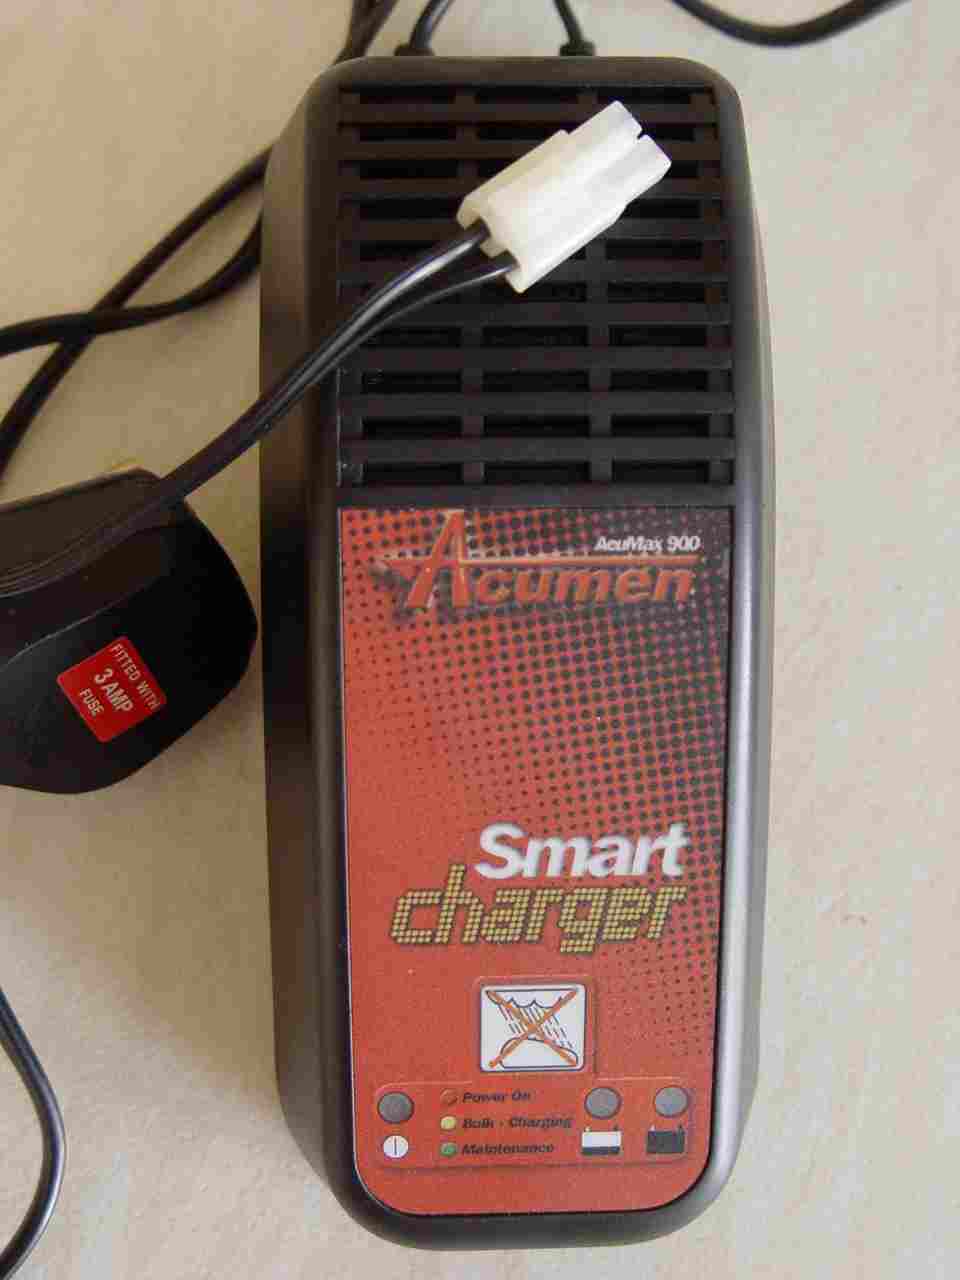
It is obvious that if you leave your car unused for a long period of time without starting and giving it a good run the battery will fail to start the car. This is quite often down to the state of, or age of the battery as well as the fact that services within the car are still using small amounts of power, car alarms for instance use power to monitor your car. Removing the battery from the car for the purpose of trickle charge is a pain, and having cut the power to the components electrical circuits results in having to reset the window positions as well as the ABS/ESP. In view of the fact that the battery fitted to the 'A' Class is of the vented type, via the attachment on the end of the battery, in can be safely trickle charged whilst still in the car using a special charger. The one I purchased for the job was an "Acumen 900" which keeps the battery charged and switches off automatically when it is fully charged, Cost £42.00 Available in this instance from a nearby motorcycle spares shop. The charger comes with various connections, I used the AMEYE connection to make to my battery, additional connectors can be purchased
It delivers a maximum of 0.9 of an amp and automatically shuts off when the battery is fully charged, cutting in again as required.
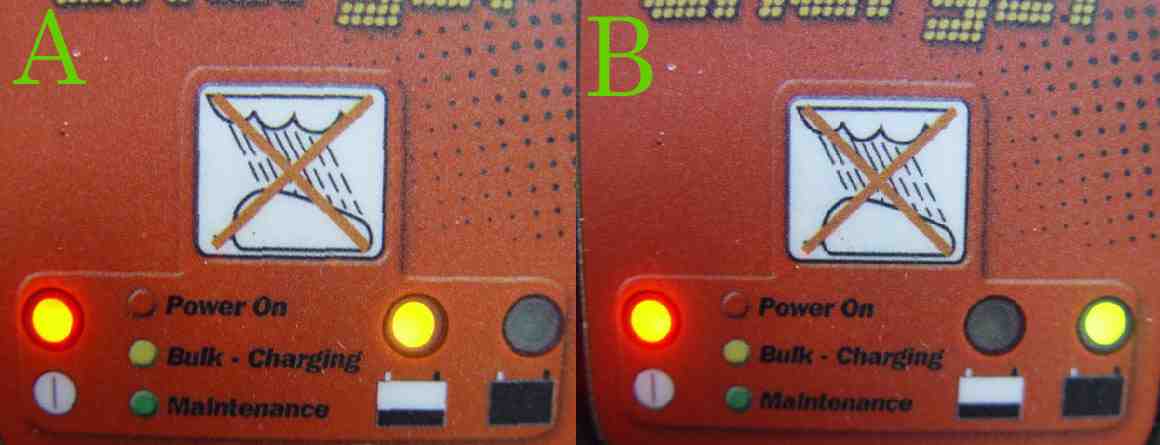
LED's on the charger indicate whether the battery is fully charged, or accepting a charge. When the charger is putting a charge into the battery a red and amber light are clearly seen
A When the battery is fully charged the amber light is replaced by the green B
at which time the charger ceases charging the battery. As we have two cars I have fitted both with the charging adaptor which is connected direct to the battery terminals. Leave the car in the Garage as we did for five weeks whilst on Holiday and return to find that it will still start, thereby avoiding the need to remove the battery from the car for charging, as well as avoiding the need to reset the the various components following the recharge. http://www.acumen-electronics.co.uk
Now as another owner, Tony has pointed out that is fine providing you can get your car to a power supply. If like him you only have on road parking then this is of little use . HOWEVER as Tony has rightly pointed in this day and age of modern technology there are alternatives.
Tony has got himself a Solar powered battery charger. it is suitable for charging the battery in location because it only delivers a very low charge. This like the unit I use is sufficient to make up for power used by the car alarm and clock which over time does take power from the battery.
Technical data:-
12 volts max output 1.5w,@17.5 volts, connects to cigarette lighter or can be connected by plug direct to the battery. Cable length 2.7 meters, Fused @ .5 of one amp, Dimensions 352mm x 125mm x 14mm However Andrew in Australia informs me that his solar charger only charges the battery when his ignition is in the on position, which rather defeats the object of the charger, He has therefore wired in a second cigarette lighter socket which he has connected direct to the battery. that obviously overcomes the problem and ensures the battery is being trickle feed from the Solar charger.
 Please read this through complete page before attempting to remove your battery
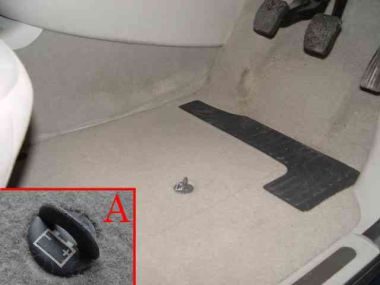 Having removed the mat, look for the black turn tab laying flat on the floor pan, flick up one side of the tab and undo anti-clockwise, easing the pan up at the same time, do not panic if the screw section comes out ,there will be a plastic washer which you can re-place when you re-fit it. Lift the floor panel out sliding from beneath the edge of centre bulkhead.
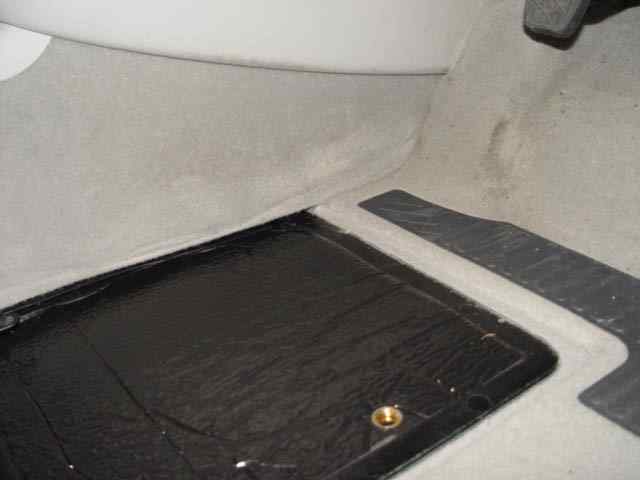
 Note the red plate
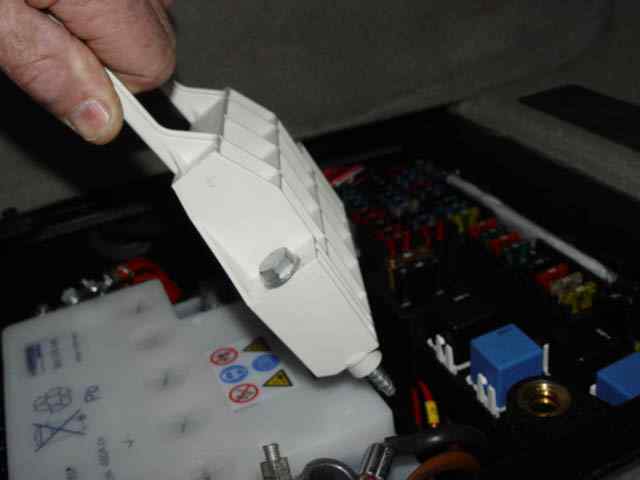
 NOTE BEFORE ATTEMPING TO REMOVE THE BATTERY, IT IS HEAVY,
35LBS OR 16kg. DROPPING THE BATTERY COULD CAUSE IT TO SPLIT OPEN, SPASHES OF SULPHURIC ACID CONTAINED WITHIN THE BATTERY WILL CAUSE SEVERE BURNS TO THE SKIN AND DAMAGE EVERYTHING IT CONTACTS.
NOTE BEFORE ATTEMPING TO REMOVE THE BATTERY, IT IS HEAVY,
35LBS OR 16kg. DROPPING THE BATTERY COULD CAUSE IT TO SPLIT OPEN, SPASHES OF SULPHURIC ACID CONTAINED WITHIN THE BATTERY WILL CAUSE SEVERE BURNS TO THE SKIN AND DAMAGE EVERYTHING IT CONTACTS.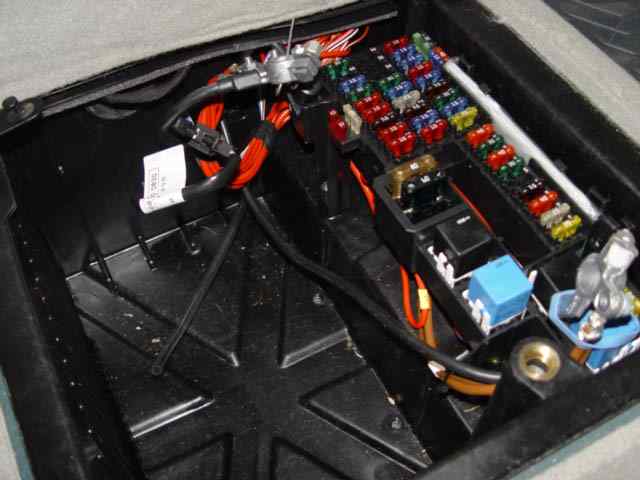

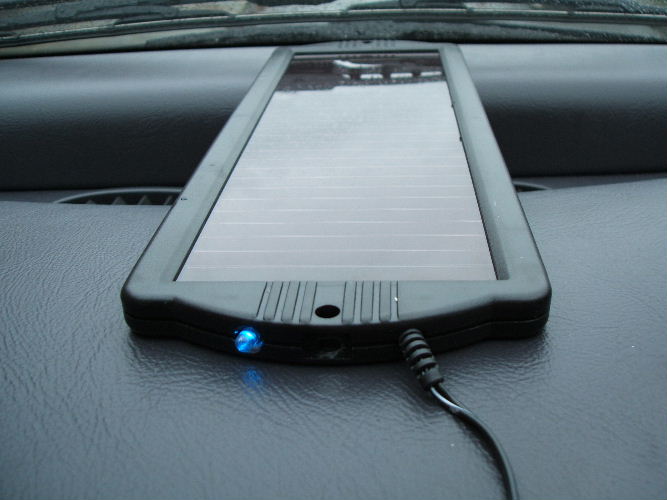 Tony has got himself a Solar powered battery charger. it is suitable for charging the battery in location because it only delivers a very low charge. This like the unit I use is sufficient to make up for power used by the car alarm and clock which over time does take power from the battery.
 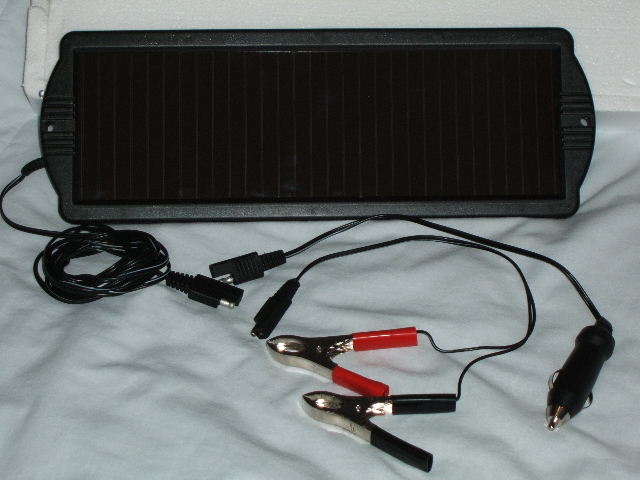 Technical data:-
12 volts max output 1.5w,@17.5 volts, connects to cigarette lighter or can be connected by plug direct to the battery. Cable length 2.7 meters, Fused @ .5 of one amp, Dimensions 352mm x 125mm x 14mm
Technical data:-
12 volts max output 1.5w,@17.5 volts, connects to cigarette lighter or can be connected by plug direct to the battery. Cable length 2.7 meters, Fused @ .5 of one amp, Dimensions 352mm x 125mm x 14mm