Component parts and Assembly
Coolant Drain and Refill System.
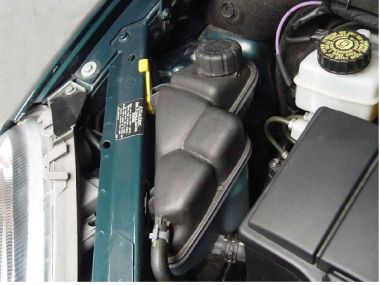
The coolant reservoir is situated on the off side of the engine compartment, and is filled to the level mark with Mercedes-Benz coolant fluid, which is a combined coolant/anti-freeze/anti-corrosion fluid.
Mercedes-Bens recommend that it be replaced every three(3) years on the 'A' Class. however discussion with MB service staff/workshop staff say 5 years.
Which ever, Sooner is better than too late! A frozen engine will cost you a great deal of money. The main thing is to get the content of the coolant right for the temperatures your vehicle is exposed to, The frost protection can be measured but remember you can't measure the anti corrosion properties, which is more important with the automatic gearbox model. There is a valve in automatic transmission that if subject of corrosion will cause major problems. so better safe than sorry .
When considered in line with other service costs, if you can replace the coolant yourself then it is well worth while and in my opinion well worth doing it ever 3-4 years
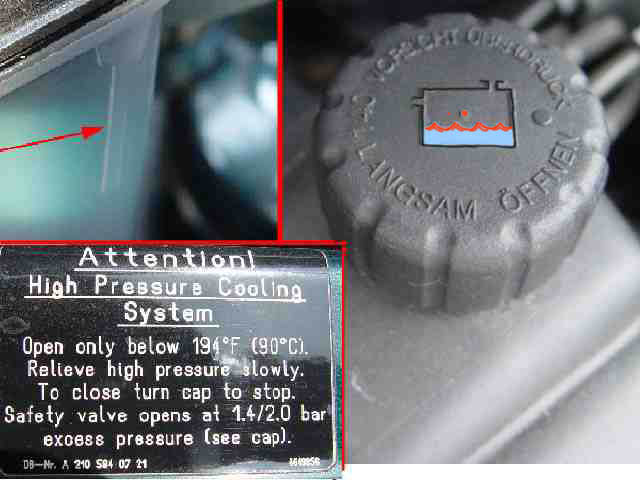
. Special attention should be paid to the warning notice which indicates the danger of removing the cap while the engine is hot or running.
* Never remove the reservoir cap of a hot engine until at least 5 minutes after the engine has stopped.
*Having allowed the engine to cool, using a cloth open the cap 1/2 a turn anti-clockwise this will allow any residual pressure to escape prior to fully removing the cap.
* As a precaution against being scalded (wet burns) by the hot chemical bearing fluid, cover the cap with a cloth
* Remove cap slowly allowing any pressure to escape.
* To cater for circumstances where there has been a build up of pressure in the cooling system, the cap is fitted with a safely valve which will open between 1.4 and 2 bars pressure.
* Never attempt to remove the cap from an over heated engine, you stand a real chance of being scalded.
* Do not expose bare skin to the coolant fluid.
*If you accidentally contact the fluid wash the exposed, or splashed area with copies supplies of clean, cold water.
* Follow this action immediately and particularly where the eyes have been splashed or exposed. Bathe the eyes with clean water in a cupped palm for a prolonged period, seek medical advise.
The coolant reservoir can be easily removed by lifting the yellow lever to an upright position then lifting the reservoir from the supporting rail, This procedure will be required when the need arises to change a defective bulb.(This may not be necessary if you follow my latest suggested method.) Take care during this procedure not to place coolant hoses & connections under undue stress.
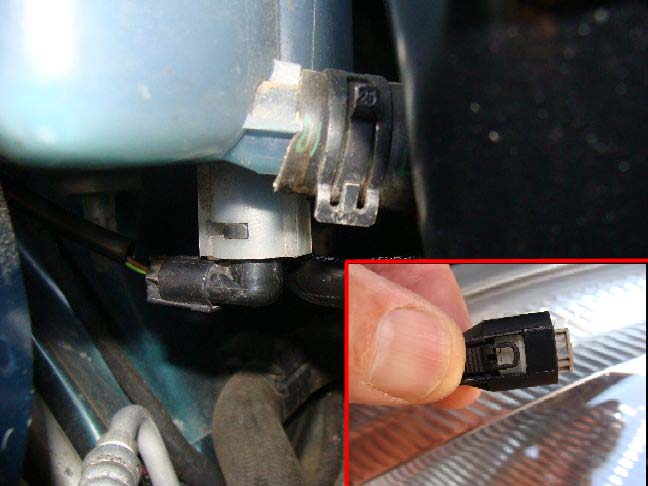
Before removing the coolant reservoir be aware that there is an electrical connection attached to the underside. This is the low level indicator connection. If the coolant is low or the connection is defective you will get this warning lamp showing on the instrument cluster when turning on the ignition. To remove the connector press down on the tab on top of the connector and with from the socket. To replace align and push until secure.
When replacing the reservoir ensure that the projecting lug
C
on the bottom of the reservoir is located in inside the rubber grommet.
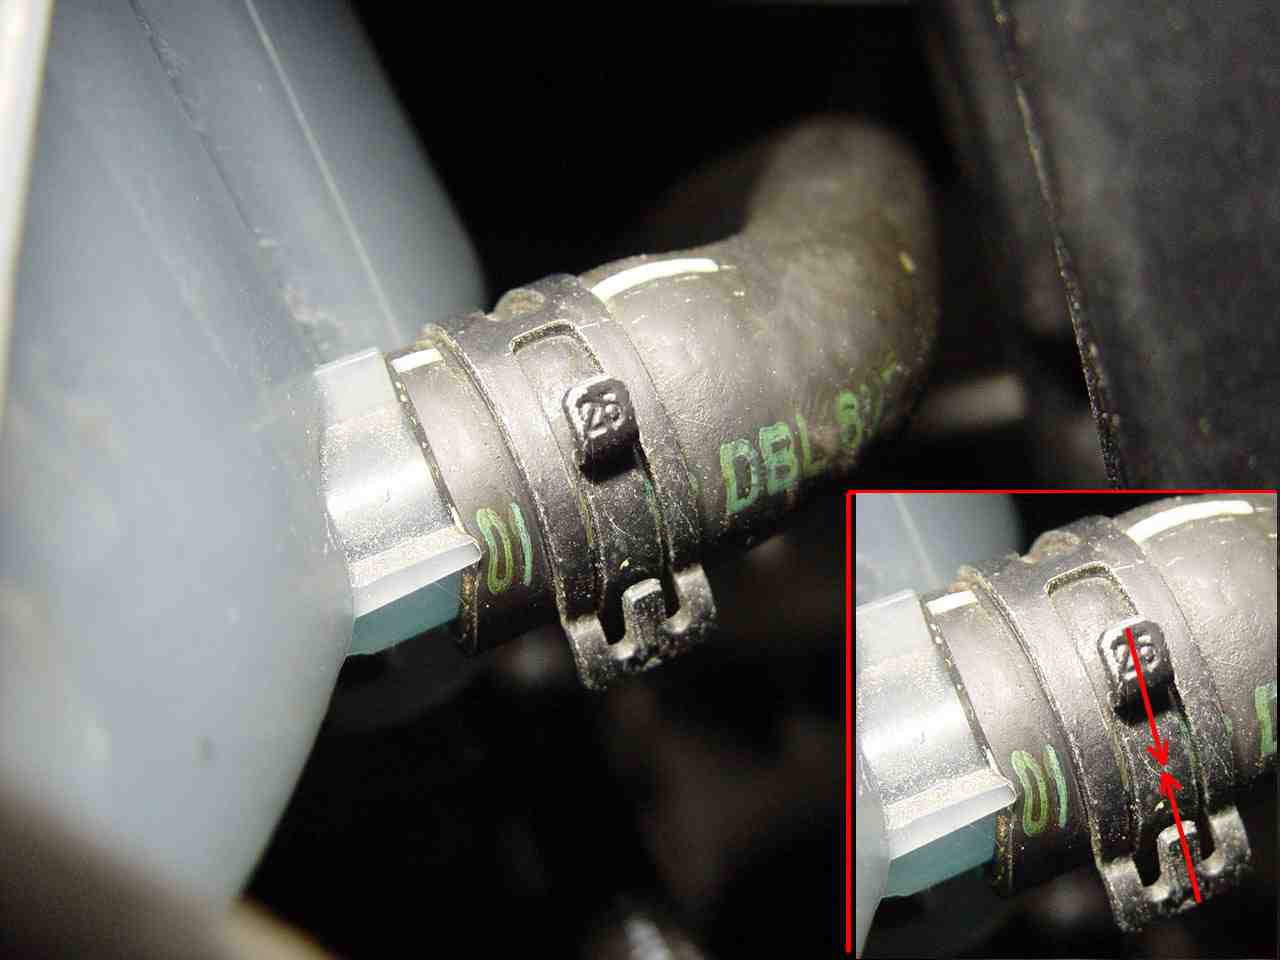
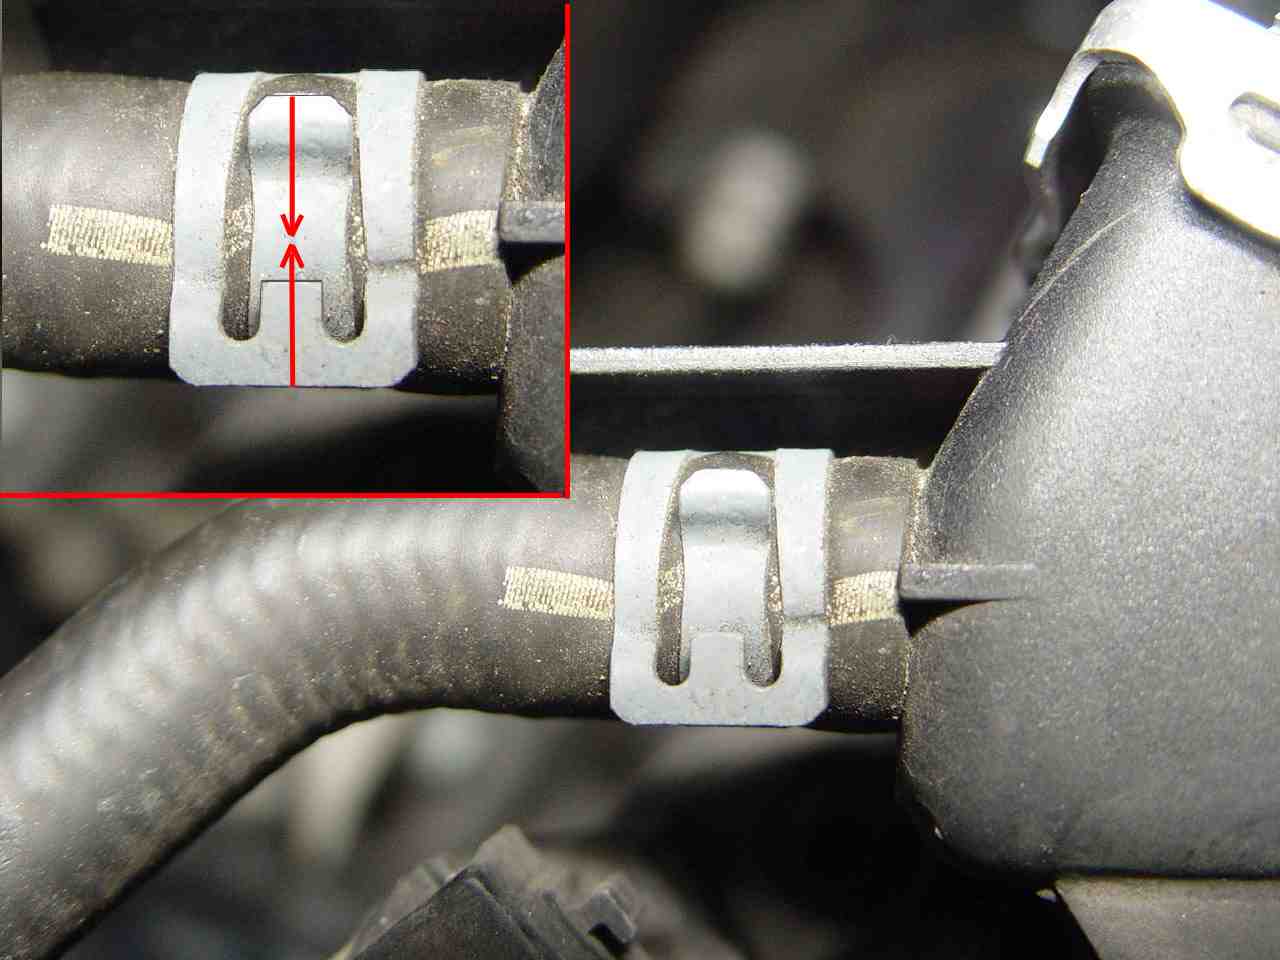
Should there be a need to remove either the 15mm or 25mm hose clips, this is an easy task, using a suitable pair of pliers grip at the point indicated and squeeze together easing the hose away from the reservoir spigot at the same time. Remember you are dealing with plastic components, take care not to damage the spigots.
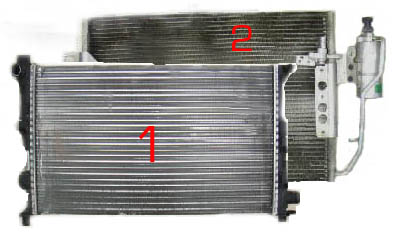
The radiator
1
is situated to the rear of the air conditioning condenser
2,
when looking at them in site they appear as one unit. There are in fact two separate components, the air conditioning system carrying compressed gas/fluid and the coolant system carrying coolant fluid, both are closed circuit systems and are serviced as separate items.
For Air conditioning system see mypage 31, Photo's are as seen from the engine bay.
Hazards In the case of frontal impact collision both systems can be damaged to the degree that the coolant reservoir /radiator will leak/spray very hot coolant, and the Air conditioning system fluid will immediately turn to gas. ('Freon') you are strongly advised to avoid contact with both as there is a considerable risk of:-
Hazard of scalding from the coolant and irritation to the respiratory tract by the refrigerant gas, causing severe breathing problems.
Tasks of Anticorrosion/Antifreeze Agents
*Corrosion and cavitations protection of all components in the cooling system
*Antifreeze protection(frost protection)
* Increasing boiling point so that coolant does not evaporate so rapidly.
* Avoiding ejection of coolant at high coolant temperatures.
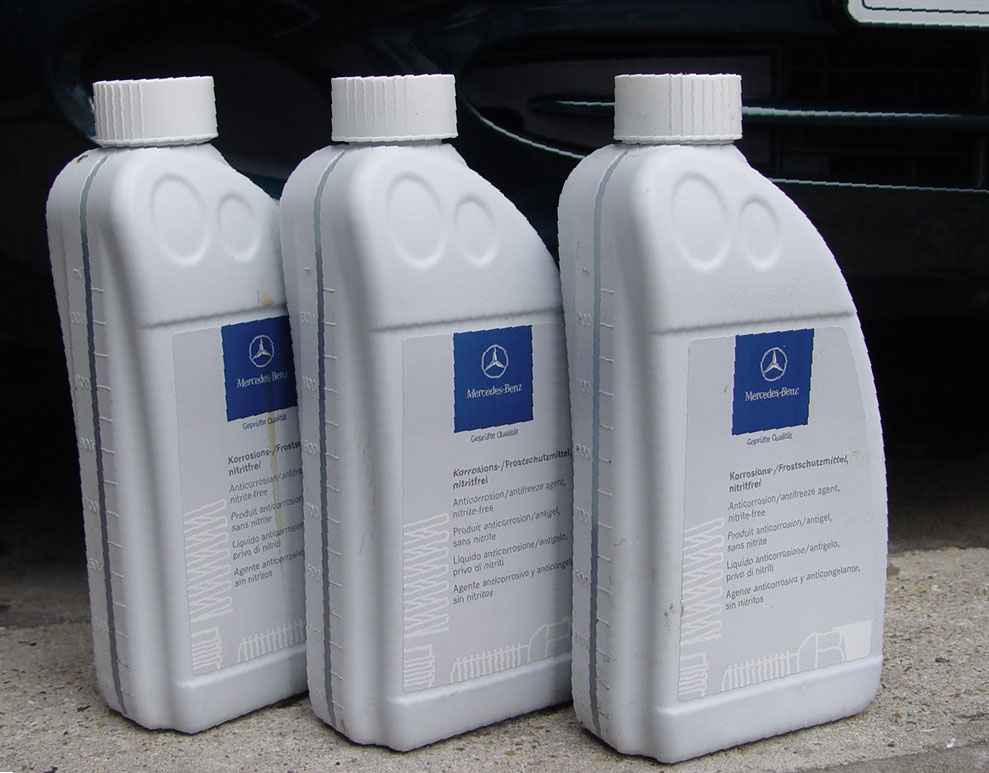
When buying Mercedes-Bens Anticorrosion/Antifreeze fluid you can be assured that it meets the correct specification for your car. Mercedes-Benz. Invoice number MA 000 989 08 25/10 Antifreeze @£10.20 for 1.5 litre container inclusive of Vat.16/1/2011 It is not advisable to mix different manufactures products,
The specification of the MB fluid meets their requirements in respect of corrosion, One owner in Brazil finished up having to get his automatic gearbox striped because a small valve had corroded, resulting in a very costly repair.
It is therefore worth while sticking to the manufacturers product and scheduled time periods for changing the fluid, thereby reducing the possibility of the same problem occurring to your car if fitted with an automatic transmission.
Before commencing work you obviously need to obtain your replacement coolant, I have used the manufacturers product and would encourage you to do the same, you should not need to flush the system if fluid changes have been undertaken at the prescribed intervals or and unless the drained fluid is dirty or contains oil streaks.
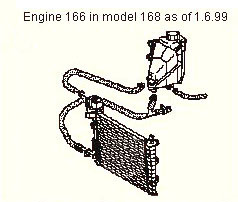
A cooling system with air conditioning with separate expansion tank requires:-
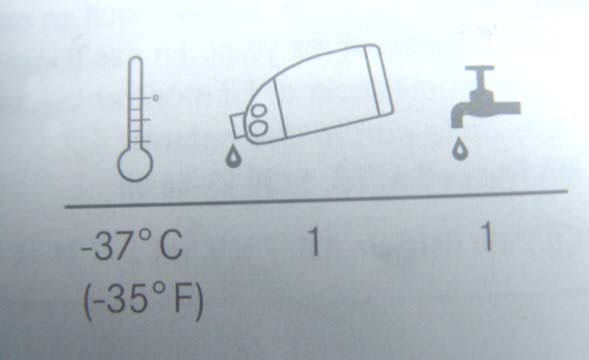
* Total capacity of system 5.7 litres
* The concentration of anticorrosion/antifreeze protection should not exceed 55% of the total volume of the system.
* protection level - 37 degrees C = 2.85 litres
* protection level - 45 degrees C = 3.15 litres
* Use water which is clean and not too hard. Drinking water frequently , but not always meets these requirements the contents of dissolved substances in the water may be of significance for the occurrence of corrosion.
Taking the above points into account, the system is drained using the two drain plugs located on the system,
The most obvious and easiest way to locate the radiator drain plug which is situated towards the off side bottom edge of the radiator, is to remove the grill/bar in the front lower grill, which normally covers the towing eye. You will now see where the red plug is located.
Having located the plug, access is via the underside of the front valance.
The second of the two plugs is located on the crank case, D partially hidden by the O/S drive shaft E
and the O/S exhaust manifold pipe F Few tools are required but a wide, thick bladed screw driver or purpose made tool is required to remove the plug, although it is not tight care should be taken not to damage when removing or over tighten when replacing.
I found the following tools necessary when doing the job,
The red radiator valve required a 8mm wide blade 3mm thick with a square end,
A Figure 2 is the profile of the plug. (tools required)
I could have got away with just a broad screw driver but the purpose made tool fitted well and did not cause damage to the plastic valve, which is not fully removable and therefore is not easily replaced. As can be seen below I merely tailored the end of a angle grinder disc tightening tool, which is always in my tool box anyway and now doubles as the plug removal tool.
The crankcase plug is a different matter, the front of the car will need to be elevated and secure. Observe all rules set out on my page 4, Working around & Under your car. As can be seen from the above photo that the plug is fitted with an Allen key way which is
6mm
I used a screw driver fitted with 1/4, 'flexi-drive' and a 6mm Allen piece. which made the job of removing this plug very much easier, as the O/S drive shaft along with the exhaust manifold is in close proximity effectively preventing a long reach Allen key from being easily used. Neither of these plugs are tight, and should not be over-tightened when replaced, remember one is plastic and the other is screwed into an alloy crankcase.
Neither of the valves have to be removed completely to drain fluid, in the case of my red valve radiator the fluid did not come out of the centre hole as was expected, making the fitting of a drain hose ineffective, I therefore drained it straight into a suitable container. Note that this plug cannot be removed from the radiator base. The crankcase plug however allowed the coolant to vacate via the centre hole and therefore a drain hose could have been used, again I drained it straight into a container.
BEFORE COMMENCING Ensure you have AND USE eye and hand protection. The Crankcase plug will fully unscrew, note it is very difficult to replace due to its restricted location. Keep a clean dry cloth to hand in case of accidental contact with the skin and or clothing
* Having placed a suitable container under the fluid outlets the plugs can be slackened.
*Note that the fluid will not flow until the reservoir cap is removed, as a vacuum is maintained. Remember this point and you will not finish up with contaminating fluid up your arm.
* Turn on the cars heater to its max setting
* Having allowed all the fluid to run from the cooling system, tighten/close the two plugs
* Pour in the new coolant, in my case with air conditioning I used 2.85 litres,
* Now top the system up with water.
* (Do not fill beyond the top of the marker on the side of the reservoir.)
* Leave the reservoir cap off at this point.
* Start & run the engine at tick over speed, (in open air)blower/fan on slow, for approx 10 minutes, bubbles of air will be seen leaving the hose and entering the reservoir
* keep the reservoir topped up to the level mark with water (Do not overfill)
* Allow the engine to run until hot air is being discharged by the heater, this is a clear indication that hot water is flowing through the system and heater matrix..
* Replace and tighten the reservoir cap
* Monitor the water level during the first few miles following replacing the coolant.
* Top up as required using fresh clean water
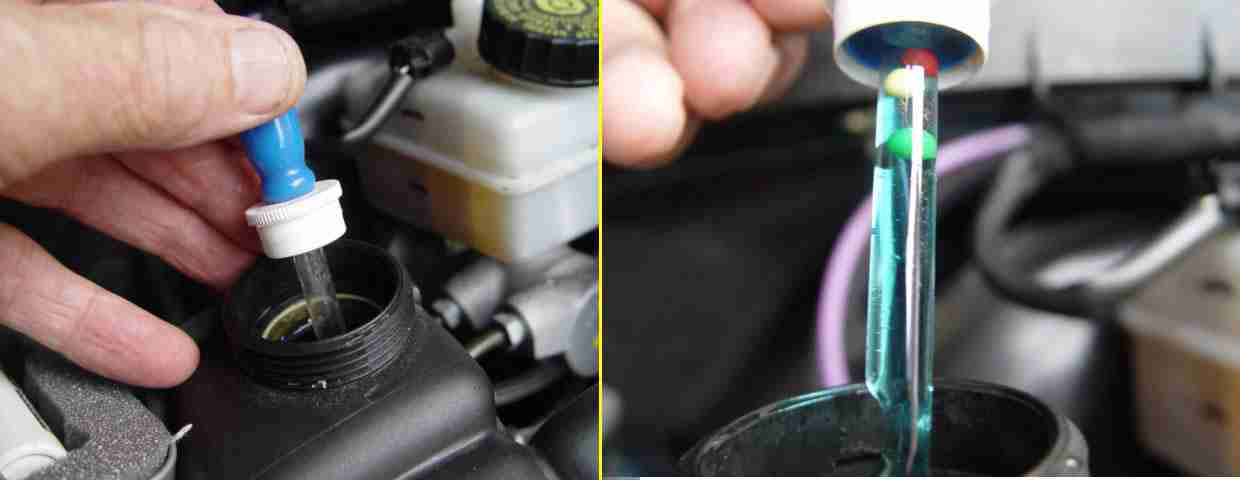
Operational monitoring of coolant. * Check to coolant level a couple of times during the first week of changing the fluid, top up as required. * If you have to add more than say a cupful of coolant check that the drain plugs are not leaking * In normal circumstances you should only need to check the fluid level before going on a long journey * It is advisable to check the coolant level weekly, and check the antifreeze content before the Winter Season, this can be done using a small hydrometer available from most good car accessory shops. Note When changing your coolant , ensure the vehicle is level, do not be over concerned if you do not get all the fluid purchased into the coolant system, I for instance purchased 3 litres but only used 2.8 approx, the remained can be retained for topping up the system when/if necessary . As previously mentioned later model A class do not have the vent valve in the radiator hose. Do keep an eye on the reservoir level for a few days after changing the coolant, top up as/if required from the remaining coolant purchased, diluted 50/50.
Used Coolant fluid The used fluid drained from your car should be treated as a hazardous waste for disposal purposes and not disposed of in the normal domestic waste water system, It can be easy contained in the containers from which the new fluid was removed or any suitable disused container (NOT DRINKS CONTAINERS) and taken as with old engine oil to your nearest local authority waste disposal site.
Inconsiderate & Illegal Disposal of such fluids can result in water ways and streams becoming contaminated and be the cause of death to much wild life. When you see the quantity you may not be concerned, However if every car owner negligently and illegally disposed of their various used fluids the World would be a worse place. Please be considerate to those yet to come to this planet!
If in doubt consult your local Environmental Services, Dept. or Water Company for advise.
Other components relevant to the cooling system,
Water pump
. Other components relevant to the cooling system include the Coolant pump ( water pump)
A Situated on the off side/ end of the engine and run off/by the poly 'V' Belt, pulley wheel system. The water pump as its name implies is responsible for pumping the (coolant fluid)water around the engine, hoses and radiator, where the atmospheric air currents displace some of the heat of the engine, as the coolant passes through the radiator. The speed of circulation being governed by the speed of the engine.
Having had a close look at the water pump location I was of the opinion that the engine would have to be removed or at least lowered to replace the pump. However Amid from Dubai, one of only 15 owners of Mercedes-Benz 'A' Class there, has sent this photo. He has managed to change his water pump from the top, engine bay, after having removed the air filter box complete. The job took him just over 2 hours but as with almost all repairs he says it would take less time if you had to do it again! One thing that Amid did stress was to ensure that the poly v belt does not come off the other pulley's, otherwise you may have to raise the car and replace it from below so take care when removing the belt to ensure it does not dislodge from the alternator, Air conditioning compressor, belt tensioner, etc. Water pump Part Number A166 200 07 200 do not forget to provide your Chassis/Vin number when ordering this component for your car, as later models may have a different part number. Cost approx £50.00 plus vat 8/06
If you do develop problems with the water pump it can be detected in several ways, the most common is water leaks from around the pump gland, Pulley shaft to impellor. However due to the location of the pump on the 'A' class and the under floor pans the water that you might spot will not be below the pump area. The tell-tail signs of a problem are :- * A drop in fluid level in the coolant/water header tank. * Water containing coolant fluid seen below the car after a run.
The water found on the floor which comes off the Air conditioning pipes will not contain coolant colouring. Be careful not to confuse the two.
* Rattling noise present all the time the engine is running (detection method, using a piece of metal rod, place it carefully in the area of the water pump, Take care not to foul the poly 'v' Belt which will be in motion hold it firmly against the pump housing and put your ear to the end; any noise will be clearly detected.) If the pump is noisy, not to be confused with the normal 'Wurrrr' noise of the impeller in the pump casing, then there is every chance the pump is on the way out, this rattle associated with a leak in which there are signs of coolant fluid, is a sure sign that the pump needs replacing. This item can only be replaced as a complete unit. * Coolant sensor indicates overheated engine caused by the drop in coolant fluid in the coolant system.*
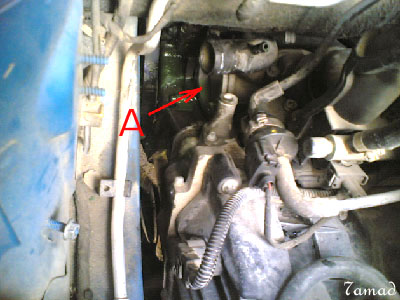
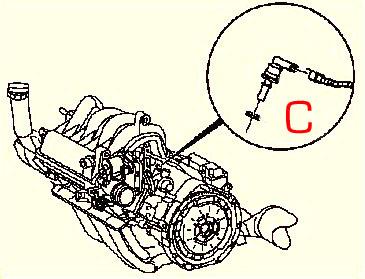
Getting at the thermostat A for replacement purposes is of course a different matter. Some owners complain at changing bulbs this operation is going to be a little more difficult, as you can see it has the steering column running diagonally across its path for a start, I suspect once again the engine will have to be at least partially lowered?
As this components name suggests it is the coolant temperature sensor, I am unsure as to how this warning/signal is given. I suspect it will be a warning on the dash display possibly with a radiator symbol. If however the thermostat is electrical rather than mechanical, then it could be this component that in itself is responsible for the control of water from radiator to crankcase (block) through the thermostat.
We should of course not forget the radiator and electrically operated cooling fan, without them the car would rapidly over heat causing severe engine damage. Badly overheated engines have been without doubt the cause of many car fires.
If your car is an earlier model, Pre 1st June 1999
then you MAY find you have a bleed valve in the cooling system, if you feel that you have an air lock
Air trapped in the system
Then squeezing the hoses in a pulse like way will have the save effect as opening a bleed valve.
All models,
when replacing the cooling fluid the heater should be turned
ON to max,
the fan does not need to be run.
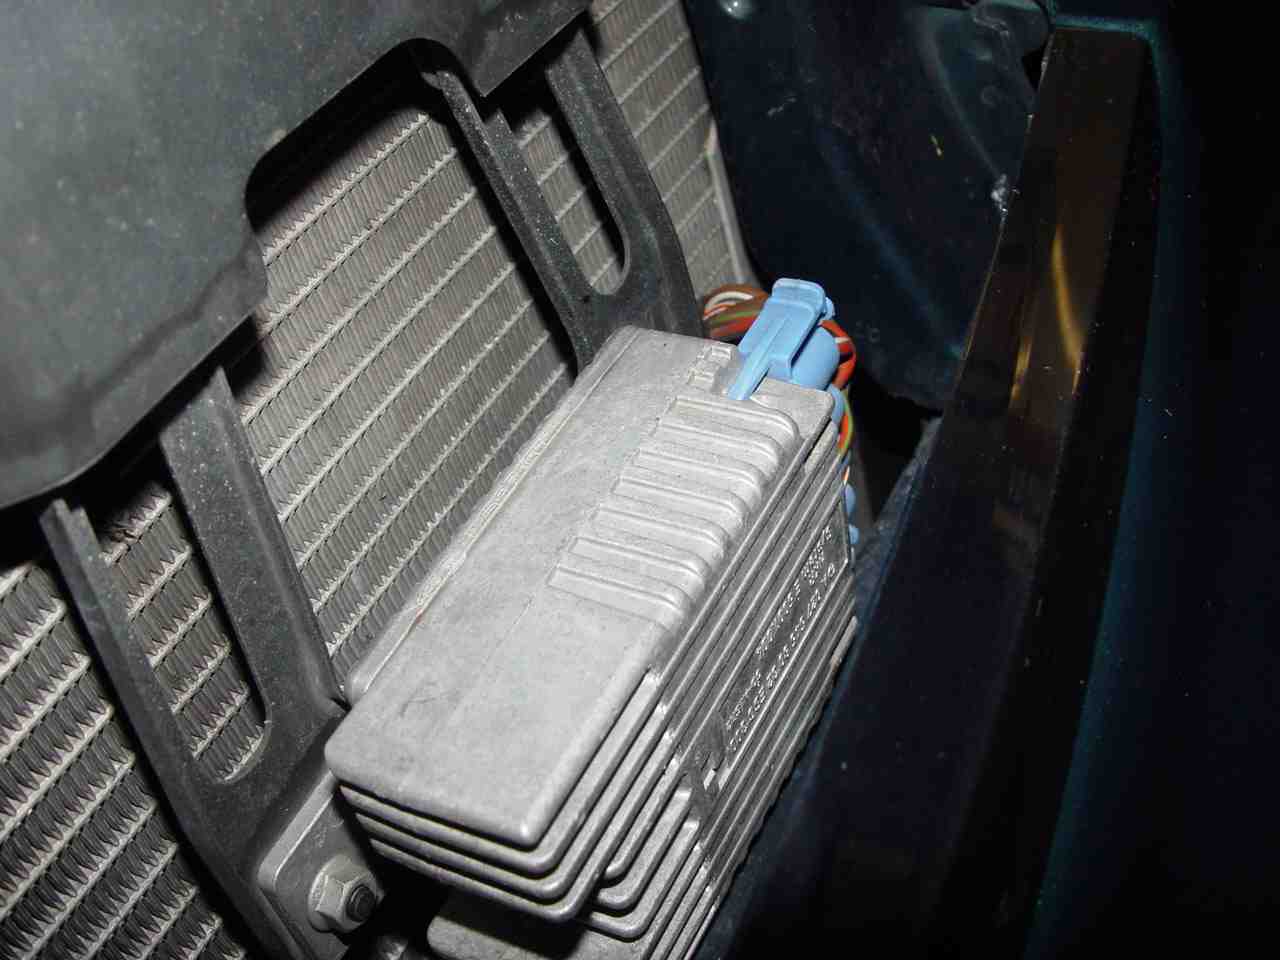
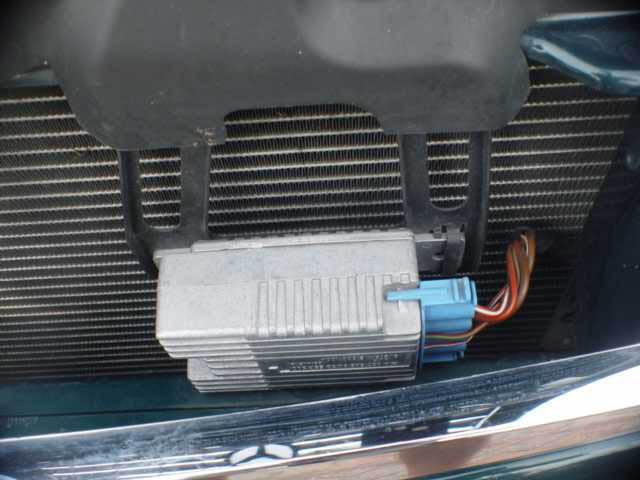
Variable Fan Control
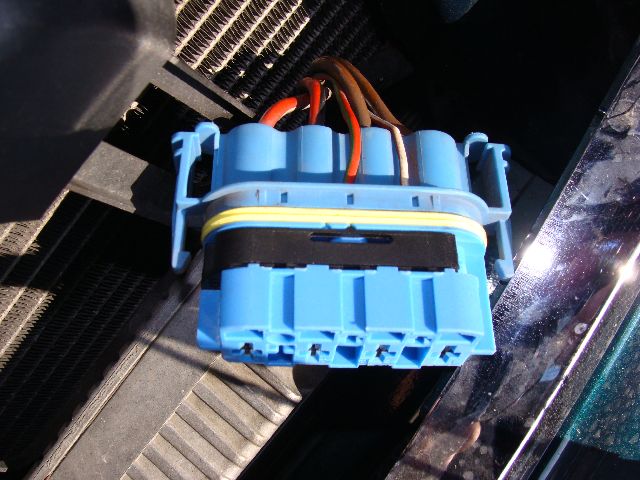
Or to give it its correct title, a 'Suction-Type Fan control Module' This is a piggy-back control unit is controlled directly by the engine control unit which operates the cooling fan on the back of the radiator. The fan control unit receives a signal from the engine control unit telling it how fast to turn (it is operated in about 8-10 stages), and hence its cooling effect. The fan control unit is separate from the engine control unit in case of a component failure: it has a direct 12v feed from the battery and if it fails to receive any signal from the engine control unit the fan will run at full speed to ensure the engine does not overheat.
Going to the module is a muti in conector, both the red & back thick wire and red & green thinner wires should be live when the ignition is turned on to position 2 . Brown wires are earths connections.>
 * As a precaution against being scalded (wet burns) by the hot chemical bearing fluid, cover the cap with a cloth
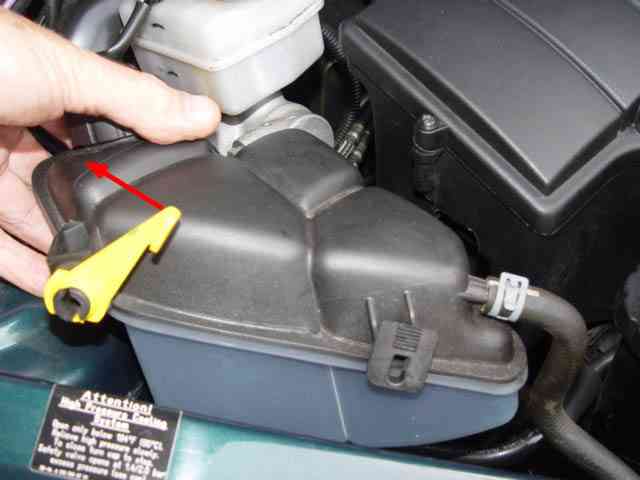
 when turning on the ignition.
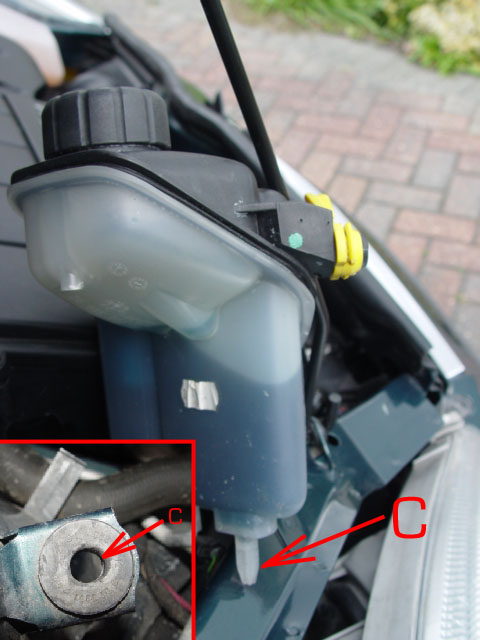
 Should there be a need to remove either the 15mm or 25mm hose clips, this is an easy task, using a suitable pair of pliers grip at the point indicated and squeeze together easing the hose away from the reservoir spigot at the same time. Remember you are dealing with plastic components, take care not to damage the spigots.
 A cooling system with air conditioning with separate expansion tank requires:-
* Total capacity of system 5.7 litres
A cooling system with air conditioning with separate expansion tank requires:-
* Total capacity of system 5.7 litres Taking the above points into account, the system is drained using the two drain plugs located on the system,
  Having located the plug, access is via the underside of the front valance.
 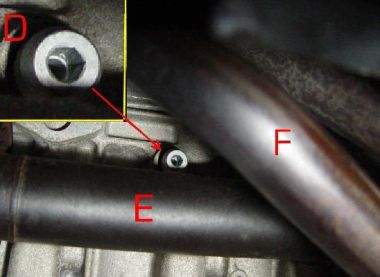 The second of the two plugs is located on the crank case, D partially hidden by the O/S drive shaft E
and the O/S exhaust manifold pipe F
The second of the two plugs is located on the crank case, D partially hidden by the O/S drive shaft E
and the O/S exhaust manifold pipe F 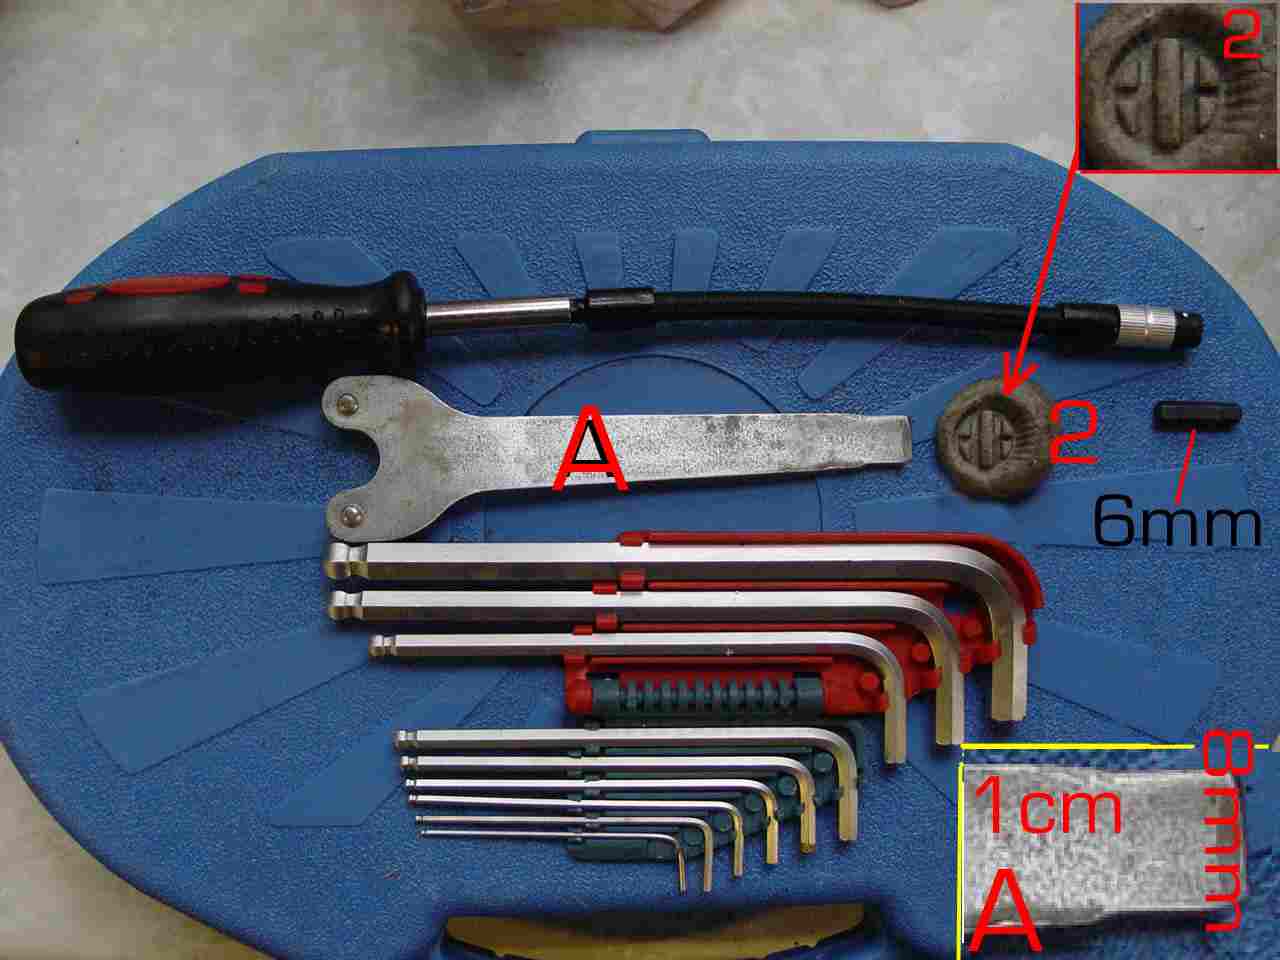
 Operational monitoring of coolant.
 Having had a close look at the water pump location I was of the opinion that the engine would have to be removed or at least lowered to replace the pump. However Amid from Dubai, one of only 15 owners of Mercedes-Benz 'A' Class there, has sent this photo. He has managed to change his water pump from the top, engine bay, after having removed the air filter box complete.
 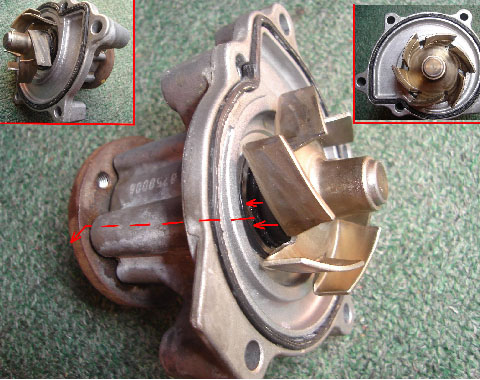 If you do develop problems with the water pump it can be detected in several ways, the most common is water leaks from around the pump gland, Pulley shaft to impellor. However due to the location of the pump on the 'A' class and the under floor pans the water that you might spot will not be below the pump area.
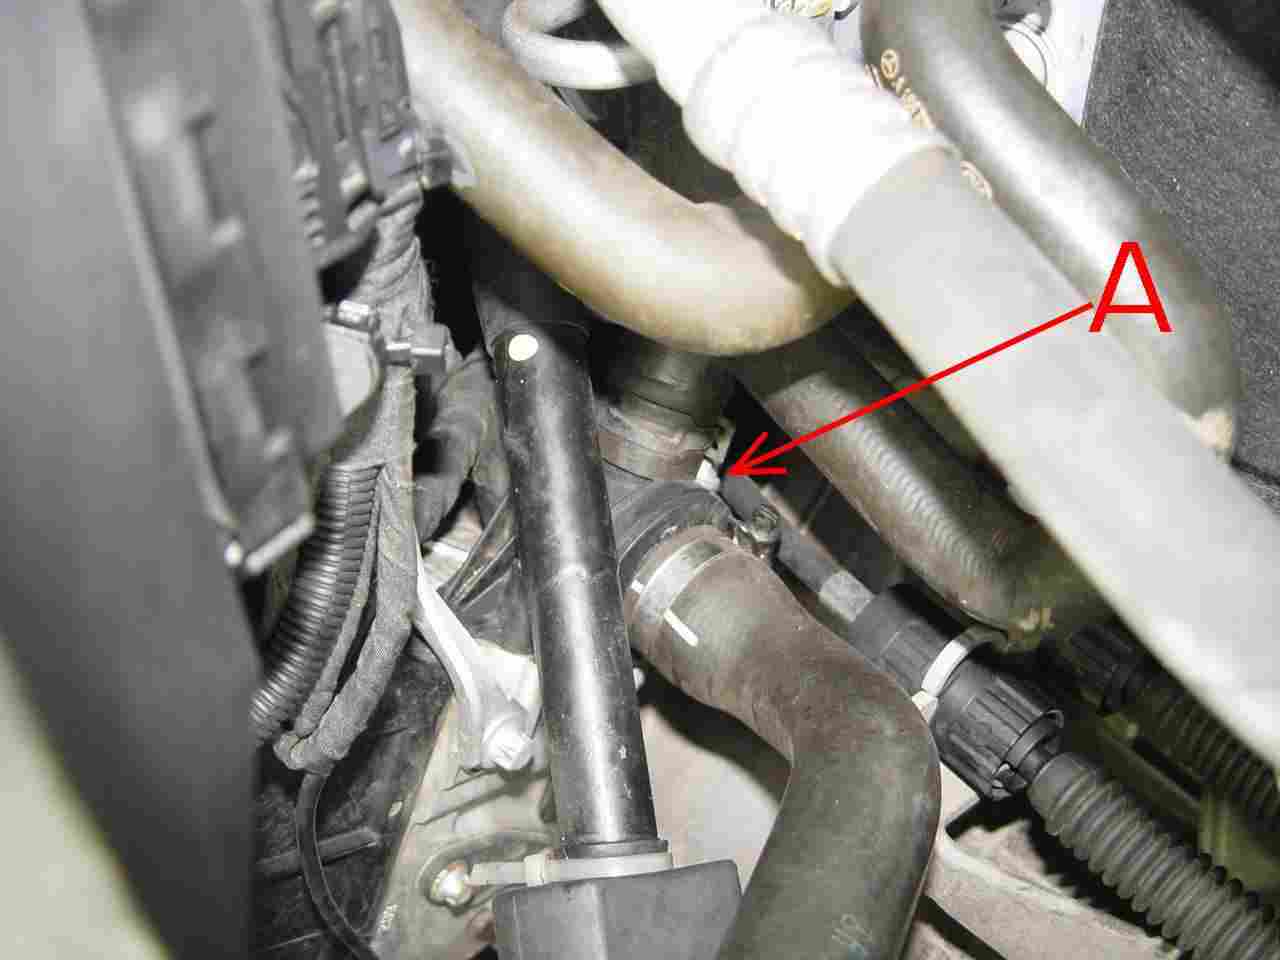
 Or to give it its correct title, a 'Suction-Type Fan control Module' This is a piggy-back control unit is controlled directly by the engine control unit which operates the cooling fan on the back of the radiator. The fan control unit receives a signal from the engine control unit telling it how fast to turn (it is operated in about 8-10 stages), and hence its cooling effect. The fan control unit is separate from the engine control unit in case of a component failure: it has a direct 12v feed from the battery and if it fails to receive any signal from the engine control unit the fan will run at full speed to ensure the engine does not overheat.