Do not confuse ACS Auto Clutch System with a fully automatic transmission both are fitted to the 'A' Class. Please Note Carbon Brushes for you ACS activator motor can now be ordered on line from :- www.engineering carbon products.com
Appreciation A large part of this page, procedures and photographs has been kindly provided by Eugene, a fellow owner in Australia.
I would like to thank him and all other owners sincerely who have contributed to this page, all of the contributions have added to our knowledge of the ACS Module and action to take when the 'F' Symbol appears. It is they who have made this page possible.
Please note, When Alan the owner of a W Reg A class with ACS transmission suffered the 'F' display along with the ESP/ABS light showing it was concluded that the problem must lie with the activator. However this was not the case and was finally traced to the ESP/ABS sender rings on the drive shafts,(wheel end) which had rusted away.
When these were replaced the 'F' display on the instrument cluster disappeared and the ESP/ABS light went out. The car was back to normal, in this case the owner had replaced the brushes in the electric motor of the activator which in the long term will save him further problems and has saved him £1000.00 which is what Mercedes will charge for a new activator complete. Diagnostics are all very well but they do not always point to the defective component. Bear in mind that with a car of this age only Mercedes-Benz or independent Mercedes Benz workshops can undertake diagnostics.
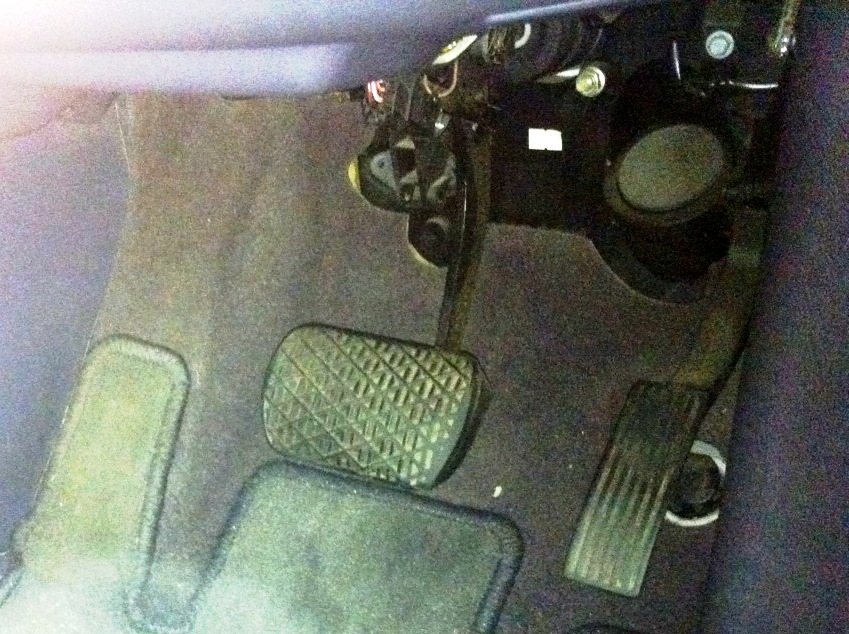
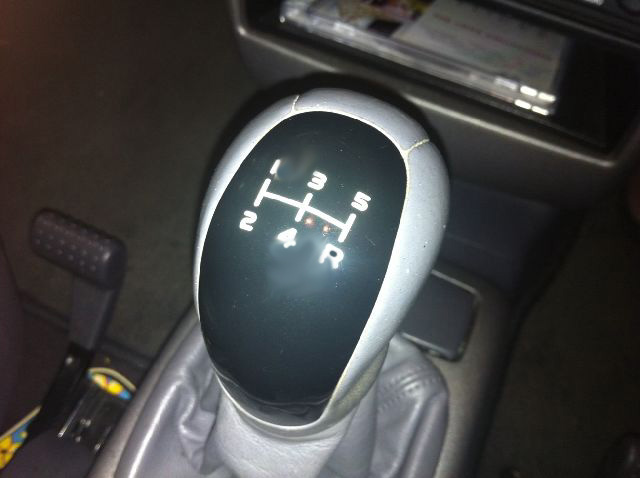
Many Mercedes-Benz 'A' Class owners are confused by the Fully Automatic and what is sometime called Semi Automatic gearbox versions, in neither case is there a clutch. However the so called semi automatic is rightfully an Auto Clutch System (ACS) Transmission which is identical to the manual clutch version, accept the dipping of the clutch is done by the ACS Module and not the driver.
It can be see in this photo that there is no clutch pedal and the gear lever is identical to the manual gear box version. This car is therefore fitted with the ACS system
In Eugene's words a fellow owner living in Australia:- The ACS (Auto Clutch-less version,) Drives just like a real manual. the Clutch engages/disengages when you move the gear lever from 1 to 2 or 4 to 3 etc. You have to select neutral(N)to start and take your foot off accelerator (de-accelerate) when you change gear.
That is of course the case unless your name is Richard who wanted to share his experience with us:-Hi Lofty,
First have to say you are a legend for providing your site, I cannot begin to explain how amazing it is to have found it.
Secondly I have had an "interesting" A Class experience recently, that may be of interest to your readers, but is bound to be very rare.
Just bought a W reg A140 in manual, and there was a great big 'F' on the
screen, made an agreement with the dealer that I could get it checked out by
MB and then come back to him if it was anything major. Took it to MB and
they told me that when this particular car came out the factory it was an
ACS! So someone had swapped out the pedal box, moved the reservoir and
fudged some piping to turn the auto-clutch into a manual one. Now according
to my brother (an MB mechanic for 24 years so far) this is actually a viable
and cheaper solution should the ACS fail one day. All parts are easily
swappable with the manual versions, you just have to deal with the 'F' on
your screen, that and an official MB garage wouldn't touch it with a barge
pole. I'm not necessarily recommending this as a solution, but if you're
presented with a bill to fix your ACS that's higher than the value of your
car then it is possible.
In my case, they have not done a great job of it, but it's salvageable so
going to keep the car, and thanks to your site I can fix all the other
niggles!
So be warned not everything is as it seems and if a conversion has been done on the car without the Instrument cluster being changed you will get an 'F' Display for the rest of the car's life and yet what you really have in an 'A' Class that started it's life as an ACS version but an owner somewhere along the line has converted it to a manual to save the cost of the New ACS module, and quite frankly can you blame them at £1000 + when spares are now available and the job can be Done DIY. We live and learn .
Thank you Richard, I am aware this is being done, hopefully with this page now completed 21.02.2011 fewer owners will have to resort to such methods to keep their older cars on the road.
So if you look at buying an 'A' Class and it has an 'F' Displayed and has a clutch beware it has been converted from an ACS version and may not be such a good buy as you think.
So on the ACS version when the ignition is turned on, the selected gear appears in the display on the instrument cluster, as well as the the gear lever being marked with gear positions As the various gears are selected the display changes clearly indicating the gear selected, and as can be seen in the above photo there is no clutch pedal. The Neutral selection is shown in the first photo,(Photos kindly provided by Eugene in Australia.)
In fact it is true to say that everything about the gear box fitted to an 'A' Class with ACS is the same including the vulnerable link on the gear selector linkage under the bonnet left hand side; so if you loose 4th 5th and Reverse gears on your ACS transmission check the link is in position before doing anything further. see for more details see mypage. 59
For those owners who have got an Auto clutch-less transmission (ACS),and do not have an owners handbook the following details are extracted for your use, Owners with hand books you will find details under Automatic clutch system.(in my manual page 197 ) owners handbook reference, MB part no 168 584 01 87/Order no 6515 0254 02:-
This e-mail is worth reading another e-mail,this time from Australia.
Hi Lofty,
I just sent a 10 quid (£10)donation via PayPal. I couldn't find a link on the homepage to email you so I'm hoping this gets through to you OK.
Many thanks for the A160 pages mate. It has so much info that just isn't available anywhere else. It's a huge service you're doing for other baby benz owners, and it's very appreciated.
My wife's A160 2001 manual is having a problem with gear selection, but it doesn't seem to be like the issues detailed on your page. There's no error code or warning light involved. What happens is that the car will be locked out of all gears except neutral and second pretty much every time the car turns left, and will unlock back to full range of gears access by turning right. There's an audible clunk both ways.
I took the car to a good independent Merc repairer who said he wasn't sure what the problem was, but it would mean taking the front end off the car, dropping the engine and gearbox out to investigate, and if it could be fixed the whole bill would come to at least $2,500 Aus, around £1,200, which is pretty much the value of the car in good condition. He recommended scrapping the car, which I would hate to do because it is so loved.
It has done 199,000 kilometers, and I'd love to squeeze out another few years of use for my wife.
Have you come across this in your travels?
Best of British mate,
Bruce
After many e-mails back and forth this was the outcome, do remember I need detailed information on your car type of geaarbox, etc to be able to refer you to the correct page or try and help you. Requests for help without a small donation may not receive a reply. Lofty
Feed back from Bruce
Hi Lofty,
I'm the most popular man in Australia, and you're the most popular man in the UK mate.
I thought I understood the gear selector linkage issue but until I had a better look at the photos on the site I really didn't get it. So, first I tried the Gear Selector Reset procedure, which confirmed that I could hear the ACS engaging.
Next I followed down the page and thought I'd better not skip over anything, and followed the link to the Gear Selector Linkage info, and had an ah-ha! moment when I saw the linkage hanging free. I went to the car with a torch and found the selector linkage hanging on one end.
The clunk I was hearing when turning left and right corners is the counter-weighted swing arm that the actuator pushes/pulls, swinging back and forth and banging on the body work or whatever, going alternately from lockout to select mode, hence the odd behavior of having to turn right to swing the arm back into select mode. If anyone ever has exactly this symptom, it's this, and if anyone is stuck somewhere away from home, chart a course back with lots of right turns in it!
My wife thinks I'm Gandalf. My son has alrady borrowed her car, to do 'user testing' in his words.
You've saved me losing a brilliant car to the wreckers. I'll be buying a couple of spare linkages, one for the car straight away and one for run.
A firm handshake and all the best mate,
Bruce in South Australia
Bruce donated £10 to the site and as a result received information that saved his car and his money and complimentary copy of my e-DVD, so he now has comprehensive information on his W168 'A' class with ACS clutch for the long time term, a wise move because when I 'pop off' and I'm now 78 the site will drop off the www. and the information will not be available, So order you copy NOW while I'm still able to supply it
Driving instructions
When the key is in position 2 in the ignition lock , the clutch is automatically engaged and disengaged when pulling away, changing gear and stopping . For this reason there is no need for a clutch pedal.
To avoid inadvertently depressing the service/foot brake , we recommend that you only use your right foot to operate the pedals (brake and accelerator.) The operation is identical to that of the manual transmission , except for the following points.. The gear currently selected is indicated in the instrument cluster . If the letter 'F' (Fault)appears in the the display b, there is a fault in the the automatic clutch control system .
The vehicle can then only be started with the brake pedal depressed .Have the automatic clutch system examined without delay .
Note when the ignition key is in position 0 or is removed , the transmission can only change gear when the service/foot brake is depressed.
Starting
It is only possible to start the car when the gear lever is in the neutral position, N will show on the instrument cluster (see photo right)
Pulling away Depress the service/foot brake and engage 1st or reverse gear release the parking/hand brake (Hand) and depress the accelerator pedal.
Note
If an attempt is made to pull away in 3rd, 4th, or 5th gear (A 160CDI also in 2nd gear) , this will be indicated by the the gear indicator flashing in the instrument cluster, e.g. 3 , please change down to the lowest gear possible.
If an attempt is made to pull away in 2nd gear when the clutch temperature is too high , or if the vehicle is held on a slope for longer than 9seconds in 1st gear or reverse gear , this will be indicated by the vehicle vibrating. Changing Gear.
Release the accelerator pedal (De-accelerate ) Engage the gear most suitable to the current driving situation.
Depress the accelerator (accelerate)
Note
If an attempt is made to shift down to too lower gear while driving at too higher speed for that gear , the car indicator will flash e.g. 2 in the instrument cluster.
Manoeuvring
when manoeuvring in a tight space , control the speed by carefully applying and releasing the service(foot ) brake. Do not depress the the accelerator pedal too suddenly or too far.
Parking With the vehicle stationary and engine running engage 1st gear.
Apply the the parking/hand brake (Hand) With the vehicle stationary, turn the key to position 0 in the ignition lock (fully anti-clockwise)
On steep slopes , turn the the front wheels towards the kerb-side, taking care not to damage the tyres. Reversing
Having come to a complete stop. Depress the service/foot brake, select reverse gear, R lightly press the accelerator pedal, at the same time releasing and controlling the speed of the vehicle by pressing the service/foot brake. On stopping apply the parking /hand brake, select neutral N release the service /foot brake pedal.
Stopping
A gear may remain engaged while stopping . Apply the service/foot brake or parking/hand brake (Hand) to prevent the vehicle from running forwards (or backwards on an uphill gradient). Note
In order to avoid damage, the vehicle must not be held on an uphill gradient/slope by controlled us of the throttle Important Note
When the vehicle is rolling (moving)the key must not be turned to position 1 or 0 in the ignition lock as this would cause the clutch to close , which would in time , cause the vehicle to rapidly de-accelerate due to the engine's braking torque.
When the engine is running and a gear is engaged, a signal will sound if no pedal is depressed and the drivers door is opened .
Do not leave the car parked with any gear selected, engine running , as it could roll away unexpectedly.
Symptoms of a failed clutch actuator
The symptoms started with the car suddenly reporting an error on the dash and the car refusing to go into gear. At first if I switched the car off for five mins and on again it usually fixed itself. However the fault quickly got worse to the point it wasn't driveable.
I found that a sharp bang to the passenger side wing (left hand front wing just above the wheel) cured the problem for a short period. Then I discovered this was where the ACS actuator was located. I decided to investigate further.
I would recommend having a go at this yourself if you're handy with the spanners as it is not that difficult and you'll save the £600 (£720 quoted in Sept 2008) which Mercedes dealers will charge to fix the problem ( now well over £1000.00).
Even if your actuator (ACS Module)is totally dead you can very easily fit a new unit yourself saving £120 + quoted in Sept 2008 for an hours labour.
I hope the content of this entire page will prompt owners into checking the ACS Module actuators electric motor which operates the push-rod that activates the piston of the hydraulic cylinder that activates the clutch system before committing very large sums of money to Mercedes-Benz who will want to fit a new ACS Module costing in excess of £1000.
Another contributor to this page wrote:-Quote
Hi Lofty
Thanks for a great and informative website. Your page with all the input from other owners of Semi Auto 'A' Class Mercedes saved me about £1000 + or having to trade in my wife's car just to fix a problem gear change.
I like so many other 'A' Class owners who's cars are over 10 years old have the same problem of not being able to get it into any gears and were facing having to pay large sums to have the problem fixed.
I was told by one garage, a Mercedes specialist that I would need a new Gear lever selector costing £900 included fitting costs and one Mercedes dealer wanted £99 just to look at it. Another garage said they would look at it but have never done it before.
Well me neither so I decided to take a look myself and was in the mind to get a second hand gearbox which seemed to be the cheaper option. But after stumbling across your site whilst trying to find tips on how to remove the gearbox, I decided to investigate the (ACS Module) Clutch Actuator and the changing of the brushes in the electric motor /power pack.
I want to give you this link below to put on your website of a firm who specialise in the manufacture of brushes. They have already done 3 or 4 prior to mine and now have registered the dimensions (6.2 mm x 6.2 mm ) in their system so repeat orders can be done over the phone and if you call before lunchtime you should get them the next day. Cost about £25 including p&p . They have two outlets one in Croydon
and one in the Midlands.
http://www.engineeringcarbonproducts.com/contact_us.php
Thanks again for all your info Colin
Brushes Availability I have spoken to the company and the following information is now available :-
Where to obtain the correct size brushes. Please go to this web site and order your brushes on on the internet from their web site, , this saves you money and saves on expensive phone calls. Please note a 5% discount is included when ordering in this way . Engineering Carbon Products.com The Order Reference isMB/ACS Brushes x 2 Costs are as per the web site and includes a 5% discount on this specific item.
Extra for Special next day delivery Monday to Friday excluding Bank Holidays
Please order direct from this Companies web site. Should you have to contact the company for any reason please call, Tel:+44 (0)208 688 1900/ +44 (0)208 686 7410 Fax:+44 (0)208 688 9913(44)
I would like to thank the Management of this Company for specifically meeting the needs of my readers. Thank you. lofty
Gear Selector Reset procedure. If you are having difficulty in obtaining gears then try this re-set procedure:-first Published by SVC global.
Sergio a very well informed and respected 'A' Class owner posted the following information on Mercedes Benz ACS (clutch-less)and manual gear boxes on his site.
Intrigued with the simplicity of this procedure, he personally did research and found that the suggested procedure does work and due to its importance felt it would be valuable to owners. As both he and I have a common aim and understanding I know he will not mind me copying it to this page.
But do remember to check the dumbbell link is present and correctly fitted first
This reset is a must, to those who suffer the old issue of difficulty in getting first and/or reverse gears
ACS Note .Ensure the car is on level standing wheels chocked as necessary
1. Pull the hand brake lever. ON
1a. Turn the ignition key to position two (2) ON, but Do not start the engine.
2. Press the brake pedal.
3. Engage the first gear.
4. Return to gear lever to neutral.
5. Release the brake pedal.
6. Press the brake.
7. Engage the Reverse gear.
8. Return to gear lever to Neutral.
9. Finally release de brake pedal.
10. Release the hand brake lever, Turn off and remove the ignition key.
11. Re-apply hand brake remove chocks
.You may well hear clicking noises coming from inside left front wing while undertaking this procedure, this is the (ACS Module)actuator working.
Even with the engine off, the ACS auto clutch system is energized but in this mode and following the script above, it will learn the correct position of the clutch drive plate.
So, if you let your children play with the gear lever, or even yourself move the gear lever just for fun and without pressing the brake pedal, in reality, you (or your children or anyone else) are misadjusting all the system.
Remember that this fully computerized electro-hydraulic clutch is very delicate and a complex system, not a toy and should be used only for driving.
Do not ever play with the gear lever and do not allow anyone else to do so.
Manual Gear Box,
Do the same as above but instead of pressing the brake pedal, press the clutch pedal.
Thank you Sergio for the procedure.
ACS transmission showing 'F' In the case of this owner again the 'F' showing on the display, his 'A' class has an ACS transmission, he tried the re-set procedure but alas it did not help. He therefore consulted a Mercedes-Benz specialist and reported back the following information:- I took the car to an independent Mercedes specialist and they plugged my car into their computer to read off the fault codes.
There were two recent faults on the system in relation to the ACS (Automatic Clutch System). I made sure they gave me a printout off the computer.
P0700-001 – General System Error (Possible Cause: Position Controller Error)
P1784 – Clutch Defective
They advised that the clutch definitely was defective (it had been slipping recently) however the guy said if it were his car he’d sell it as a new clutch + release bearing cost at least £1235 inc VAT
So that gives me a bit to think about. I’ve had this car for 8 years and it has been a truly wonderful car, but it is old so I’ll consider my options further.
Thanks again for your help and your excellent website. Interestingly enough after I left the car for a few hours it started working again and no longer displays 'F' on the dash, so I suspect that the P0700-001 General System Error was the one causing the problem and has cleared itself. I physically couldn’t put the car into any gear, so I suspect the P1784 Clutch Defective error was the one causing the car to display the 'F' in the display Continued
I really did like this car. however have decided to trade it in and I have now set my mind on a new car which I will be buying this week.
One thing of note however is that this morning the car displayed the F again (second time now it has done this). The symptoms were as follows;
a) Car displayed F
b) With engine stopped I was able to push the gear lever into every gear
c) With engine started (needed to hold my foot on the brakes to start engine) I was physically unable to put the car into any of the gears.
In effect this owner who loved his 'A' Class traded in in against a new car because two carbon brushes were worn out causing the ACS Module to fail. I'm aware of many cases like this with Mercedes offering little or no constructive advise as how to overcome the problem , short of spending thousands of pounds on a new ACS Module plus labour.
Thank goodness we now know better and owners are starting to get to grips with the problem, rather like we have with the petrol version ECU/MAFS repair See page 38 for details.
Other owners describe their actions following e-mails sent from this site, I tried at least 20 times to start the engine but it always said F. So with some scepticism I tried a hard whack on the left wing of the car where you indicated in the picture you e-mailed me The ACS Module was located and the car started first time without the 'F'.
I must admit I am incredibly surprised that worked, but I would agree that I likely need repair work done to the actuator and also the new clutch fitted as it is 10yrs old and definitely worn.
A point here about the clutch assembly. There are no difference between A class models fitted with manual or ACS gear selectors in respect of the clutch assembly or components, both wear out and in time do need replacing, this is normal and applies to all vehicles with clutch plate s. The only variation may be where a driver rides the clutch (Keeps their foot on the clutch pedal while driving) This habit can cause unnecessary wear to the clutch plate , where as the vehicle fitted with ACS Module will not suffer this problem and therefore maximum mileage should be obtained from the clutch plate assembly.
So it appears that if you car doesn't behave, a good beating does do some good!
Joking aside the jolt to the ACS Module actuator does obviously jar(Shock) the electric motor bringing the worn brushes back into contact with the armature of the motor, this action may work for a short while but the brushes will need replacing soon.
Oh and in passing the front wings are plastic so you are unlikely to dent them if you do have to resort to this unique method BUT do this on a freezing day and you are likely to shatter the wing!!
WARNING Before commencing any work which involves the disconnection of electrical components you are strongly advised to disconnect the battery
This not only avoids short circuits on the electrical systems but also avoids fault codes being stored in the memory of the ECU when the components are disconnected with the wiring live.
To avoid the Engine management light, in respect of the battery always follow the correct procedure for both Disconnection and Reconnection Now before going further! If you intend removing the battery for any reason:-
. have you got a radio? That requires a Radio Code to re-start it? If yes have you got the code? If no you will need to back the electrics up from another battery or 'Code Saver' before removing the fitted battery. This will preserve all electric settings including window and ESP/ABS.
*A code saver is a devise which is plugged into the cigarette lighter socket which maintains 12 volt power to the electrical circuits on the car thereby preserving the settings , Radio-Code, ESP/ABS & window settings. one such product. Even if you have a radio where the fascia lifts off you will need to remove & refit before the radio will work. . DO NOT disconnect the battery connections from the battery while the engine is running.
This could damage the electronic components (e.g. the alternator ) beyond repair
. Switch off all electrical consumers
. Loosen and remove the negative terminal first followed by the positive terminal. .NOTE when the battery is removed the ignition lock Cannot be turned Reconnecting the Battery
.This is the Mercedes-Benz Hand book directive. All electrical consumers must be switched OFF?
However It has been found that when fitting a New or fully charged battery, that the spike of power being supplied to and reaching the ECU can cause the engine management light to come on and stay on. So when you next start the car the light does not go out.
.To reduce the possibility of this happening on your car, turn the light switch to at least the side lights position before connecting the battery, remembering to turn the light switch to off when the battery has been reconnected. .If the Engine management light does come on following the reinstallation of the battery on pre-March 2001 'A' Class the only way you can get the light deleted is to go to a Mercedes-Benz workshop or an independent Mercedes-Benz in both cases they make a charge main dealers charging £50 + as the 'star' diagnostics equipment has to be used to delete the fault light. Should it occur on Petrol models made after March 2001 ,or Diesel 2004 fitted with EOBD specification cars then it can be deleted using OBD2 or EOBD hand help diagnostics tools.
Procedure for reconnection of the Battery
. Connect the positive terminal first followed by the negative,
. If you have not used a back a up battery or code saver the following operations will be required.
.Re-set the clock.
.Where appropriate enter the radio code.
.. Reset the side windows
.Reset the ESP system
Accessing (ACS Module) Hydraulic Actuator to (Replace Carbon Brushes in Electric Motor/power pack)
Step 1 - Loosen Passenger Side Wing
Loosen the left side wheel arch lining by removing 2 screws on to the right (top & bottom), 1 nut at about two 'o clock, 2 screws at the top and two screws on the left. This allows access to some of the bolts holding the wing on as well as to remove a screw holding the wing. To loosen the wing enough to allow access to the actuator/pump:-
. Unclip the triangle and then remove the two screws beneath it
· Next, open the bonnet and remove the two screws located inside
· On the right side of the wing, from below (where the wheel arch lining was loosened) there are two more screws to unbolt
· Finally, on the left side, again from below, locate the screw on the outer edge of the bumper and remove.
.The wing can now be moved away from the car as shown in the picture
Step 2 - Remove ACS unit from car:-
· The ACS unit is held in place by 1 Torx screw on the bottom right side. Remove the screw
· Now remove the hydraulic cylinder body by unscrewing the two Torx screws at the front of the unit (This is by far the easiest way as it avoids having to bleed the hydraulic system when returning the refurbished unit.
· Finally, remove the electrical harness by sliding the connector to the right this action releases the electrical contact pins from the sockets.
. The combined power pack and actuator can now be lifted clear from the car and taken to a workbench to work on.
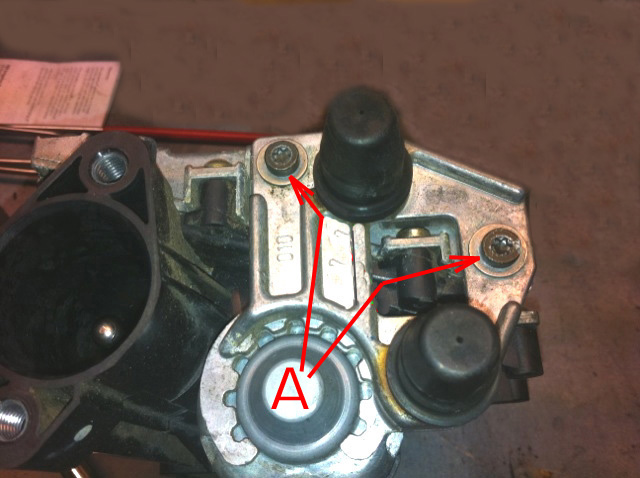
Step 3 - Open The Electric Motor · First remove the top holding plate by unscrewing the two Torx screws A .
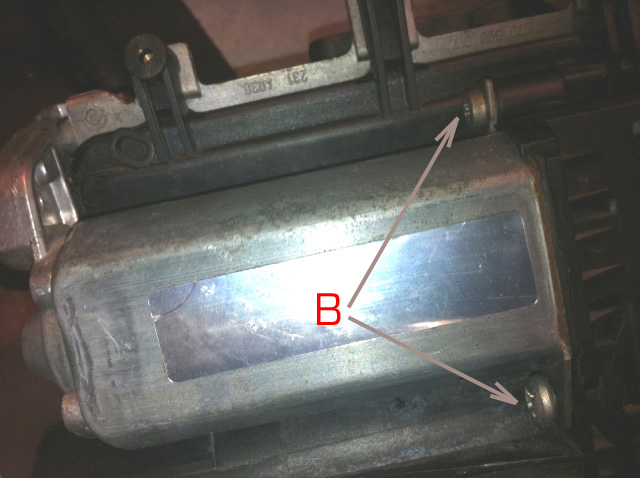
Now remove the electric motor cover by unscrewing the two Torx screws B at the bottom of the cover. .Carefully lift the cover off to expose the motor
Step 4 - Open The Electric Motor & repair/replace the Brushes
· When you look at the motor, there are two plastic lugs that cover the brushes. Use a small screwdriver to break them to expose the top of the brushes.
· This will give you access to the brass brush carrier/insert in the plastic brush holder assembly. . With a small screwdriver, prise open the two brass lugs on each brush holder and take care to retain the springs which will spring out! . You can remove the old carbon brushes.
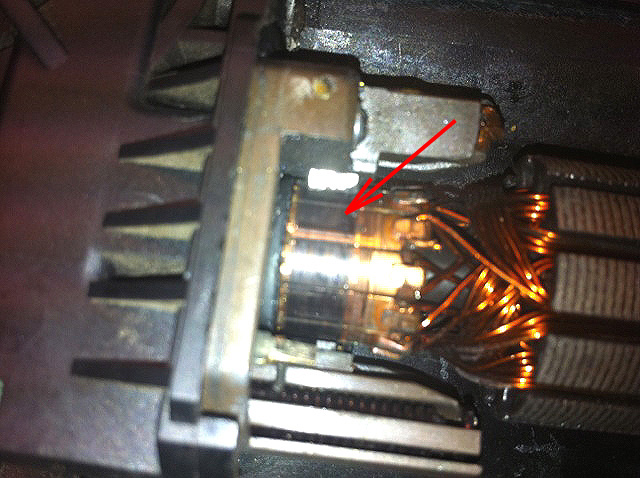
The photo shows the exposed armature. .Before fitting new brushes:-
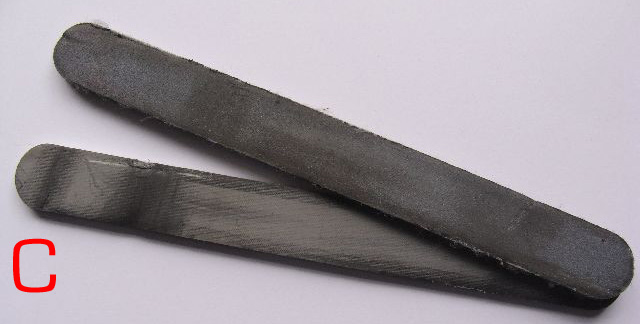
If the armature seen on the right is blackened by carbon, as shown in the photo this can be cleaned off using very fine 'wet & dry' (1000 grit)paper, do not use any form of polish or solvent as this may damage the armature.
. Hold the fine paper or nail polishing board C against the armature and slowly rotate the until the the brush surface is clean of the armature is clean. .Blow any dust created off the armature
New Brushes
Next you will need two new brushes. These can be obtained from an auto-electrical shops and need not be an exact fit to start with as long as they are bigger than 6.2 x 6.2 x 10mm you can easily file them to an exact size. leaving the copper contact side untouched (Eugene went to a local auto-electrician and he gave him a handful of old brushes)
Brushes Availability Where to obtain the correct size brushes. Should you wish to replace the brushes with ready made to size units www Engineering Carbon Products.com will readily provide them.
The Order Reference is MB/ACS Brushes x 2 so repeat orders can be done over the phone and if you call before lunch-time you should get them the next day. (UK Only) Cost £21.28 per pair (5/7/10) plus Vat. The company have offered a 5% discount off the current list price to my readers if 'ACLASSINFO' is quoted when ordering Carriage is F.O.C.(Free of Charge) in the UK by standard post.
Special next day delivery is £8.00 extra Monday to Friday excluding Bank Holidays
Telephone contact:- Tel:+44 (0)208 688 1900/ +44 (0)208 686 7410 if you phone Mention 'ACLASSINFO' for a 5% discount when ordering. Fax:+44 (0)208 688 9913(44) remember to quote 'ACLASSINFO' and the item code:-MB/ACS Brushes x 2.
I would like to thank the management of this Company for making this concession to my readers. Thank you. Thanks also to Colin for forwarding the company details
Replace with New brushes
·Removing the worn brushes:-
.Cut the copper 'tail' attached to the brush, where it joins the soldered joint with the hard wire which is to the side of each brush.
.Ensure the Spring is in place or retained in place.
.Replace with new brushes ensuring the copper wire on the new brush fits smoothly into the groove provided.
.Carefully bend the two brass tabs back as found taking care not to break them off.( this happened to Eugene, as an interim measure, he has drilled a small hole into the plastic holders from the side and inserted a small nail over the spring to hold it in place. he is still looking to find a thin enough piece of brass/copper plate to make up new brush holders, and will inform us of his progress with this in due course.
.· Once it is established that the brushes fit perfectly, re-solder the copper wires of the new brushes onto the hard wires. Ensure a good joint is made.
.Replace brushes back into plastic sleeve.
Rob of New Zealand has asked me to add the following :-
************************ (My steps added below) ***********************
I'm not sure whether it's implied to do this, but I'll mention it anyway:
At this point, I found it **MUCH** easier to pull the brass brush guides out
of the plastic housing entirely using long nose pliers.
* Close the lugs on the removed brass brush guide you opened to remove the
spring.
* Use a small screwdriver to slightly bend the 2 retaining clips back on the
brush guide (these hold the guide into the plastic housing)
* Load in the new spring and brush into the guide from the bottom ensuring
correct orientation.
* Push the whole brass brush guide with the spring and new brush back into
the plastic housing. This is much easier than trying to push the lugs down
to retain the spring under tension.
************************ (My steps added above) ***********************
Also, I believe the plastic lugs that are snapped off initially should be
glued back into place afterwards.
The reason is that should the lugs that were bent over initially to release
the spring make contact with the metal cover of the motor, this could cause a
short. I used a 5 min epoxy, and just put a very small amount at the bottom
where it was snapped.
When the metal motor cover is put back on after the clutch cable alignment
procedure has been done, ensure the glued plastic lugs slip inside the metal
cover. The plastic lugs will serve 2 purposes: 1. Protection against short circuit.
2. Provide additional support to the brass lugs that hold the spring, as the
plastic lugs will press against the metal motor housing.
Hope readers find my suggestions useful useful.
Rob. Thanks Rob, anything that helps readers solve their problems and enhances safety is welcome on my site
Renovate using existing brushes
These copper holders have a slot on the one side where the copper wire is attached to the brush this slides up and down as the brush is moved or wears. The failure of the electric motor that drives the actuator push-rod arises when the brush has worn away to the extent that the copper wire reaches the bottom of the slot thereby preventing the brush from remaining firmly in contact with the armature.
This problem can for some time produce an intermittent defect in that the 'F' will show some times but not others. Eventually the brush looses contact with the armature and electric motor will fail to drive the actuator push-rod
.To Extend the copper wire slot
.Using a suitable tool push the worn carbon brush as far as possible away from the armature thereby fully compressing the spring. . This may allow you to elongate the slot without removing the brushes from their guides. . If this is the case then take care not to damage the carbon brushes which are quite soft and brittle also chip very easily.
· Using a suitable tool such as a small hobby drill, fitted with a suitable grinding bit carefully grind away 1 to 1.5mm of brass material thus lengthening the slot, this will allow the brush to slide down further towards the armature, making better contact with the armature . when you have completed extending the slot release the brush ensuring it comes firmly into contact with the armature and that there is sufficient slot left for the brush to wear further without a repeat failure. Although there will be little movement of the copper wire ensure the edges of the newly ground copper are smooth so as not to damage the copper contact wire.
.Release the old brushes ensuring the brush moves freely. ( This should be considered as a temporary repair, although may last some considerable time,
dependent on the amount the vehicle is used.
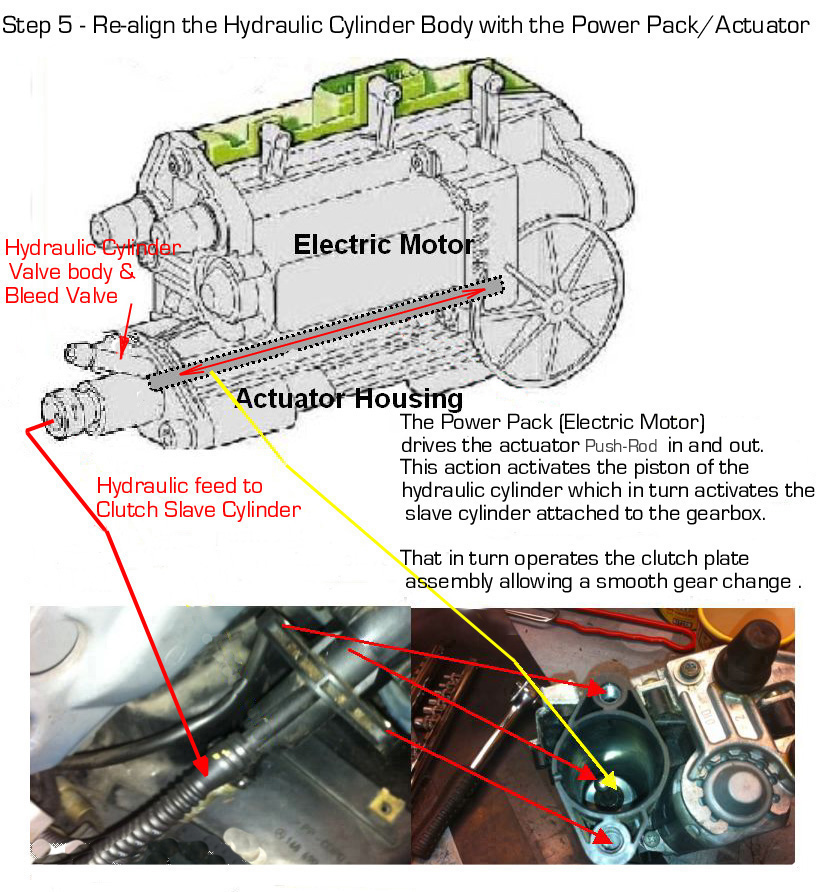
Step 5 - Re-align the hydraulic cylinder with the power pack/Electric Motor
NOTE:-Now before you re-assemble the motor cover and bracket plate. . Take the power pack/actuator to the car and offer it to the the hydraulic cylinder body.
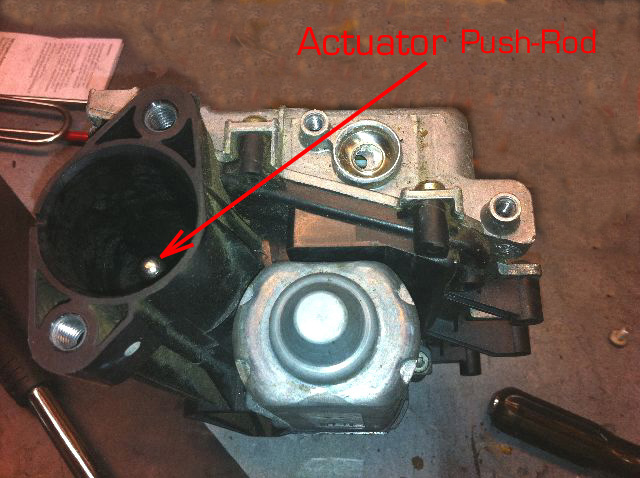
· Whilst working on this unit you will find that the electric motor tends to unwind .As can be seen, these is a gap between the hydraulic cylinder body and the power pack/actuator A .By turning the armature of the motor you will see that the hydraulic clutch actuator push-rod moves in or out.
. Carefully turn the armature of the motor by hand until the actuator push-rod has extended as far as it will go. (Out)
·Now turn the armature of the electric motor, by hand, until the power pack /actuator comes firmly into contact with the hydraulic cylinder portion of the unit B.
·Carefully remove . Ensure the armature is not moved . Now refit the electric motor cover and top bracket plate
.Take and refit the complete assembly to the inner wing, ensuring the two Torx screws that hold the power pack/actuator to the hydraulic cylinder body and the assembled unit to the inner wing are firmly tightened.
.Replace the electronic contact block to the top of the assembled unit. .. Remember this slides back towards the front of the car.
.Replace the wing and inner wing as found. .Test to ensure the system works correctly before tightening all other bolts and fixings. .Although the hydraulic fluid system will not have been touched, check the fluid level. .Remember that on the 'A' Class the one master cylinder and reservoir serves both the braking and clutch assembly.
It is hoped that the content on this page will save owners hundreds of ££££££
However if you feel that you yourself are unable to tackle this work then you are welcome to print off the page and speak to your local garage who may be willing to undertake the work for you .
The costs of course will be higher than doing the job DIY but you will still save hundreds on not having to purchase a new hydraulic actuator.
There will also be instances where the actuator is defective for other reasons. In such instances there is no reason why a good second hand part cannot be purchased and fitted.
Replacing the Clutch plate assembly on models fitted with ACS.
The procedure for changing the clutch plate assembly is the same as for the manual gearbox. see my page 59 However having fitted a new clutch plate assembly the clutch must be reset by following the procedure below :-
This reset is a must to those who suffer the old issue of difficulty in getting first and/or reverse gears
ACS
Note ensure the car is on level standing or chock wheels as necessary.
1. Pull the hand brake lever. On
1a. Turn the ignition key on but do not start the engine.
2. Press the brake pedal.
3. Engage the first gear, you may hear clicking inside the wing . This is the actuator push-rod moving within the ACS module.
4. Return to gear lever to neutral (*).
5. Release the brake pedal.
6. Press the brake.
7. Engage the rear gear (*)
8. Return to gear lever to neutral (*).
9. Finally release the brake pedal.
10. Release the hand brake lever, turn off and remove the ignition key.
11. Re-apply hand brake remove chocks
Note also the warning about allowing children and persons moving( playing with ) the gear stick about without the car being driven.
Bleeding the clutch after replacement. a. Using a well fitting ring spanner ensure the bleed nipple on the clutch slave cylinder located at the base of the gearbox (Bell Housing) can be opened and closed easily. b. Push fit, attach a short length of flexible tubing to the nipple the open end being placed into a suitable container, this is to retain surplus hydraulic Fluid while bleeding the Clutch and actuator. c. Ensure the ACS hydraulic fluid reservoir situated on the right of the engine bay is topped up with hydraulic fluid . d. With he add of a third party get he/she to engage and disengage the gears while you open and close the bleed valve . Each time the actuator is activated fluid will be pumped down the fixed pipeline to the clutch, with the bleed valve open, the air will escape via your flexible tube along with any fluid.
Close off the nipple between gear selections, this ensures air does not go back into the system, If the end of the flexible tube is submerged below a small amount of fluid in the container air cannot leak back into the system.
Dispose of surplus fluid responsibly following completion. DO NOT REUSE. e. Continue this procedure until no air bubbles are seen in the flexible tube, which should be positioned /held above the height of the bleed nipple.
f. Ensure the bleed valve is fully closed, follow the re-set procedure above , this will allow the clutch to re-set the the new clutch plate installed.
g. Fail to do this and the clutch will snatch when gears are engaged and possibly stall.
h. Top up the ACS fluid reservoir to at least the min mark, check level after use.
Thank you Eugene for the latest information on bleeding the system which can be tricky.
Having completed the bleeding , carry out the re-set procedure above, your car should now drive well.
Lofty
 Please note,
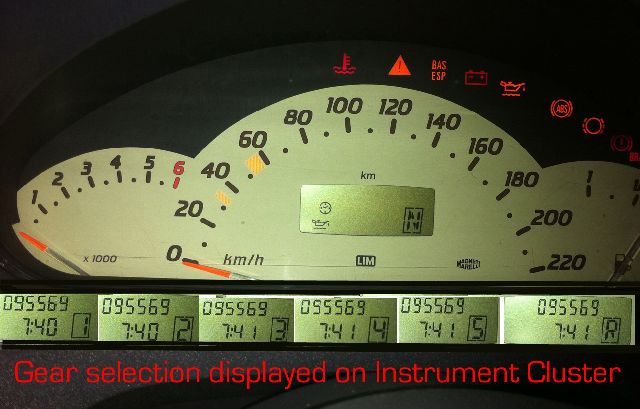 So on the ACS version when the ignition is turned on, the selected gear appears in the display on the instrument cluster, as well as the the gear lever being marked with gear positions
 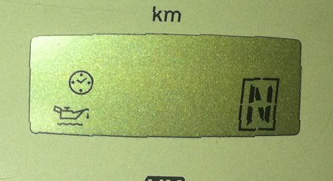 Starting
  Step 1 - Loosen Passenger Side Wing
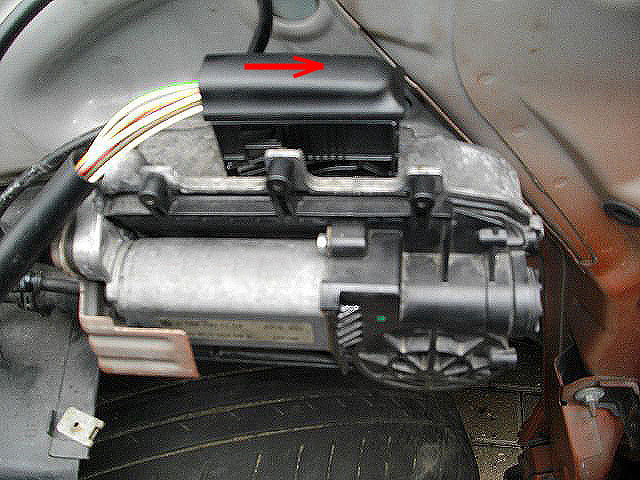
 . Hold the fine paper or nail polishing board C against the armature and slowly rotate the until the the brush surface is clean of the armature is clean. .Blow any dust created off the armature
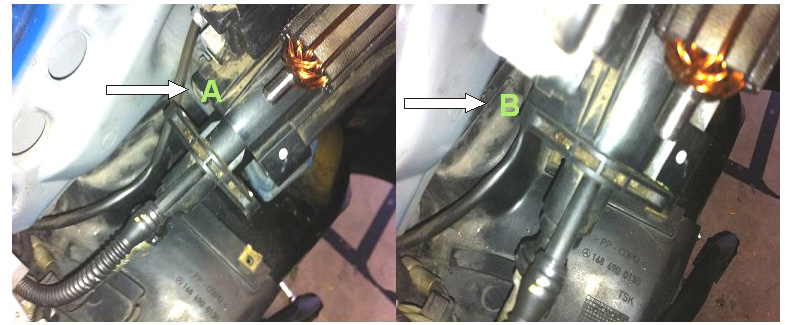
 . Carefully turn the armature of the motor by hand until the actuator push-rod has extended as far as it will go. (Out)