On several occasions over the last 10 years or so Owners have contacted me with a problem where the indicator switch fails to produce the correct signal, although I have mailed owners I have never been able to add the information due to lack of feed back . However Tony has just suffered the problem and has provided the answer I will post his mail here:-
The issue is when you put the indicator stalk in the LEFT position and the dash indicates RIGHT as well as the actual right hand indicators front and rear of the car. There is no problem when indicating right. The issue occurs 90% of the time (in other words I cannot be trusted!) I initially tried replacing the indicator stalk as this seemed to be an obvious place for the problem to be occurring (with no luck). I have since replaced the instrument cluster with immediate success! So the fault does originate from the instrument cluster. All references to this that I have found state that it is not repairable and a replacement cluster is the only remedy. Thank you Tony I'm sure this will help owners with this problem which I should add is rare.
Having fitted a replacement instrument cluster you may have problems with the fuel gauge, I feel sure that this can be corrected using MB 'Star' diagnostics if a second hand instrument cluster has been used the mileage can also be adjusted, remember to take your old instrument cluster and last MOT certificate for mileage verification with you.
A good independent MB garage should be able to do this for you. However do try to correct the fault by disconnecting the battery first, do remember to turn your lighting switch to at least side lights before re-connecting and re-set your ESP/ABS and electric windows/
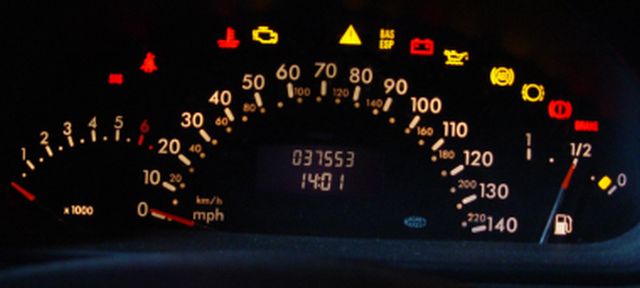
Before you consider pulling your dash apart because you haven't got the various lights displayed here, be aware the pre-face lift and face-lift models as with the W169 A Class will have different light displays.
It is also worth noting, :- One owner recently contacted me because only two of the lights on his instrument cluster illuminated when he turned on the ignition, although the car still started and ran OK.
He took the car to a non MB garage who couldn't help and so booked it into an MB garage for a diagnostics test.
In the meanwhile I gave him some pointers hoping this would help him with the problem. While he was waiting for my replies he decided to disconnect the battery which has been known to cure a number of problems on owners cars in the past (there is only a need to disconnect the negative terminal.)
When he reconnected the battery some minutes later every thing lit up as normal and he was to say the least a happy owner.
He was also able to cancel the appointment with MB workshops which would have set him back £50.00 at the very least. So please remember it is worth while disconnecting you battery if you have an electrical glitch like this.
I would disconnect and leave the battery disconnected for several minutes.
A more recent mail from South Africa, fuel gauge jumping about imposable to know how much fuel was in the car, battery disconnected again the fault was corrected.
When you do reconnect put your lights On, before connecting the battery, thereby reducing the serge of power to the ECU, and remember to re-set your windows and ESP/ABS by turning the steering wheel fully left then fully right, this is best done while the car is slowly moving, the warning light will go out. Repeat the procedure if necessary.
Back to differences in the models, there is for instance no engine management light on the display when switching on the ignition on a pre-face lift a class. also the SRS light only stays on for seconds so make sure you look for it if checking.
Also before we can even consider replacing bulbs in the dash display we have to consider what year 'A' Class we are driving.
Gaining access to the bulbs in the instrument cluster display can vary considerably from pre-face to face lift A168 from the 1/3/2001
Also if you are removing the display because the display is dimly lit then DO REMEMBER that the display lighting can be adjusted by using the + (plus or - Minus buttons on the right had side of the display. Check this feature before going further, it may solve your problems.
Also remember the bulbs light for different features on the car : In position 2 before the engine is started most will be illuminated others will only light when the vehicle lighting is on.
For Pre Face-Lift 28/02/2001 see link bottom of page.
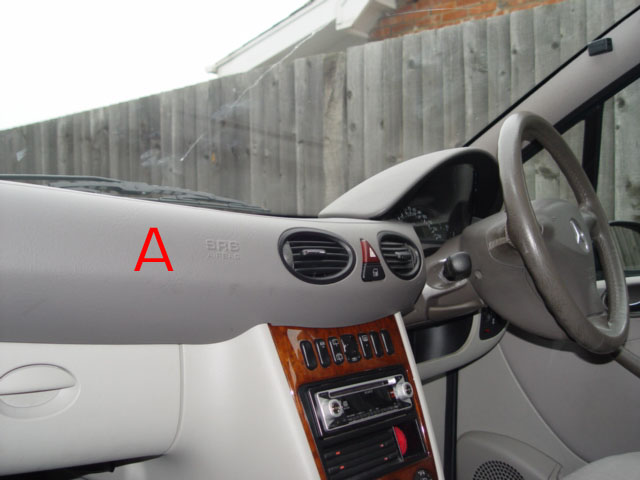
When looking at the dash one of two displays will confront you, look at the facia mouldings A if it is continuous from one side of the car to the other then we are dealing with a face lift model. If that same moulding is split just to the left of the steering wheel, on right hand drive cars we are dealing with pre face lift
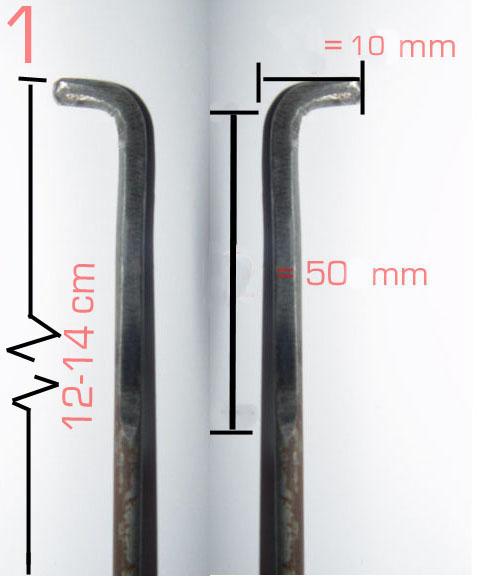
* The cowling that covers the instrument cluster behind the steering wheel is reasonably easy to remove, although two tools are required, I made these up from and old pegboard display hooks and they worked well. Obviously better than the proper MB tools as one of the securing clips had already been broken and the car has only ever been serviced by Mercedes-Benz.(MB)
 *2
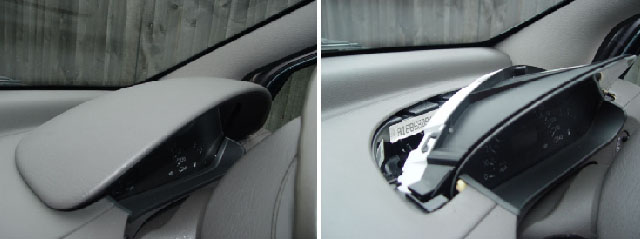
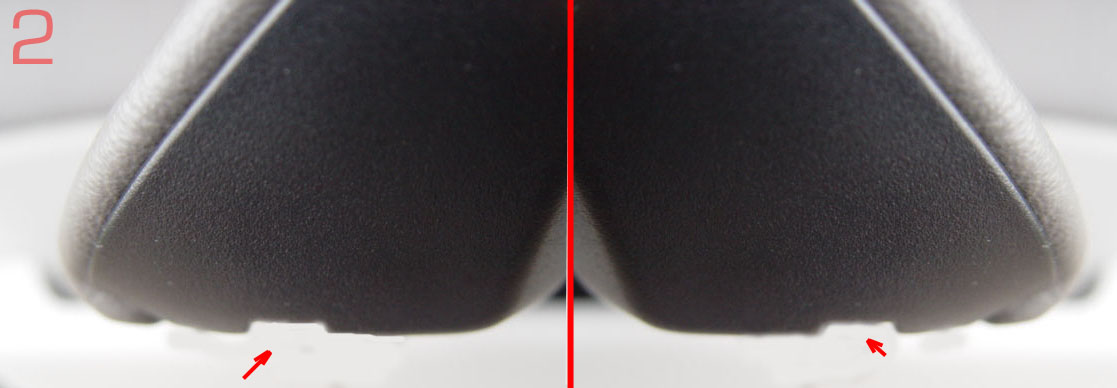
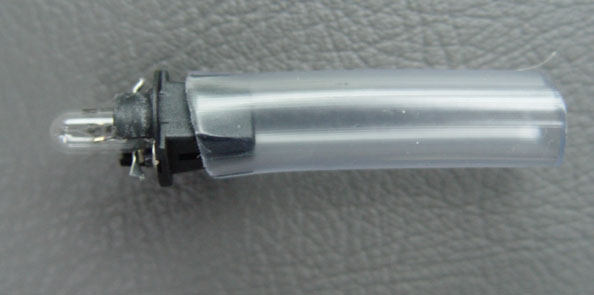
These two photo's show the dome the right way up as when fitted.
As you look at the arch of the cowling, although it is impossible to see them there are two slots about 1/8" deep.
*2
These two photo's show the dome the right way up as when fitted.
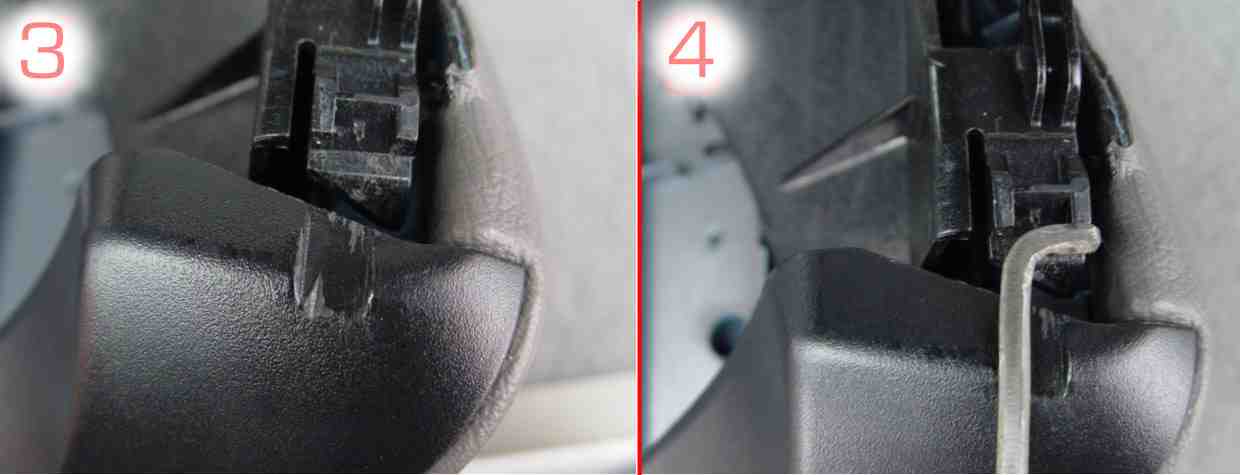
As you look at the arch of the cowling, although it is impossible to see them there are two slots about 1/8" deep.* Slide the two hooked tools with the tip pointing towards the outside edge of the dome in each case. as shown in photo 4.
 *4
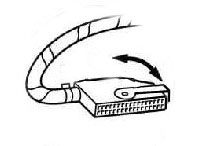
Please Note in these two photo's the cowl (Dome) is shown upside down. Turn the tools bringing the tip of the tool into contact with the securing clip, to release the clip apply slight pressure thus lifting the clip, and pull the cowling towards the steering wheel.
*4
Please Note in these two photo's the cowl (Dome) is shown upside down. Turn the tools bringing the tip of the tool into contact with the securing clip, to release the clip apply slight pressure thus lifting the clip, and pull the cowling towards the steering wheel.*Sprung clip 3 If it does not release apply slightly more pressure when turning the tools, too much pressure may damage the clips.
* I found using an assistant allowed me to apply pressure and for the assistant to gently pull on the cowling.
* the cowling can be completely removed, this now exposes the instrument cluster which can also be removed if required, after removing the securing screw (if fitted)
* If using MB tools then pull the tools towards you to release the cowling.
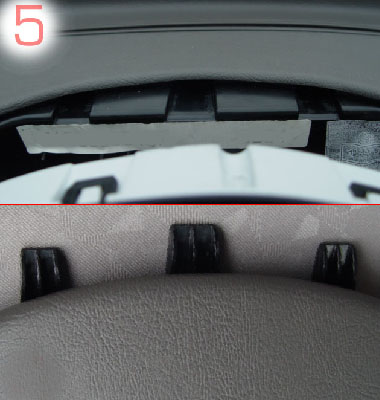
*5 When replacing the instrument cluster ensure it is correctly situated and re-secured as found.
When replacing the contact ribbon (Multi pin plug), ensure it is firmly housed,
when replacing the Cowling ensure you engage the three toes into the slots provided,
* Slide the cowling back into position and press firmly, the two clips will be heard to re-engage holding the cowling firmly in position.
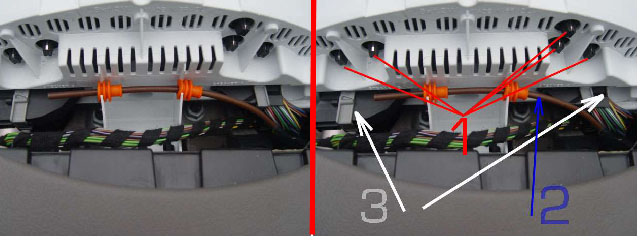
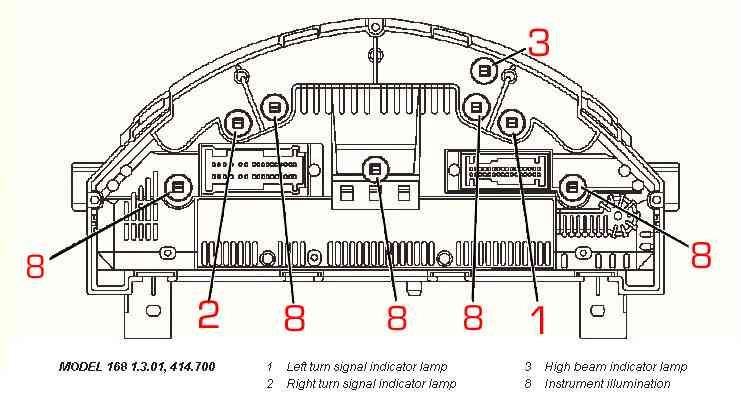
Having removed the cowling, the instrument cluster becomes visible. *1 Shows the bulb positions 8 x 12v 1.2watt although there are only 5 shown.
The location of these is such that it is almost impossible to remove them without using some form of tool. I found that a piece of 10mm bore polythene tube pushed onto the bulb holder allowed me to turn and remove the bulbs without any problem, and without disturbing the Instrument cluster further.
I have not had the need to purchase bulbs and so am unsure of cost or MB part number.
However it should be stocked by most car accessory shops 12volt 1.2 watt dash bulb.
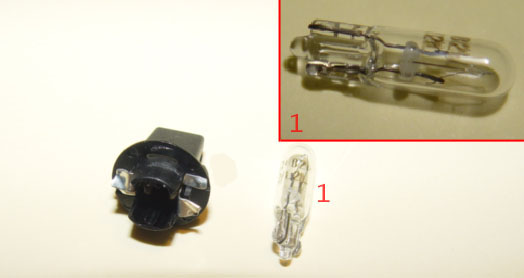
The bulb will not come with the black holder, pull the glass bulb from the holder and replace with the New bulb.
HalfordsStock the 12V 1.2 W bulb their number stock 286. Price £1.79 each.
Bosch also do a bulb complete with holder their stock number 509T Note (Some bulbs are not removable from holder) ALL 'A' Class dash bulbs remove. * 2 Temperature sensor.
I have no information on this item, it is the probe of the temperature sensor.
*3 Multi pin connectors to the instrument cluster. Before attempting to release either of the multi- pin connectors from the instrument cluster module, the battery MUST be disconnected.(see page 35 for procedures on re-setting windows and ESP/ABS)
This is because removing them trips the anti tamper circuit which causes the alarm to sound
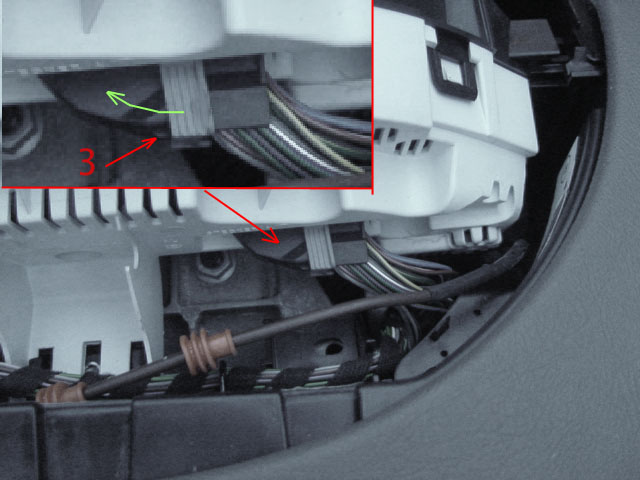 To release the connector from the instrument cluster module press the small black pip 3
in towards the connector, then slide the clamp round & away from the multi plug.
To release the connector from the instrument cluster module press the small black pip 3
in towards the connector, then slide the clamp round & away from the multi plug.To remove the multi plugs from the module I suspect that the instrument cluster module will need to be released from the dash as there is insufficient room to pull & remove the plugs
Should there be a need to remove the complete instrument cluster, the multi pin connectors need to be removed as well as the temperature sensor probe being moved out of the way.
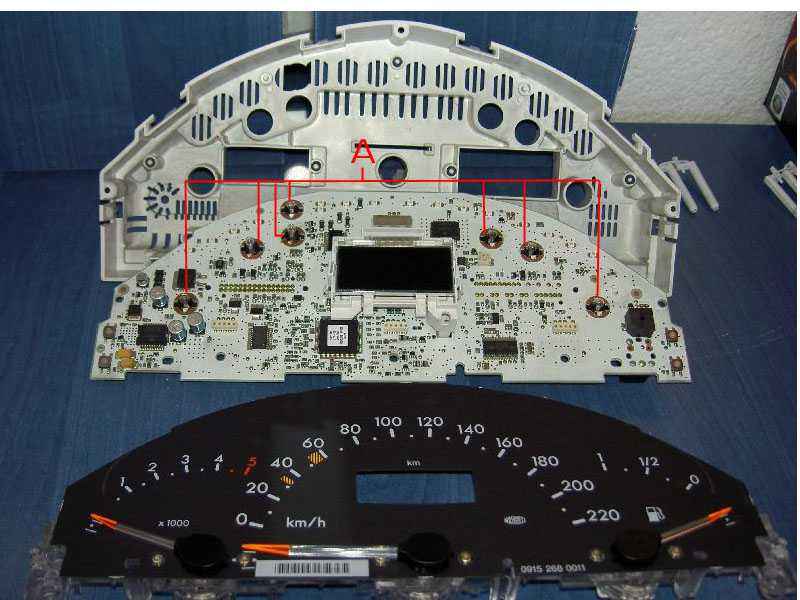 When Savcic , a fellow owner had problems he was told by MB that he needed a new instrument cluster , he knew he had some bulbs gone ( bulb locations indicated by
A
Which are removed from the rear with the instrument cluster fully assembled) and so removed the cluster , cleaned the terminals and replaced the defective bulbs, his original problem still exists but this does not affect the running of the car.
When Savcic , a fellow owner had problems he was told by MB that he needed a new instrument cluster , he knew he had some bulbs gone ( bulb locations indicated by
A
Which are removed from the rear with the instrument cluster fully assembled) and so removed the cluster , cleaned the terminals and replaced the defective bulbs, his original problem still exists but this does not affect the running of the car.He was also told that he needed a new foil in the passenger seat as his SRS light remained on, he replaced this and deleted the problem, so diagnostic tests aren't always right and repairs can be carried out although it appears that MB fitters just replace the part irrespective of cost!
However stripping components to this degree unless faulty should be avoided , as can be seen the unit is made up of hundreds of micro components and damage can be caused just by the removal of the cover so take great care, Savcic had nothing to loose as he was told it need replacing before he started. As the problems of the various lights flashing when he turns off the ignition does not affect the running of the car he can do this as and when finances allow.
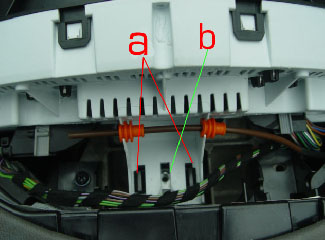
The cluster is held in with one screw b and two black clips a
The screw that secures the cluster is not installed on my car, although there is provision for it.
NOTE A number of these photographs were taken through the windscreen, before replacing the cowling check to ensure all components have been replaced in their rightful place.
Re-assemble in reverse order.
Pre Face Lift 28/02/2001 Removing/installing Bulbs Instrument cluster
Next.
Back to Index,
Purchase DVD.
Please Make a Donation.