If you are intending to work on the windscreen wiper equipment on your car please refer to page 42. Do not use this procedure.
For owners who are still having their car serviced by MB this cabin/pollen filter should be changed on the 'B' Service and on my invoice was listed as a Dust filter.
part no 168 830 08 18 and cost £36.39 inclusive of VAT. but excluding fitting unless included as part of a 'B' Service.
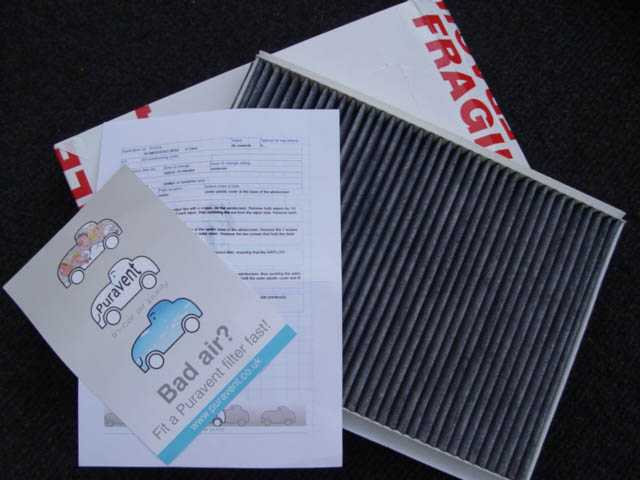
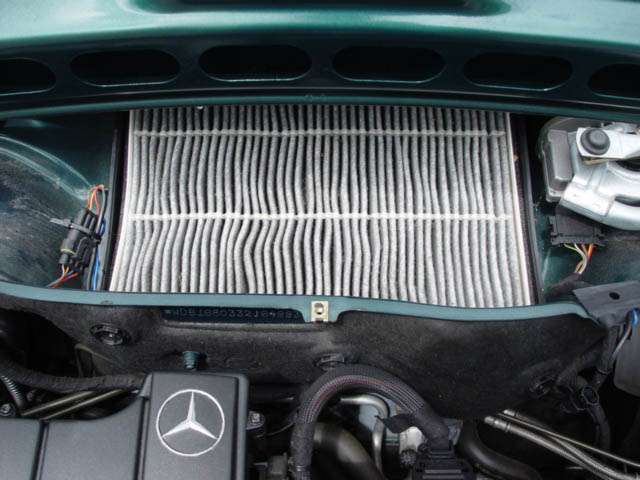
The pollen filter is located behind the dash and central to the car, and is fitted to all 'A' Class models irrespective of whether the car is fitted with Air Conditioning or not. It is accessed for replacement purposes from the engine bay. The recommended period for replacement is 20000 miles + or - much the same sort of mileage as the Air conditioning service/re-gassing. Arrange for both to be done at approximately the same time and I suspect you would think you were in a different car! The activated carbon pollen filter in the picture was supplied by Puravent and orders can be placed on line. Simply go to www.puravent.co.uk, place your order and the filter will be with you in just a few days. The price I paid in August 04 with a 10% discount voucher, details available from the baby-benz.com Mercedes 'A' Class owners site was £29.43, which included the VAT. Postage & Packing.
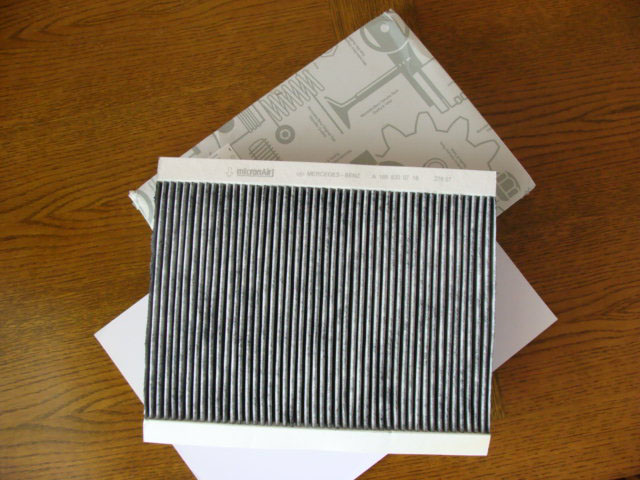
Activated pollen filters are of course available from MB parts however in this instance they are several pounds more than the above filter, differences? It would be hard to tell them apart when fitted and both do a good job.
I have also discovered that there are two Mercedes Benz part numbers for the Activated carbon Filter for the 'A' Class, albeit they may be for different years of 'A' Class .
What is interesting is that one is much better quality than the other.
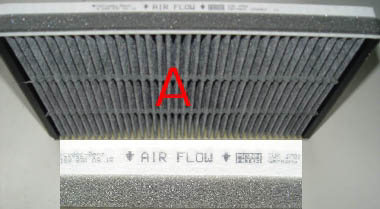 Filter A part numbers are:-A160 830 08 18 has a foam seal all the way round the outer edge of the filter to form a seal when fitted.
 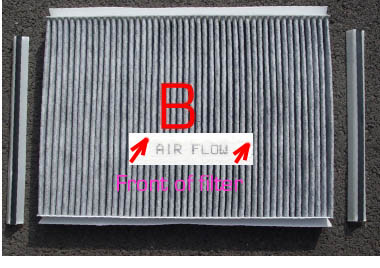 Filter B A160 830 07 18 has a removable plastic strip attached to which is a rubber flexible strip which forms a seal on the sides and a flap attached to the top and bottom edges that hinge to form a seal one those two edges, these are held in position when fitted by small lugs inside the filter housing/frame. (see detail below)
 This in my opinion is a far better quality filter and the seal is far better also .
Both filters appear to be the same size and therefore can be interchanged, in fact over the years I have now used both.
The spare filter I currently have as a spare is the 08 with the foam seal and the one fitted is the 07, I see no reason therefore why the detachable strips fitted to the one now in my car should not be switched from one filter to another when replacing this filter, if necessary they could be cleaned as the are constructed of plastic and rubber.
Discussion with Mercedes Benz of Chichester in west Sussex My branch, have confirmed that the A160 830 07 18 is a modified filter (4/8/08) so if your car is being serviced or you are purchasing a activated carbon filter from MB then insist on the latest filter, it is a better fit in the car.
Top tip. E.Bay sellers in the Mercedes 'A' Class section sell these genuine MB parts at considerably below the retail price. MB part Number A168 830 07 18 , and 07 08 respectively. (These units will not fit the new 'A' Class W169)
I like to think I keep my own 'A' Class fully serviced and yet it appears even I can slip up!
Of late I have been wondering about getting my air conditioning serviced/re-gassed as it is performance appeared to be below par during the hot spell.
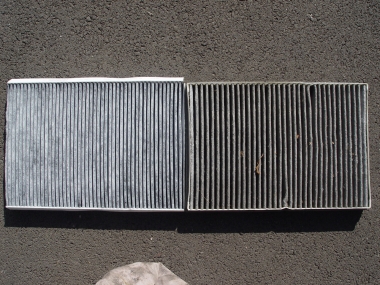
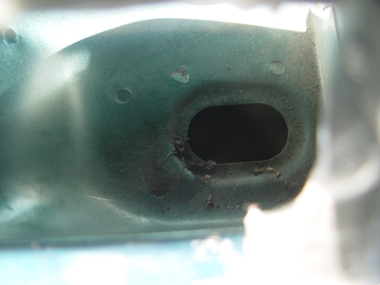
Having just returned from Scotland I thought I would treat the car to a service and to my horror I found a very dirty 'Activated carbon filter' See photo.
Having fitted the replacement unit I'm astounded at what a difference it has made. No need for re-gassing the Air con is fully back to normal. So lesson learned if your air con is causing you some concern, try changing the Activated carbon filter.
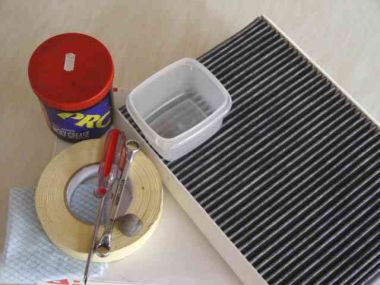
Fitting the filter really is quite easy although you need to think about what you are doing, and take your time. The tools required are of the absolute minimum, namely one ring spanner, one Phillips or Posi-drive screwdriver, a small lump of blue tack or similar, a small amount of general purpose grease, either a glass marking crayon or a small amount of masking tape any width. My preference of maker was the tape, a cloth to wipe your hands on and a container in which to place your 9 screws. I used a 1/2" AF ring spanner, check your tools box for a good fitting spanner, a 15mm preferably a ring spanner should do the job.
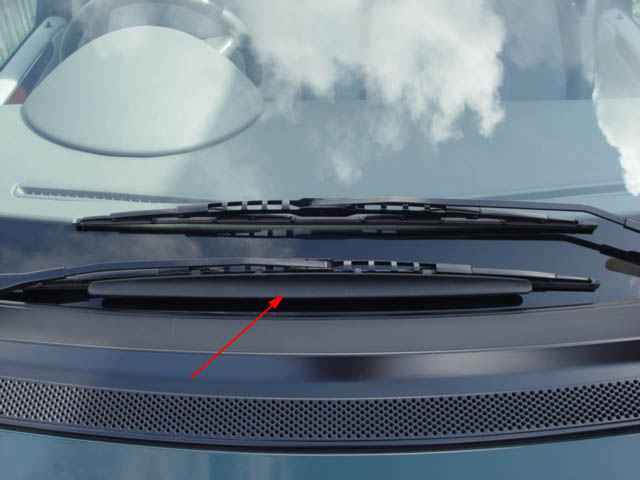
Before we start have a good look at the layout of the wiper arms the location of the air spoiler which is located on the lower blade and also the rubber screen seal and the way it locates on the front upper grill.
 Now satisfied that I know where & how the various items are fitted I can start the filter change, It will be noted that you cannot lift the wiper arm spindle covers 1 with the front metal grill in position.
During this procedure we are going to have to open and close the bonnet several times, in all cases only close it onto the safety catch.
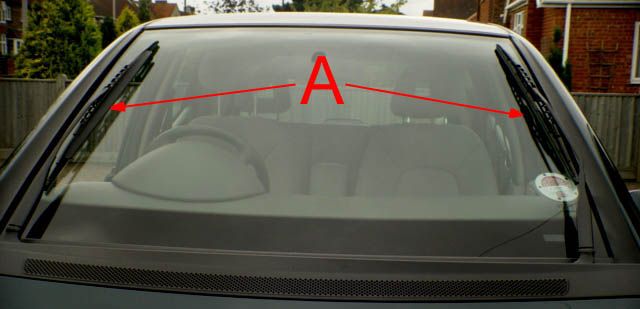
Our first job is to establish the positioning of the blades so that they can be replaced in precisely the same position, in the instance of changing the Activated carbon Filter we can position the blades at our convenience I am therefore going to mark them when they are vertical, it is must easier to mark them and reposition them on completion. A As they are easiest worked on from the side of the car and can sometimes be difficult to remove, I am going to position them towards the outside edge of the windscreen. Note that we Cannot do this when working on the wiper mechanism
Should you wish to do the same simply:-
1 TURN THE WIPERS TO INTERMITTENT WIPE, the first position on the switch,
2 TURN ON the ignition.
3 TURN OFF, the ignition when the blades reach the position you require, It may take a few of sweeps of the blades before you achieve the position you require but take your time it is vital they they are re-located on the spline from which they were removed,
4 As a precaution against accidents and to prevent the ignition being switched on while you are working in front of the car & in close proximity to the wiper arm mechanism. REMOVE THE IGNITION KEYS. Prevention is always the best cure!
5 Now raise the blades a few inches off the screen and re-lower them back onto the screen, this action will relieve any tension the blades are under due to the wiping action
6 Now accurately mark the position of both blades. I have used masking tape but a glass marking crayon could also be used. But being wax may be hard to remove.
Note that the N/S blade the one with the wind spoiler re-locates beneath the other blade when parked/stationary.
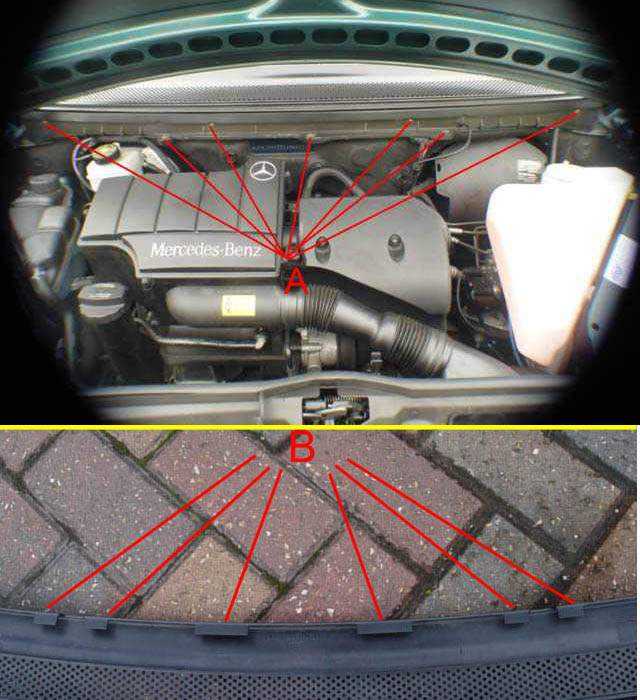
Our next job is to locate the seven screws that secure the metal grill and filter cover A Remove all seven screws and put a side for safe keeping.
Lower the bonnet and ease the metal grill up towards the top of the screen then and away effectively releasing the retaining clips B on the back of the grill.
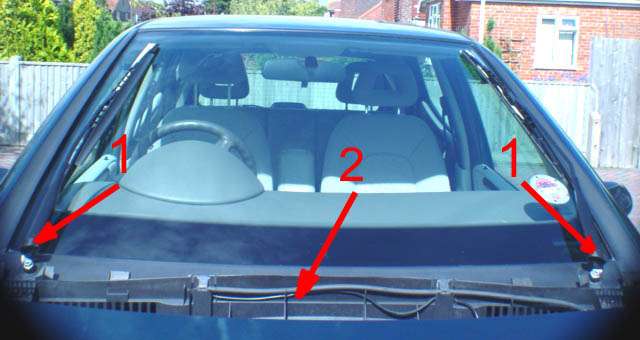
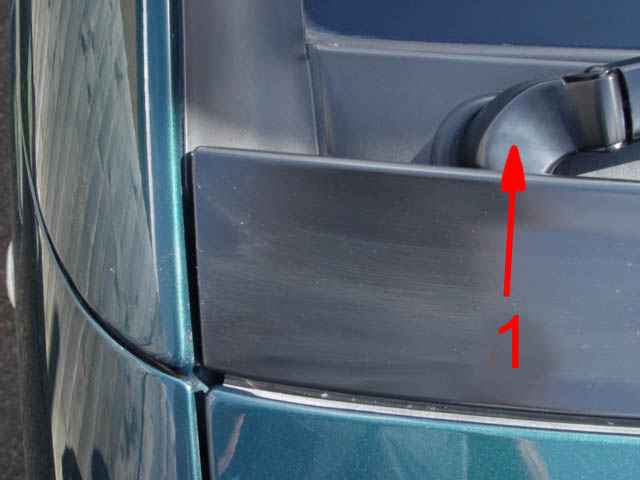
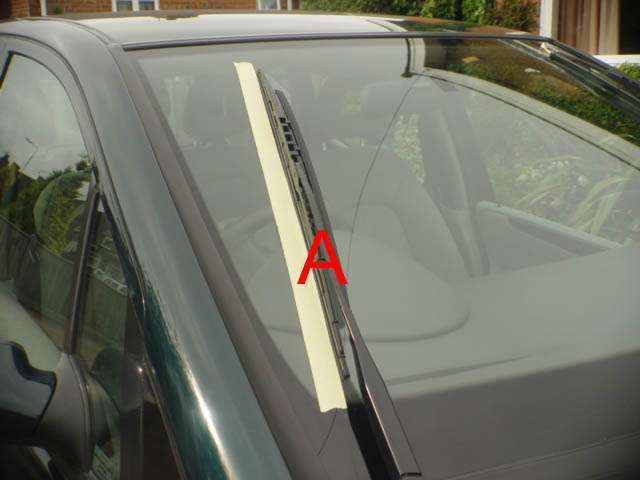
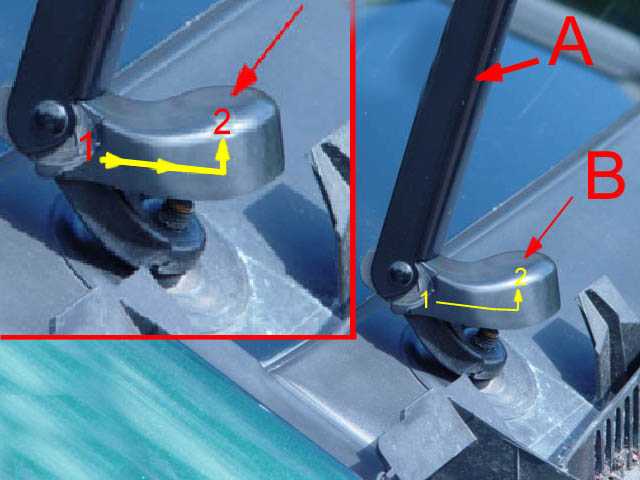
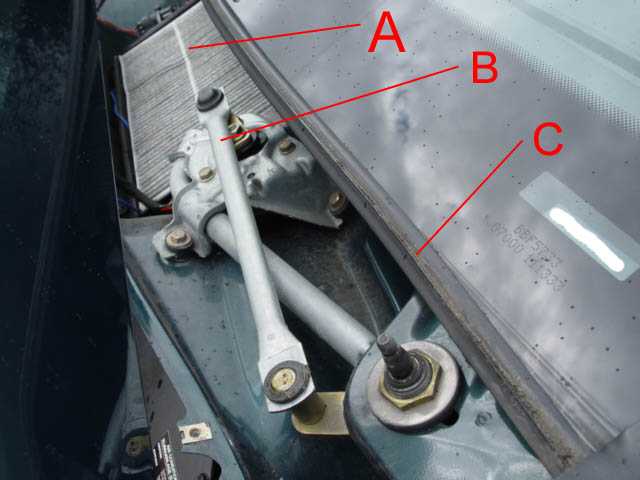
Firstly we need to raise the drive spindle covers, 1 this I found was best done using two fingers placed close to the shoulders, located by the spindle 1 ease the cover away from the arm at the same time easing up,
its only made of plastic so take care not to damage it!
Note The cover only flips up it does not totally remove.
 .
.Using the 1/2"AF /15mm Spanner slacken the wiper arm retaining nuts, anti clockwise to undo, Note that these nuts are NOT TIGHT! and when being replaced must not be over tightened, or damage will be caused to the spindle drive mechanism. In this photo I have already removed the nut. note also the wiper arms are 90% to the screen, take care the springs are quite strong. This will enable us to take hold of the arm, very close to the screen and to then gently but firmly rock/tilt the arm from side to side, this will loosen the arm on the tapered spindle & spline and allow the arm and blade to be removed, if there is no movement initially, persist they do come off! Repeat the procedure with the second arm.
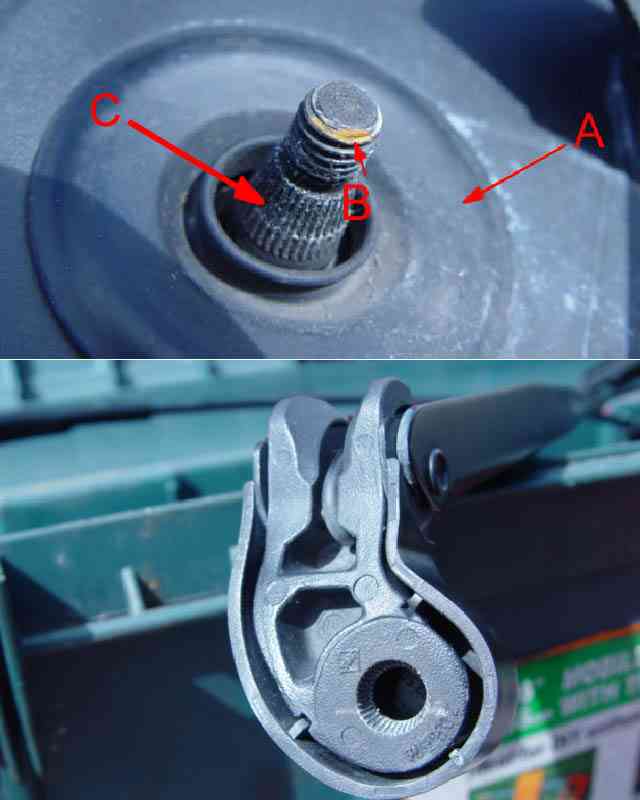
The tapered spindle from which the arm has been removed can now be seen, the grooves within the aluminium body can also be seen, it is these that engage on C the spline's to effect the drive of the arms, and on which the arms are engaged to re-align them on the spindle. Surrounding the spindle is a rubber grommet, A Do not be concerned if this is dislodged as it easily replaced, and can be done after you have replaced the filter and the plastic filter B A small amount of rust forming, which can be avoided by applying a smear of grease.
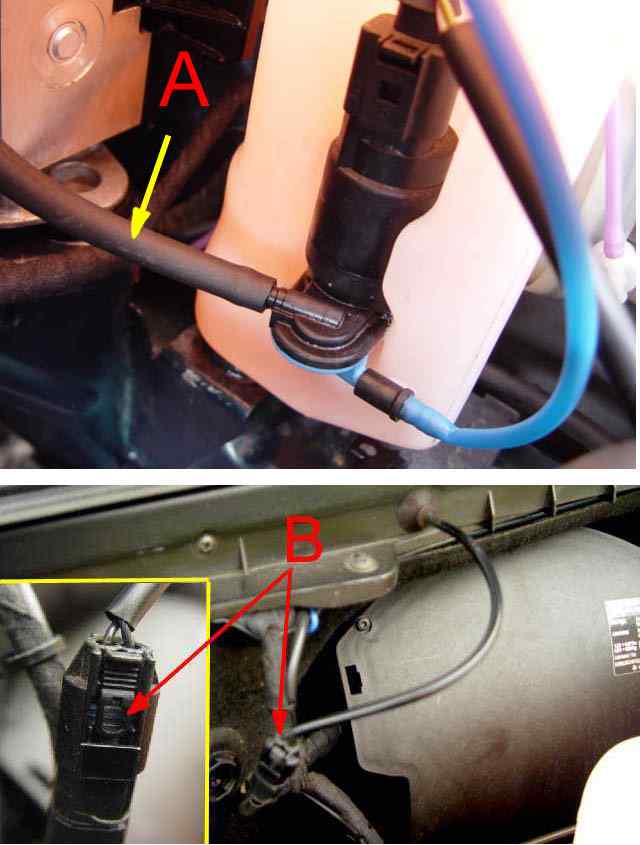
A If like me you wish to remove the complete plastic filter cover so as to be able to thoroughly clean it, then you will need to disconnect the front washer tubing from the pump. Have your Blu-Tac of something similar to hand, carefully remove the rubber tube then block the outlet with the Blu-Tac or your screen wash fluid will drain from the reservoir. take care not to damage or bend the outlet spigot.
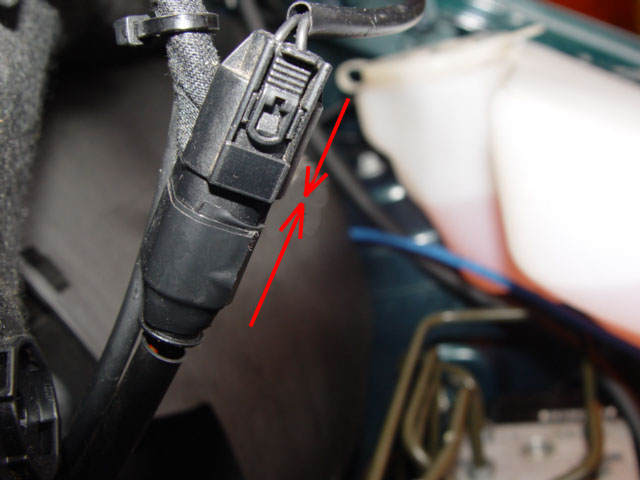
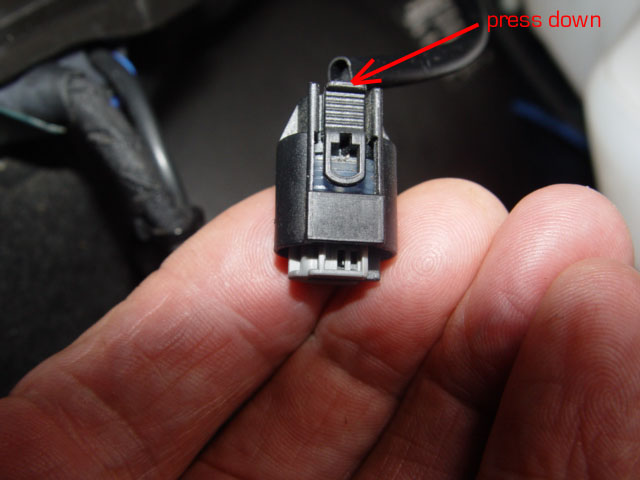
B The electrical supply which powers the heated washer nozzles also needs to be disconnected, press on the narrow shoulder between the two hips, if the connection will not open try pressing the two parts of the switch together then press the hip .this will allow the two parts to be separated, ensure that undue pressure is not placed on the wiring or connections.
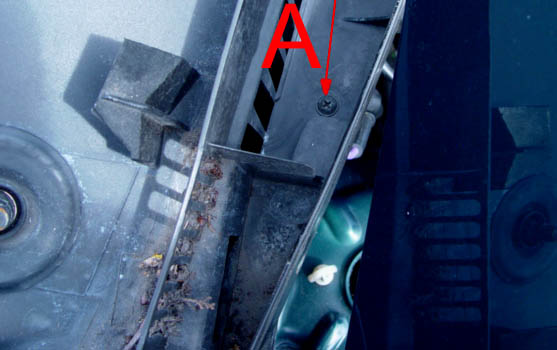 We are now ready to remove the last two screws that are still holding the filter cover which forms the filter cover in place.
. A
One either side, All the screws removed will be of the same type and length so there is no need to keep them separately. Having now removed them, the moulded plastic filter cover can be completely removed, close the bonnet and working from the top ease the filter cover out from its under the vertical windscreen rubbers either side, when completely free remove it from the car & carefully place it away from under your feet. The pollen filter and screen wiper mechanism will now be visible.
We are now ready to remove the last two screws that are still holding the filter cover which forms the filter cover in place.
. A
One either side, All the screws removed will be of the same type and length so there is no need to keep them separately. Having now removed them, the moulded plastic filter cover can be completely removed, close the bonnet and working from the top ease the filter cover out from its under the vertical windscreen rubbers either side, when completely free remove it from the car & carefully place it away from under your feet. The pollen filter and screen wiper mechanism will now be visible.
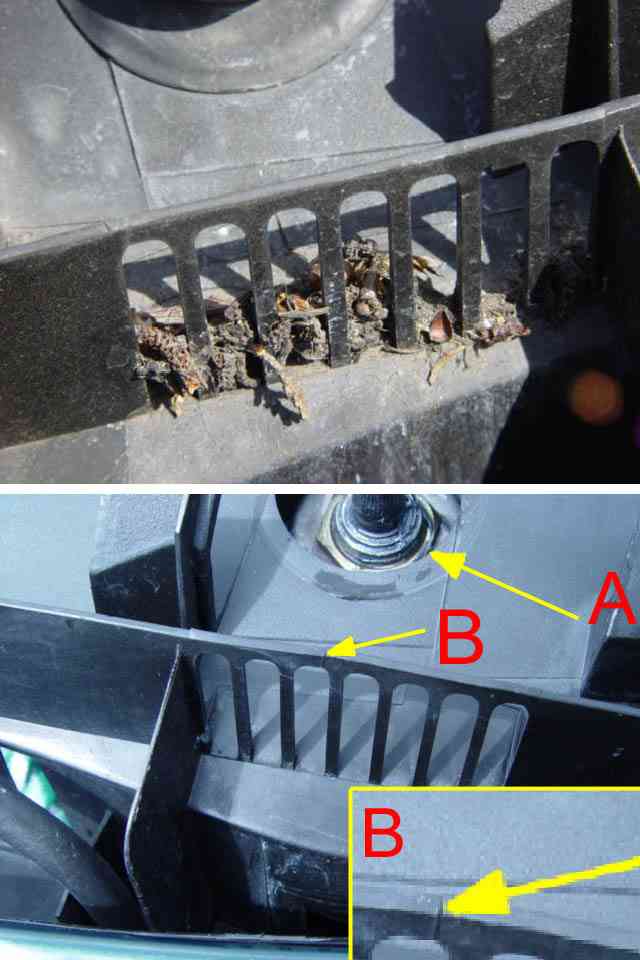
 Handle this entire component with care , it is all plastic and in some parts is quite fragile. in particular the area of the drains at either end. The older the unit the more brittle it will become. Having removed mine I gave it a good wash off with liquid soap and cold water and a 1" paint brush, making sure all area's were clean ready for return to the car.
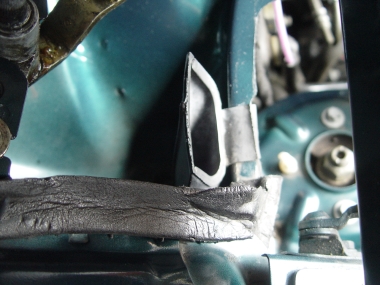
 A shows the hole that left by the grommet which has been dislodged during removal.
B shows an existing break in the fragile area of the plastic.
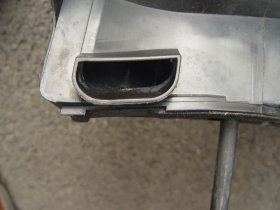
C Washer jets.
D Washer hose.
E Electrics servicing the heated nozzles.
We have at last reached the old pollen/dust filter which can still be seen located in it is housing. To remove slide upwards towards the bottom of the windscreen so as to clear the retaining lugs A Below situated along the bottom of the housing.
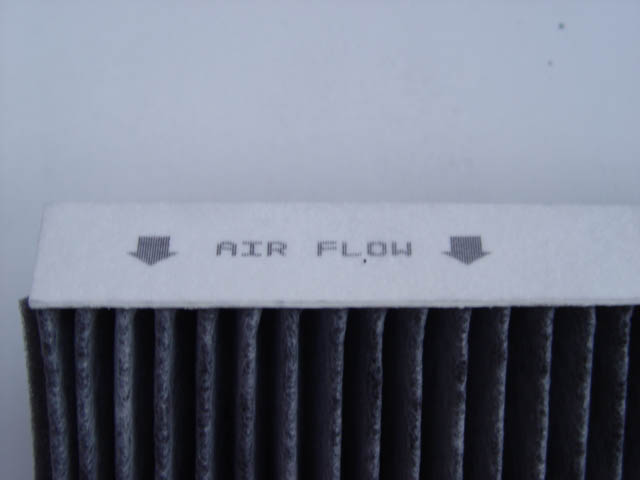 Fitting the New filter couldn't be easier, check for the direction of air flow indicated on the flap-seal attached to the edge of the filter. Place the new filter into the housing accordingly, having first ensured that the housing is clean.
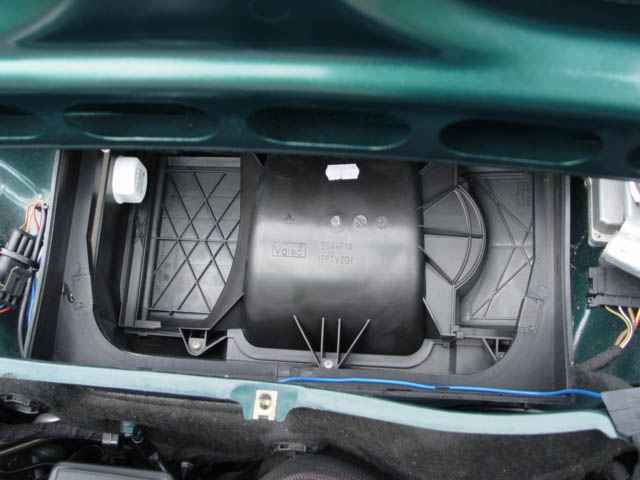
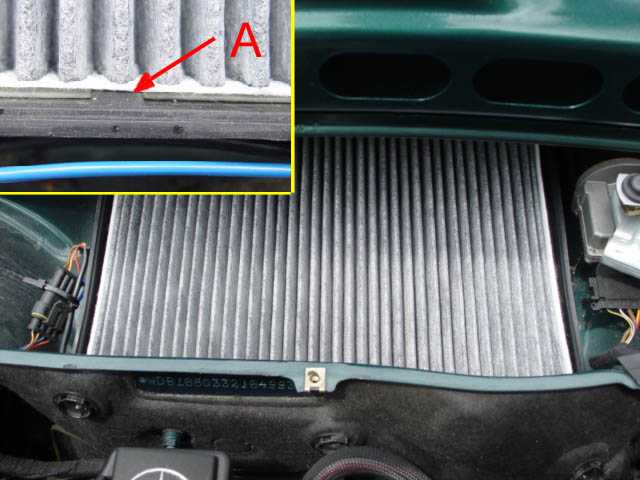
It was interesting to note that when I removed the old filter the blue cable was trapped in the bottom edge of the filter housing effectively breaking the seal, there is little point in having a sophisticated activated carbon filter if the air being drawn into the car is bypassing the filter. Its worth making sure on installation that nothing breaks the seal between filter and housing.
We are now ready to start re-assembling the components, Obviously they are replaced in the reverse order but there are a couple of points to watch.
Running along the bottom edge of the windscreen is a rubber seal, in my instance this was thick with black filth, that had obviously collected from the screen, a quick wash in cold water and liquid soap and it was like new, the improved seal will also ensure that water does not track-back under the bottom edge of the screen.
A Shows out New filter in place. Take care that the horizontal seal is seated correctly on the bottom of the screen before commencing re-assembly. C
While we have the chance a small amount of general purpose grease on the moving parts of the wiper mechanism will do no harm, I also applied a smear of grease to moving components and where ever you see signs of rust. B
Be very sparing with any grease applied on the wiper arm spindles, it is important that the tapered spindle housing on the arm fully engages with the spindle and spline when re-installed. Severe damage will be caused to both housing and spindle if they do not correctly locate.
Do NOT be tempted to try the wipers at this stage. If you do you will loose the wiper settings and cause yourself real problems trying the re-set them. (see page 42)
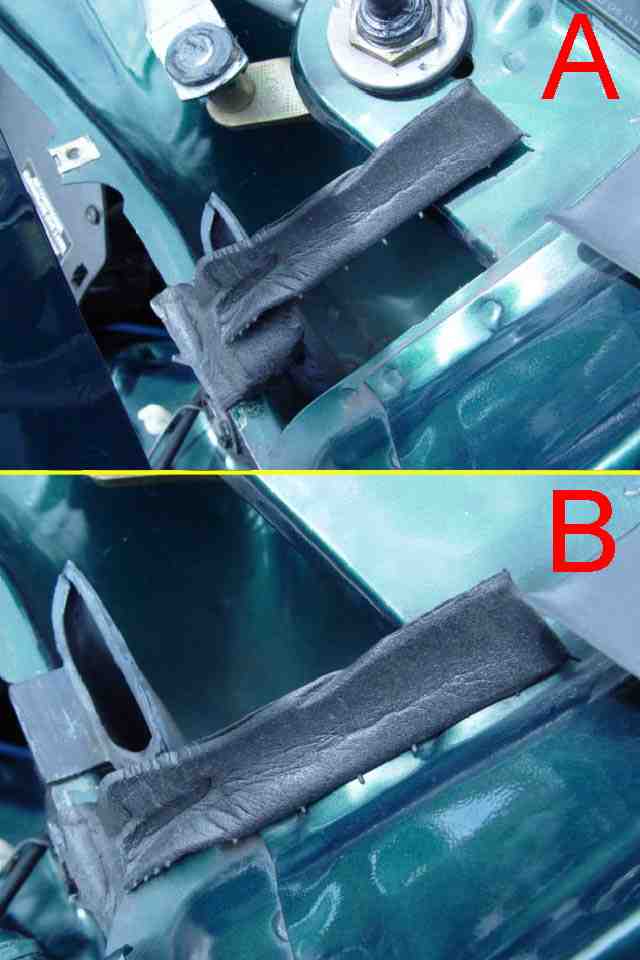
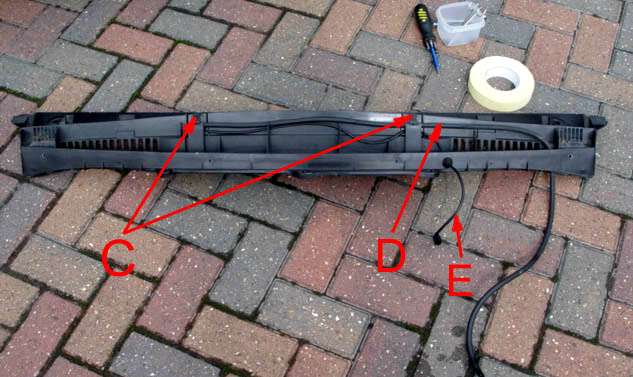
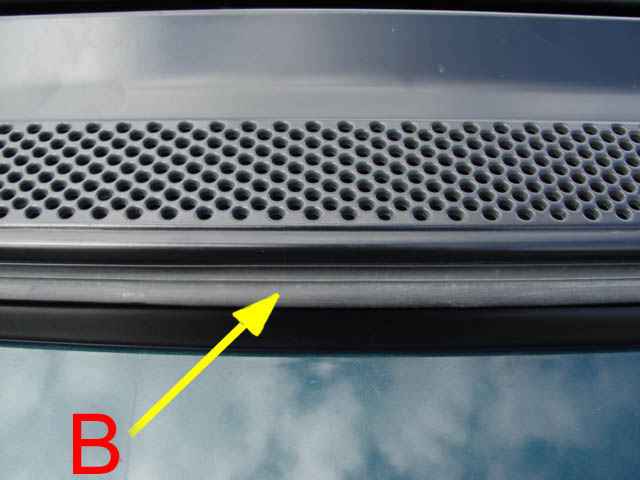
There were also two expanded foam seals one either side which were detached A from their location, a spot of glue from a cycle repair kit and they were relocated to their correct position. B
Also see detail below
In the same area there is a rubber spout which carries water away from the gully below the windscreen, If like me you are tempted to clean this area the spout can be easily dislodged from the hole in the bodywork below. check this before replacing the plastic cross member. it is simply refitted with a rubber flange locating on the bodywork.
Also on the underside of the plastic cross member there are two spouts which should engage into the neck of the rubber sleeve when the filter cove cross member is re-fitted. I can see no way of checking that they have engaged correctly.
Having completed those tasks, we now need to start re-assembling the component parts.
 Close the bonnet positioning the stay in the alternative location, this will allow you sufficient room to work and replace the components with damage to the paint work at the back edge of the bonnet
 Having cleaned the rubber seal re-fit on the bottom of the windscreen ensure correct location.
Replace and position the filter cover/cross member across the width of the car ensuring it fits over the wiper blade spindles,
Ensure the ends of the filter cover are housed beneath the rubber sea either side
. Ease the filter cover fully into its correct position, it is possible to slide the complete unit slightly in either direction for adjustment. Line up the screw holes and ensure the screw location clips are behind the lower fixed horizontal plastic cross member.
Replace the screws that locate in the gully
When replacing the metal grill engage the top edge first , you will find lugs onto which this engages.
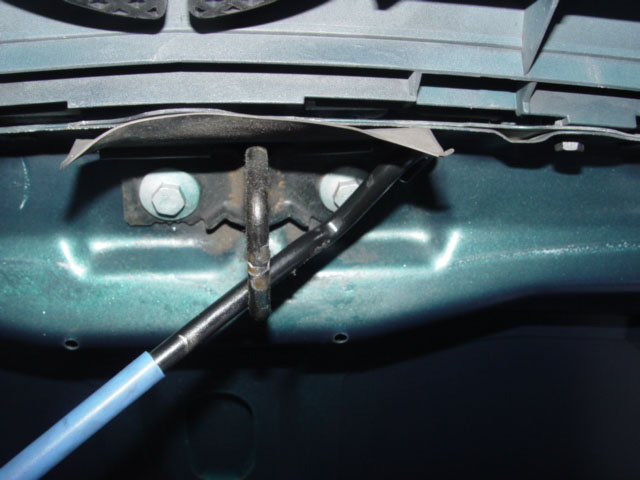
 Before replacing the two screws in the box section of the filter cover, ensure that the screw clips situated under the bonnet have located behind the plastic moulding, (see under bonnet)
When all the screw holes line up re-place the two screws in the box section of the cover, one either side of the filter housing, open the bonnet:-
Remove the Blue-Tack and refit washer hose, take care not to damage the outlet.
Reconnect the electrical connection.
Refit the wiper blades taking extreme care to re-align to your markers, Refit nuts,
Do not over tighten.
Before replacing the metal grill. Remove the tape markers, Test your wipers on a wet screen using the screen wash, this will test both wipers and re-prime the washer hose.
If satisfactory re-install the metal grill.
Again we do so with the bonnet closed, place the grill across the width of
the car, site it roughly in its position.
Remember we need to move the whole grill towards the windscreen and then
pressing slightly downwards locate the clips on the back of
the grill to the housing below it by easing it, back and down.
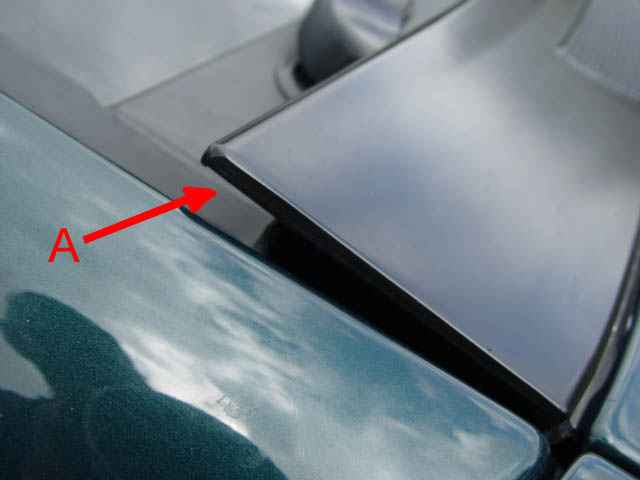
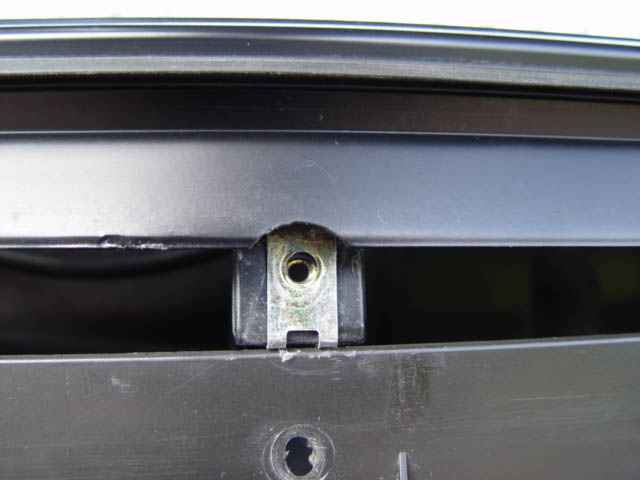
It is immediately noticeable if you have not engaged the clips on the metal grill, as the grill will not sit down correctly. A
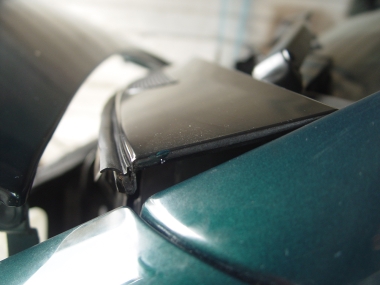
 Having now got the grill into the correct position while holding the grill firmly, open the bonnet, the seal on the bottom edge of the metal grill will be seen to flick below the bonnet edge
B
as the bonnet is lifted.
After fine adjustment & when the metal grill is seated correctly install the remaining seven screws.
Having now got the grill into the correct position while holding the grill firmly, open the bonnet, the seal on the bottom edge of the metal grill will be seen to flick below the bonnet edge
B
as the bonnet is lifted.
After fine adjustment & when the metal grill is seated correctly install the remaining seven screws.Test Air conditioning fan for performance. Clean up. Job Done!
I would stress that this is the way I tackled the job, it is not the only way and some of you may decide to follow a different route, either way I wish you success.
Next.
Back to Index,
Purchase DVD.
Please Make a Donation.