Bulbs
The use of bulbs in the modern cars is different to older cars, yes they do still provide the light but the elements in the twin element bulbs serve different purposes. Many of us will have asked for twin element headlight bulbs knowing that they double as Head & Dipped beam. Not so, not any more, the Double element bulb situated on the inside compartment of the headlamp now serves as the Main and Fog light. While the single pole bulb in the outer compartment serves as the Dipped Beam only, the parking light remains on throughout.
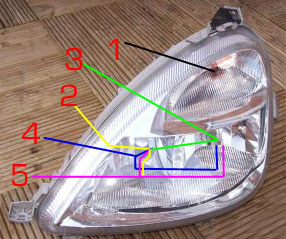
What's lit when, Headlights>
___ 1. Indicators/turn signal, coloured bulb.
___ 2. Parking lights only.
___ 3. Dipped headlight + Parking light.
___ 4. Main Beam + Dipped headlight + Parking light
___ 5. Fog light + Dipped Beam + Parking Light
There is also a change on the stop and tail light bulb which we will deal with later.
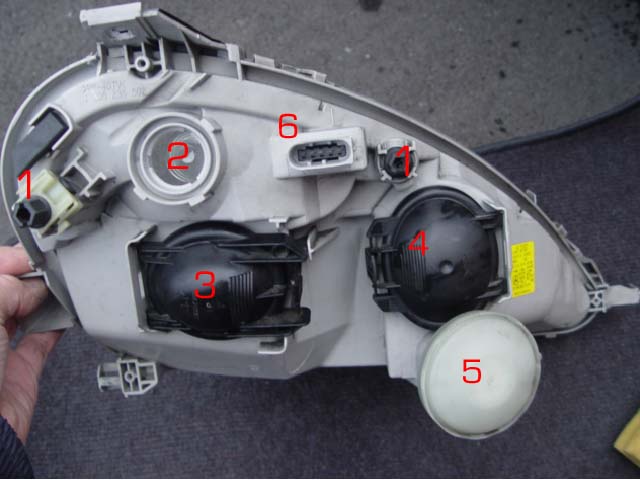
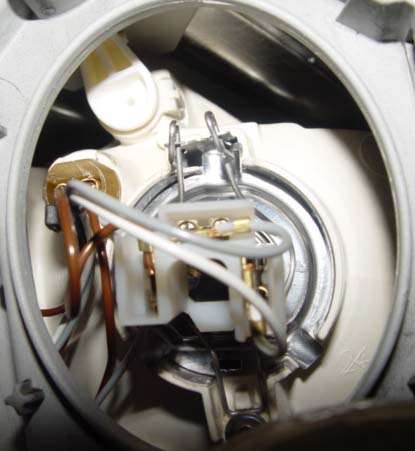
1 Head lamp assembly adjusters
2 Indicator bulb port
3 Dipped head light bulb location.
4 Main beam/fog, Parking light location
5 Headlight height Vacuum diaphragm unit.
6 Multi-pin connection for headlight power.
The front N/S Indicator bulb must be one of the easiest to replace being housed in the top corner of each wing . As can be seen the bulb comes away complete with the bulb carrier, remove the housing by turning ant-clockwise The half round cut out in the two pin connection block accommodates the plastic location pin of the bulb housing.
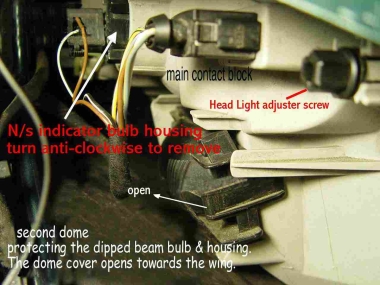
Note the location of the indicator bulb housing.
Note the location of the headlamp assembly electrical contact block and the location of the N/S indictor bulb housing.
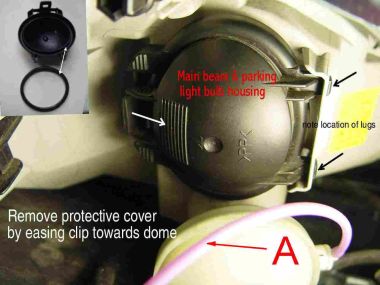
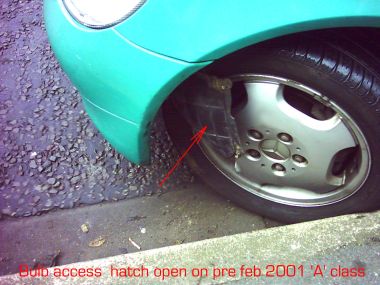
Both sections of the headlight assembly are protected by plastic dome's which have an integral but replaceable seal, ( see inset photo) the dome nearest to the wing opens towards the wing the other opens towards the middle of the engine bay, The plastic release clip can be seen in the photo the dome is then removable, lugs being re-engaged when refitting the dome snaps closed as the clip re-engages
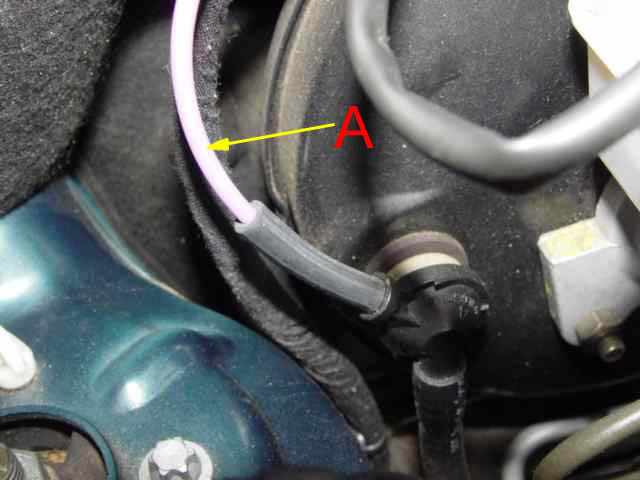
Its interesting to note the location of the mauve tubing A shown in the photo above which runs from the brake servo to the head lamp load adjuster on the N/S. There is a also a tube going to the O/S but that is slightly smaller in diameter and is pink, I do not know where that one terminates I suspect the adjuster inside the vehicle.
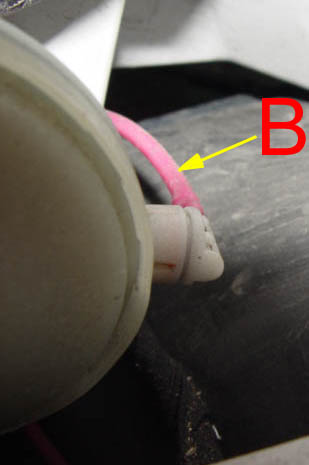
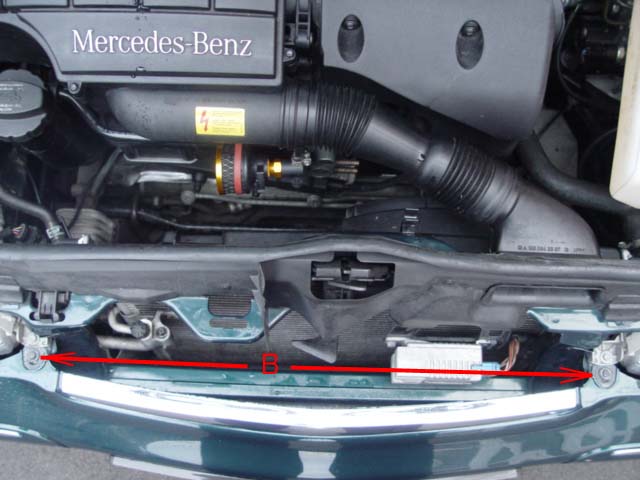
B So the vacuum is created by the servo is also used to operate the headlamp load setting/beam height adjuster , selected using the wheel adjuster in the cabin? I think it is! anybody got any different ideas?
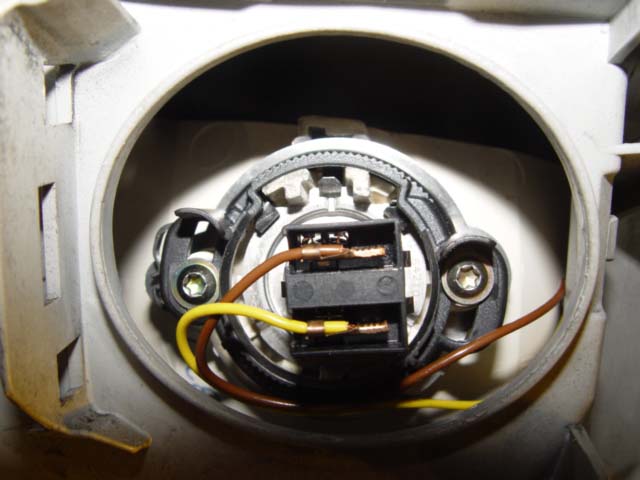
A close up of the electrical contact block in place, this contact services power to the main beam and fog lamp elements of the bulb. Note the connection going to the parking lamp, very difficult to get at as it is situated within the rim of the headlamp housing.
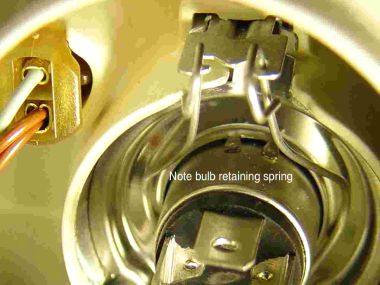
This is the dreaded bulb retaining clip which only fingers can feel but due to it is location eyes cannot see Unless you use a mirror, Now we can see what we are dealing with!!!
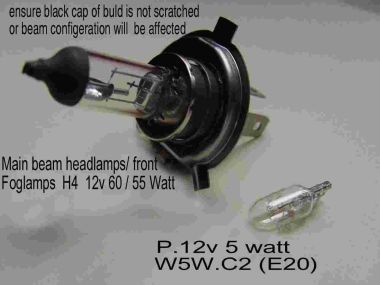
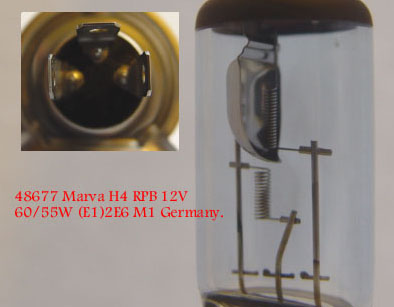
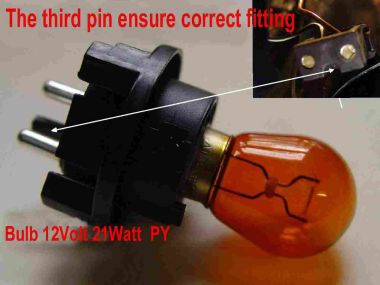
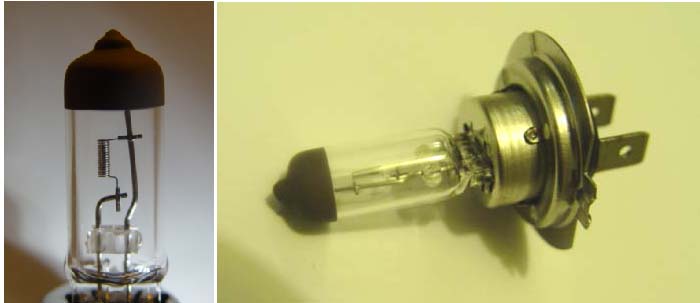
This bulb provides the Main Beam & Fog light, triple spade connection, three lugs which in theory only fit one way! The bulb is fitted as positioned in the photo. Precautions should be taken not to handle the lens of the bulb alternatively clean off any finger prints before fitting with a clean dry soft cloth taking care not to damage the black cap or the configuration of the beam may be effected.
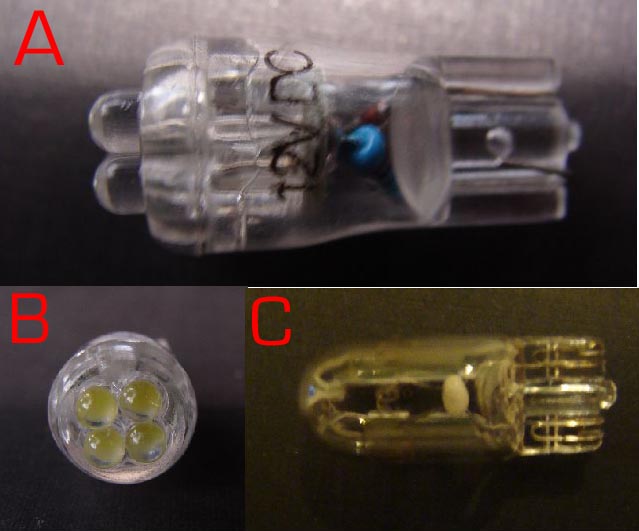
The small push fit bulb is for the parking light.
 Parking lights
Should only be used when parking and should not be used as a sole means of vehicle lighting when moving.
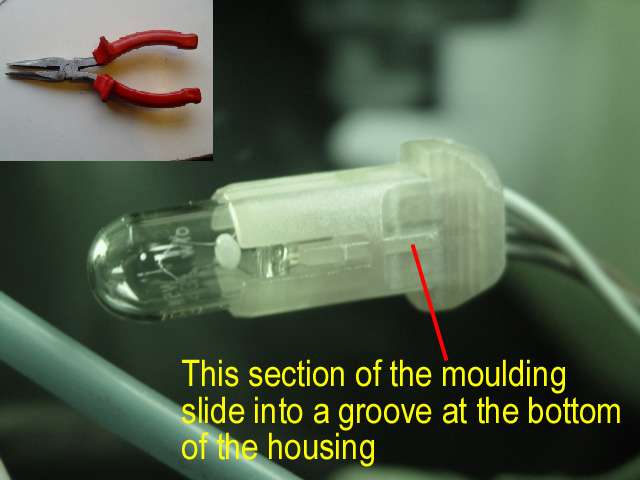
The parking light bulb is one of the most difficult to get at and being unaware of the fitting doesn't help. However it was finally removed with a pair of 6" pointed nose pliers, as it turned out the bulb housing like the bulb is a slide push fit and with gentle pulling slides away from the main housing. Avoid pulling on the wiring at all cost, an easy thing to do when you can't see what your doing. I have arrowed the small projection on the bulb housing that locates in a groove at the bottom when you re-install it.
Day time running lights
As of February 2011 all new cars sold in EC countries must have day time running lights, (EC Law) this law is not retrospective although many owners have made enquiries as to the reason.
It is considered by the law makers that day time running lights will reduce accidents because the vehicle is more easily seen.
 If that is the case then surely using your side lights during the day would help other drivers and pedestrians see your vehicle more easily, to that end I have fitted LED bulbs to the side lights on my car, they are cheap to purchase and are very visable during the day light hours, in this casae it was a dull wet day and in my opinion they show up very much better than standard bulbs. They should however they should still not be used alone when driving after 'lighting up time'/dark.
 They use very little power and are readily available on E-bay UK and I didn't have to fit resistors on my car for them to work, as far as I'm aware the 'A' Class has not got a bulb failure indication devise and so they are not required.
If suxch a devise is fitted on your vehicle then because of the low amperage drawn by the LED bult the indicator may well indicate the a bulb had failed, this can be overcome by fitting a resistor provided with the LED bulbs on request, but the amperage drawn by the LED and restistor would be the same as for a normal bulb. from Ace parts of Alderney.
Replacing Dipped Beam Headlight bulb.
The bulb that provides the Dipped Beam, single element twine spade connection. Cost £8 + normal bulb, £18 + blue bulb plus another £5+ if you can't fit yourself "Oh and you will need an appointment Sir". said the man at the garage that's name begins with 'H' and whose workshops had a connection to the AA.
Is any wonder there are so many cars running around with duff bulbs! Are you one of them I wonder? Do you know if you have a bulb gone? Check before you get stopped or somebody runs up your rear!
Although it is possible to replace the Headlamp Main beam & Fog lamps bulb quite easily, changing the Dipped Beam bulb and even the parking lamp bulb is very difficult story and changing them at the roadside would be an almost impossibility!
The location of the dipped beam bulb is on the extreme outside of the headlamp lens and access is obstructed on the Near side, by the screen wash reservoir and the coolant reservoir on the Off side, so both sides are difficult to get at.
 To make things even more difficult the bulb is secured by a rotating locking ring, which has to be rotated anti-clockwise to release the bulb and Clock-wise to lock the bulb , neither action is easy when working by touch in such a confined space.
Large hands do not in this instance make the job any easier!
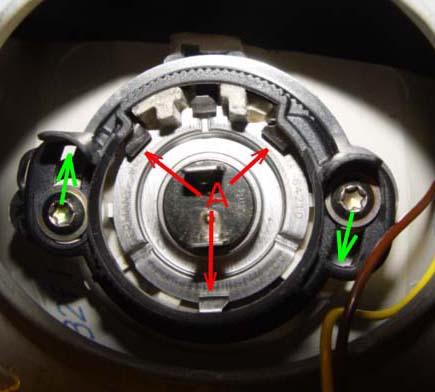
A Shows the clips that hold the bulb when locked.
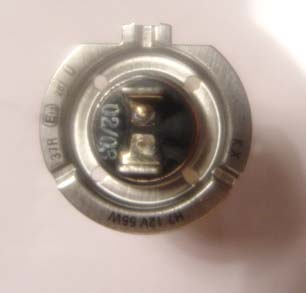
Note that the square section of the bulb goes to the top when fitted.
Note that is this photo the bulb is unlocked.
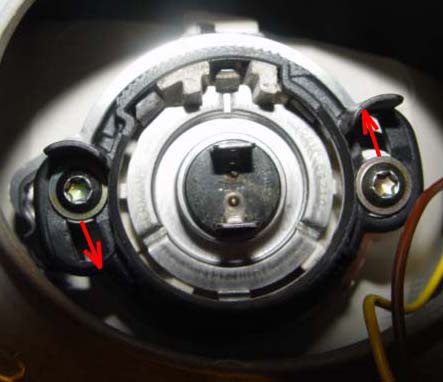
Shows the connector in place bulb locked.
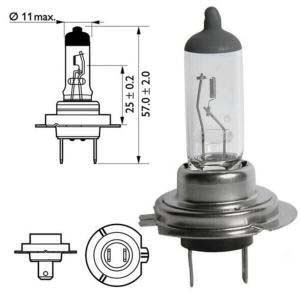
The bulb a H7, 12 Volt, 55 watt, single element bulb, has a painted black , try to avoid damaging this as it affects the pattern of the beam ,Also as with all bulbs avoid contacting the glass portion of the bulb, if contact has been made wipe the glass section with a clean, dry, polishing cloth.
Replacing headlamp unit complete
Alternative Bulb changing procedure on W168 'A' Class Models built after 1/3/2001
Although I appreciate not all owners will want to follow this procedure it is an alternative method for changing bulbs is by far easier and there is no need to disturb either the coolant or screen wash reservoirs. However great care must be taken not the drop the lamp assembly when removing.
Protect glass front while changing bulbs. the whole job takes less than 20 minutes from start to finish.
Tools required.
socket 8mm,& 10mm plus small wrench.
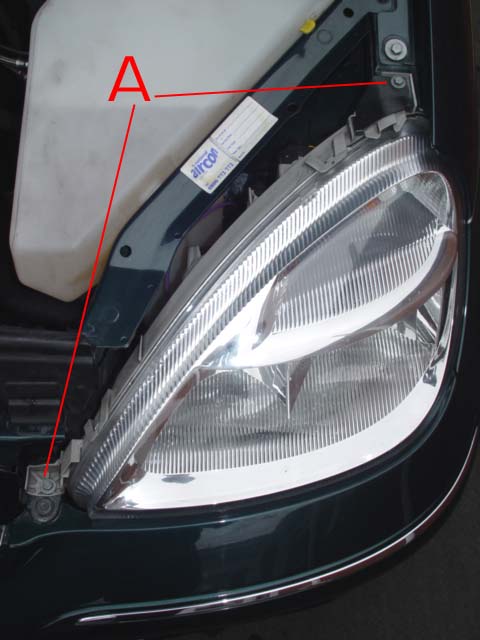
1. Having located the Defective bulb, remove the screws securing the head light assembly A
2. Remove the two screws, one either side of the radiator securing the front valance/bumper, B this will give you movement on the valance while removing the head lamp assembly.

3. Remove the the two bolts securing the plastic wing, located in the gully on the defective bulb side only. C
4. The headlamp unit will now be loose, gently pull lamp assembly towards you at the same time easing the bottom of the lamp from under the front valance and from inside the wing.
5. Remove the Indicator cable connector from the rear of the headlamp assembly.
6. Remove the oval multi-plug connector from rear of the headlamp housing.
7. The complete lamp assembly can now be brought sufficiently forward for defective bulbs to be replaced following the guidance above.
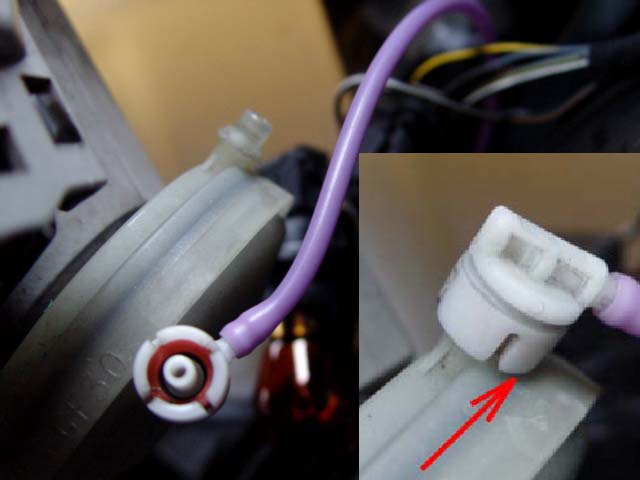 8. Note If changing or wishing to remove the headlamp unit complete, you will need to disconnect the vacuum tube going to the height adjuster diaphragm.
9. During cold weather warm the plastic connector with medium to hot water applied on a sponge or cloth as the plastic may be brittle having warmed the unit, ease it off the diaphragm unit by levering the female portion away from the male section using screw driver blade, See arrow for location of screw driver blade, twist the screw driver blade to lever off the female from the male spigot. Take great care not to break this unit or the Vacuum height adjuster will not work when replaced.
10. To replace, as this is a gas tight connector, make sure the components are clean, hold the female square with the mail and press firmly home, you will hear it snap into place.
11.. Take care when replacing the headlamp unit back inside the wing and the lower edge of the lamp unit under the front valance/bumper
12. At this point reconnect both the indicator unit and the multi-pin connector
13. Ensure the lamp assembly is properly positioned, loosely fit the two securing screws.
14. Ensure all is re-aligned, replace remaining bolts & screws loosely
15. Check all lighting for correct operation. Including indicators
16. If satisfactory, tighten bolts and all screws evenly.
17. Where bulb replacement only has taken place with no other components on the headlamp housing assembly being touched i.e. adjusters the beam setting will not be affected by this procedure.
18. Where the Headlamp unit complete has been replaced the headlight beam alignment will need to be at least checked for beam setting
19. If you are aware you are going to replace the lamp assembly complete, before starting the job, position your car facing a wall or doors, turn on your headlights and make crosses where the centre of the beam sets, do this for both Main beam & dipped beam both headlights. (I have a mark on my garage floor and crosses permanently marked on the doors for re-aligning the headlights.)
DO NOT MOVE THE CAR
20.Having completed the job you can now check your beam setting and adjust/re-align to the earlier made marks /crosses.
Next.
Back to Index,
Purchase DVD.
Please Make a Donation.