Replace Damaged/worn/Remote Flick Key Case.
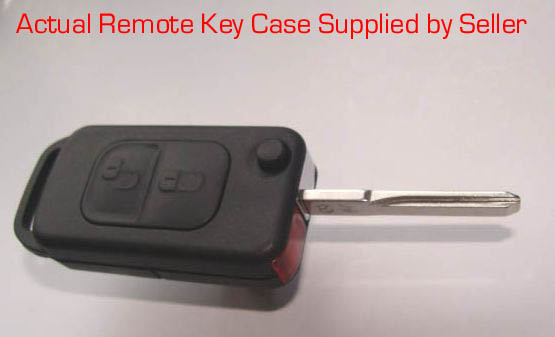 If your 'A' Class is an early model then there is every chance that your remote key casing is badly worn or even damaged .
New remote Keys complete with the internal components coded to your car in Germany now cost close to £200.00 9/7/2011
If your 'A' Class is an early model then there is every chance that your remote key casing is badly worn or even damaged .
New remote Keys complete with the internal components coded to your car in Germany now cost close to £200.00 9/7/2011
Or in the case of later models the key is damaged by dropping which happens more times than we are prepared to admit.
Well there is now an answer to this problem , if you have a key tucked away that works but you cannot not use because of the damaged case you can now replace the case only.
You will have seen on my previous pages me saying 'do not purchase Mercedes-Benz 'A' Class keys off e-bay or any where else for that matter as they will not work with your car.
That is still true and nothing should convince you otherwise,
unless you can utilise the components of both your own and a second hand key .
If you have a need for such an item then you can order direct from:- Remotecentre@googlemail.com :-
Ensure your mail includes the following:-
Copy in the Subject:- Mercedes Benz Remote Flick key Case, as advertised on 'Lofty's Homepage'.
Copy to mail page:- Please supply one (1) Mercedes-Benz pattern, Two Button Remote Flick key Case, priced @ 10.99 each. including postage and packing UK Only £1.99 extra for over seas orders Note The seller will not post to Italy
Enter your address details as you wish them to appear on your package.
indicate how many required if more than one
Note This is a different supplier to the original one mentioned in this page, the remote key case of this supplier being much nearer to the original MB case in it's design detail/specification.
This is especially relevant to the red reflector lens which works at least as well as the MB fob case when batteries are tested. However please note slight alteration is required when fitting the components, this mainly applies to the PCB support plate as well as the box into which the transponder pea is situated .
Bearing in mind that a new Key from Mercedes Benz will cost you £200 + it is well worth the time is switching the working components from the damaged case to this new case.
You will then be contacted by the seller who will give you payment details which is by paypal, you do not need a paypal account to order this item.
Dated 8/08/2011
However if you purchase a remote key case only (empty Case) with no components it will be fully compatible with your internal components being almost identical to the original Siemans/Mercedes-Benz remote key fob,
That being the case, the internal mechanism in your existing key fob should be transferable to the new case.
Please note, having now secured a second hand MB remote key I have found that there are very minor variations in the interior moulding of that case which will require alteration before the components are switch from one case to another.
It is a job over which you should take your time, one because the new case does not come with instructions and 2 any damage to the internal components is likely to prevent it working even though installed in a new case.
This swap of components is only appropriate where the key is fully functional to start with but is suffering from a badly worn or damaged case.
Changing the case of a non functional key will not make it work.
But I will make a further suggestion at the bottom of this page.
The new case will comes apart easily, it not having been sealed, this should not be the case with your existing remote keys, the two halves should be found sealed, in fact they can be difficult to open unless you take your time; I used a Stanley knife and went round the sealed area of the case which was then quite easy to open.
Note
other slight differences:-
1. There is no information on the case to indicate how the batteries should be fitted or details of the fob specification. This obviously does not affect the key or fob.
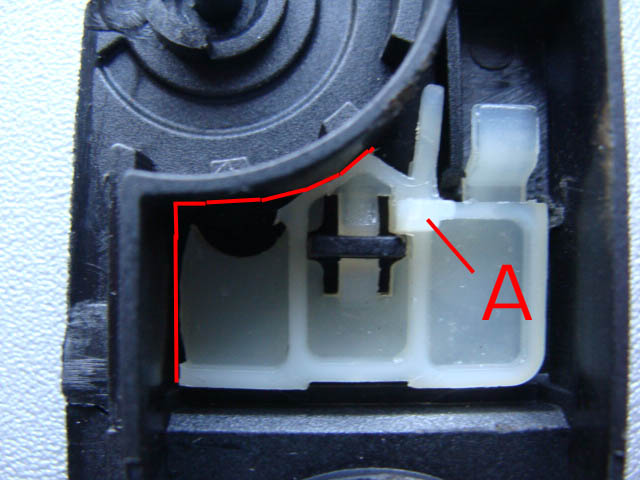
2. It does not come complete with the small white inner tray as shown in the photograph. (right)
that you will in your original key fob, this mini tray is transferable from the damaged /worn key case and must be transferred as it supports the PCB of the remote key when located correctly.
However you will find that it has to be altered slightly to get it to fit the new case
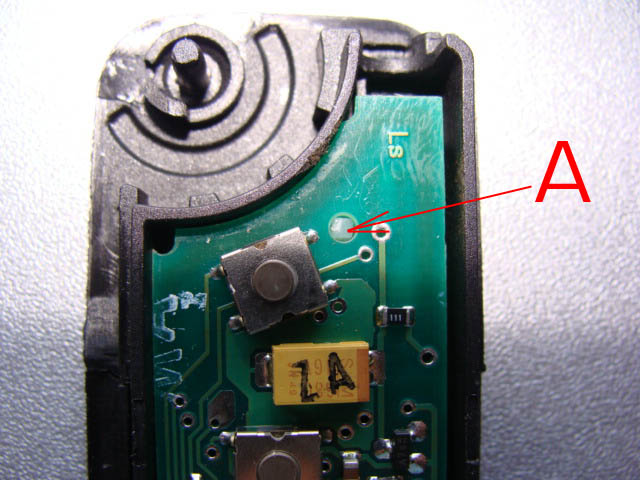
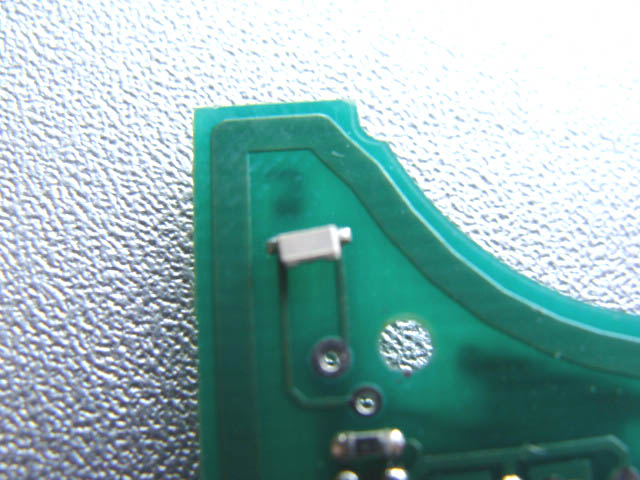
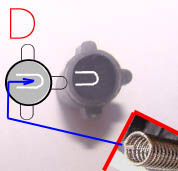
When fitted correctly the moulded pin on the mini tray locates in a pre-made hole in the PCB, See A

The pre-moulded box shown in the photo on the right has to be cut away to allow the fitting of the tray and to allow the transponder pea to be located correctly
In the case of the moulding at the top of the key reflector end this is only shaved away The pre-moulded box shown in the photo on the right has to be cut away to allow the fitting of the tray and to allow the transponder pea to be located correctly In the case of the moulding at the top of the key reflector end this is only shaved away in thickness to allow the fitting of the transponder pea DO NOT TOTALY REMOVE the plastic or the transponder pea may be lost.
When the white mini tray is replaced the white clip will support the transponder pea in place.
Note
When opening the original Mercedes-Benz provided key, the underside of the transponder pea had been lightly glued to the plastic case
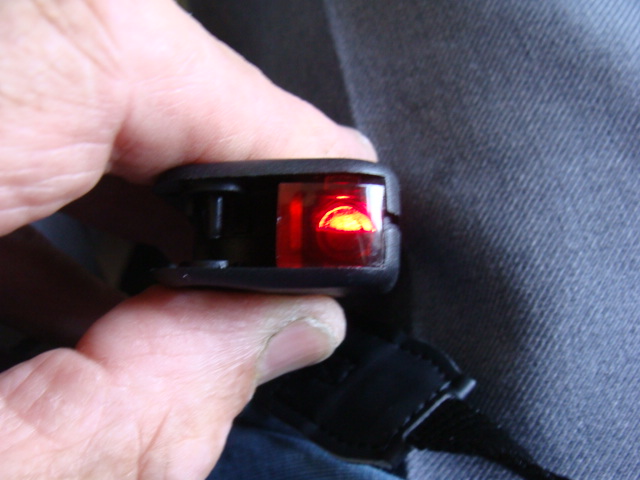
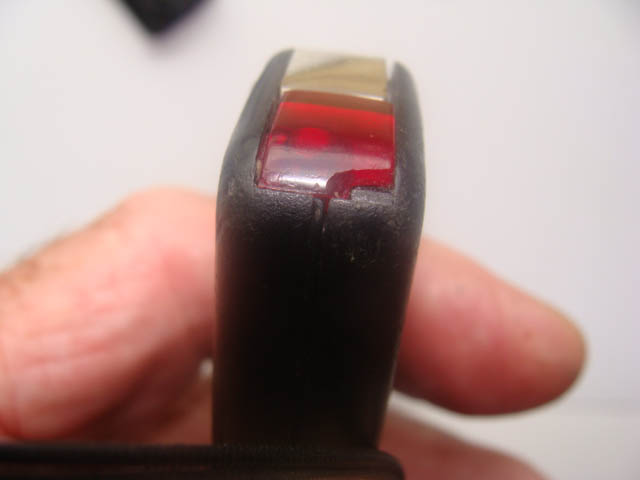
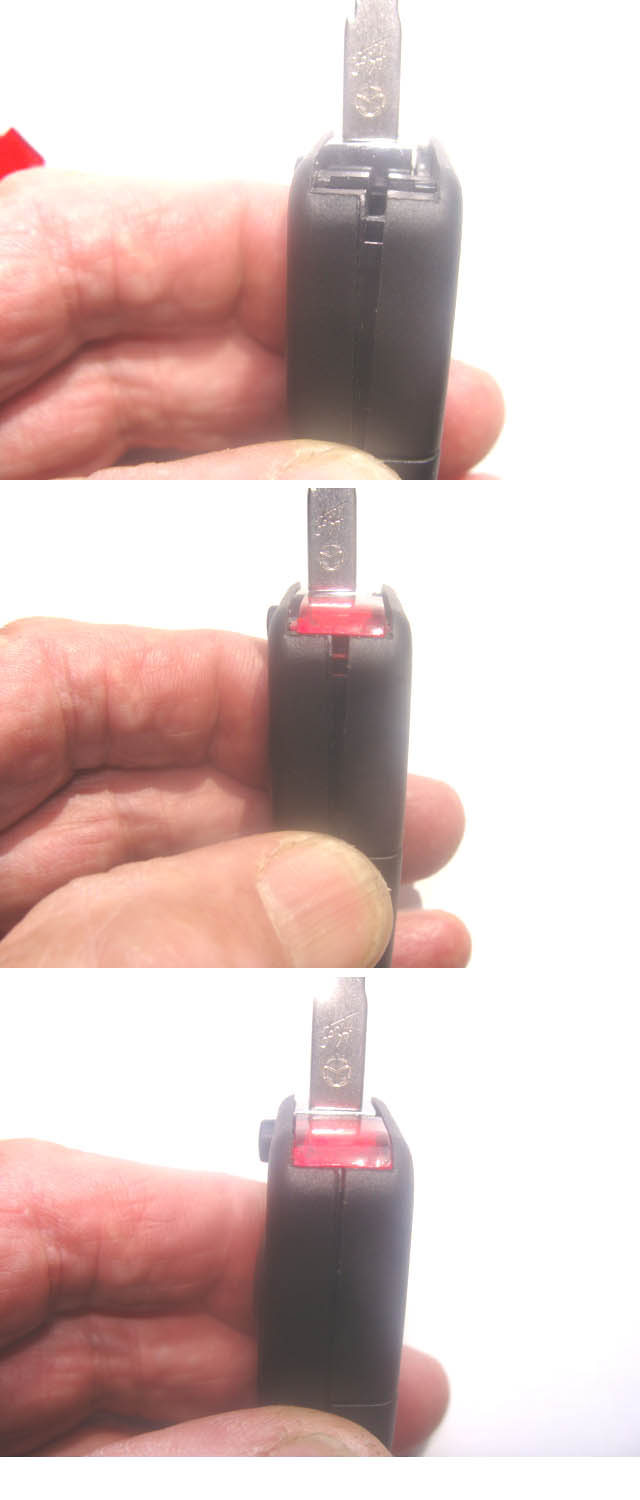
The red Battery test facility on this case is as good as the original Mercedes-Benz Key when all components are fitted and working.
The light being emitted by the very small diode on the right.
If purchasing a second hand key, this feature of the remote fob must work for it to be of any use.
The key blade fitted to the new case is uncut, you can either have this cut, or you can just transfer the key blade and holder from your existing damaged remote case.
Note, the uncut key blade will not enter the switch until it is cut.
If the chrome is damaged on your old key blade holder then you can remove the key compatible with your car and fit it to the new holder .
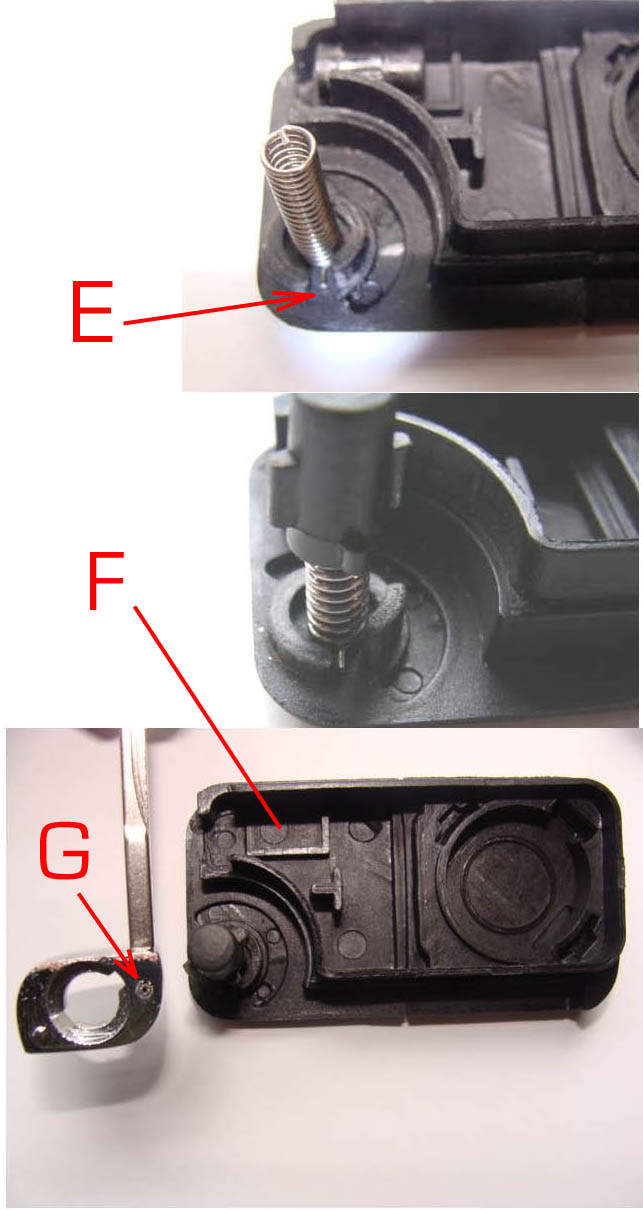
This is done by tapping out the securing pin G with a very small drift/punch, remove the new blade from the holder, simply pull, fit your own blade and replace the pin.
However note that the securing pin can only be seen and thus removed when the key blade is folded at right angles to the case.
If you have reason to purchase one of these remote key cases then I strongly suggest you practice taking it apart and re-assembling several times before you do the actual transfer.
This is because the parts are small and need to be assembled correctly for the key blade to lock closed and spring back out when the button is pressed.
Note in the case of both copy key case the key blade lock open and closed , unlike the MB key which only locks closed.
If the spring is not pre-tensioned correctly this will not happen and it is too late to alter it if you have already sealed the case which you will finally need to do to prevent the case coming apart, loose the transponder pea and you will need a new key from Mercedes-Benz Parts.
When you reach this stage and have ensured the key is working with the car, then a glue such as 'Araldite', two part glue would do the job , it will take a few minutes to go off but will give you time to make small adjustments. if you examine the two parts of the case you will see the contact points which will best secure the key against falling apart and loosing the transponder pea.
Avoid using glue on the red reflector as it effects the reproduction of the infra red beam
Assembly
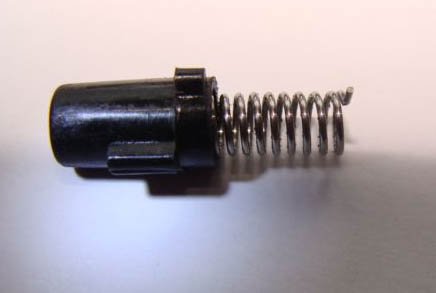
Locating the spring correctly :-
Inside of the key release button there is a location slot for the top of the spring to locate, Place the button on the spring and rotate , you will feel the tail of the spring engage in the slot.
The projecting tail at the base of the spring locates in a slot on the bottom half of the casing supported by the spring support that projects from the bottom half of the case.
With the spring inserted into the button locate the spring complete with button onto the spring support on the lower half of the casing, Now locate the key blade and holder on to the button. you will need to align and adjust this to suit the slots in the key blade holder with the projections on the button.
Note that as in the photo, right. The blade is just beyond parallel to the top of the key case this angle will need to be adjusted until the components align and engage with one another.
This must be located in this way to enable the lugs to be engaged on the button
now turn the blade 360 degrees, hold ,
Now place the top half of the casing onto the button and align the top half of the case with the bottom half do not want to fully close the case at this point.
Now place the red reflector into the top of the casing, open slightly if necessary, when in position fully close the case.
With the casing held closed , test the folding and release of the key blade, ensure the blade locks closed in the side of the case.
Only when you are satisfied that you are familiar with the assembly procedure, remove and transfer the components from the damaged key fob.
Avoid touching the components on the printed circuit board as much as possible, wear gloves if available.( moisture on your hands will be transferred to the components or avoid touching the PCB.(Printed circuit board) hold only the edges of the board.
Remember as well as the main board the transponder pea must also be transferred, a missing or incorrect transponder pea will result in the instrument cluster displaying the message, 'Start error' when the keys are turned in the ignition
E shows the point where the projection on the bottom of the spring engages with the lower portion of the spring engages with the lower portion of the
Is the pin that secure the key blade in the key holder.
The pin is re-usable if care is taken tapping it out.
Take care not to loose it, it is minute in size. size.
F Indicates the location point of the transponder pea. lightly glue in place, keep glue to a minimum.
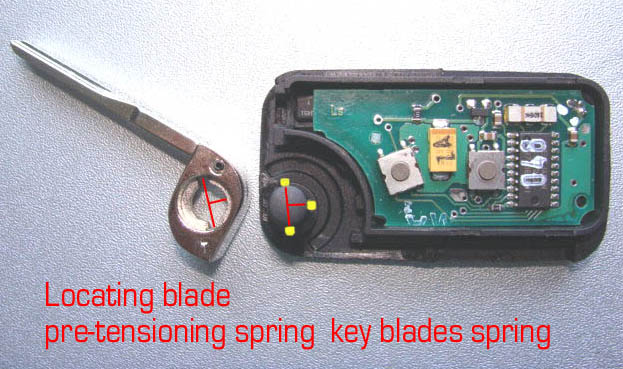
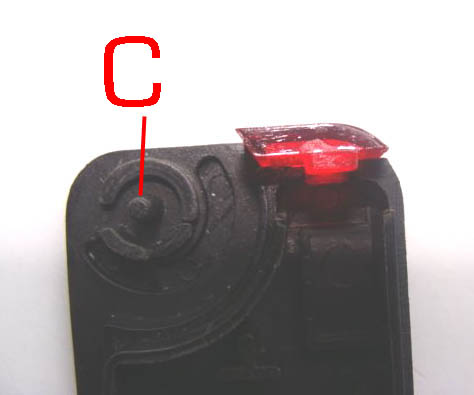
The three yellow marks indicate the lugs on the button which must engage in the key blade holder.
Having engaged the lugs rotate the key blade 360 degrees anti-clockwise the pre-tensions the blade return spring.
Fit top half of key fob
The red reflector can be fitted by slightly opening the back edge of the fob and inserting the red reflector .
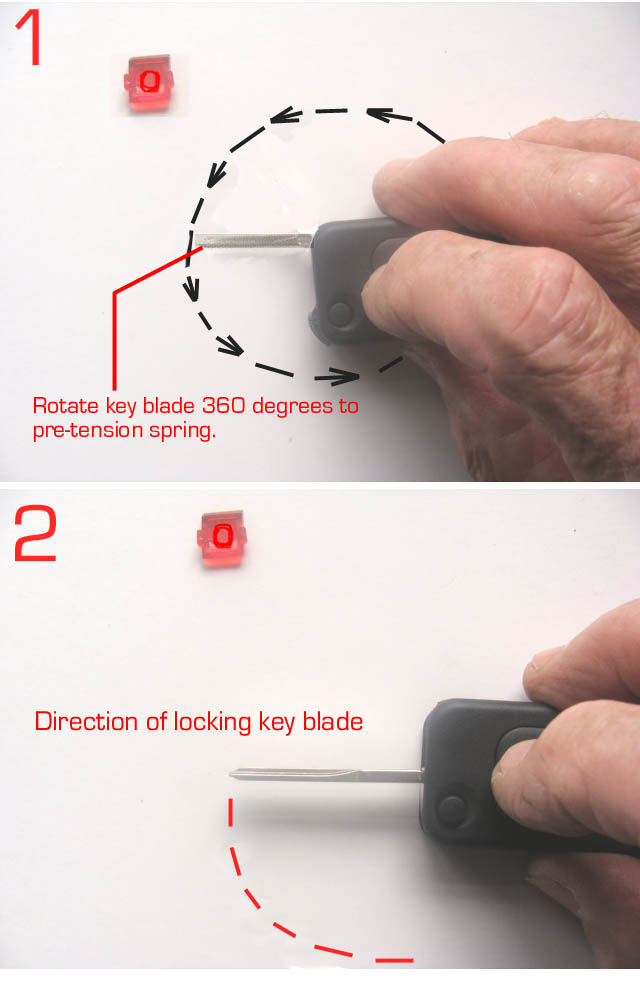
Shows the approximate angle the blade will need to be positioned to engage on the lugs of the button.
Shows the direction for closing the blade which should lock both when in both the closed and open positions. .
Leave fitting the red reflector your last assembly job, Bearing in mind that the transponder pea is in this immediate area, and having satisfactorily installed the other components, leave the back edge of the case open by 1/8" (3-4 mm)
glue
Having carefully applied a small quantity of glue to the contact surfaces place the reflector in position and close the back of the remote key case.
Clamp closed using a rubber band until the glue is fully set.
Avoid getting glue on the new case
some glue's will damage plastic.
.JPG)
When fitted the PCB into the bottom half of the case ensure battery contact pins locate in the slot provided and are not bent. cont
Ensure the battery terminals and batteries are clean before placing into remote case, moisture on your hands may damage the components.
I having now managed to obtain a second hand 2 button key of the type supplied to owners of W168 'A' class the following slight differences between the original MB key and the copy key fob have been spotted.
The support plate will need adjusting (Trimming to fit the new case.
The transponder pea location housing will need trimming to allow the fitting of the pea.
DO NOT TRIM THE PEG ON THE PCB SUPPORT PLATE AS THIS ENGAGES IN A SMALL HOLE IN THE SUPPORT PLATE WHEN FITTED CORRECTLY
Other Possibilities
 Now that a suitable replacement remote key case available, other avenues open up for the possible construction of a working key for you car, there is the possibility of purchasing a second hand key removing the PCB from the key and placing it into the new case.
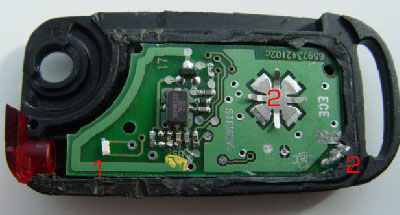
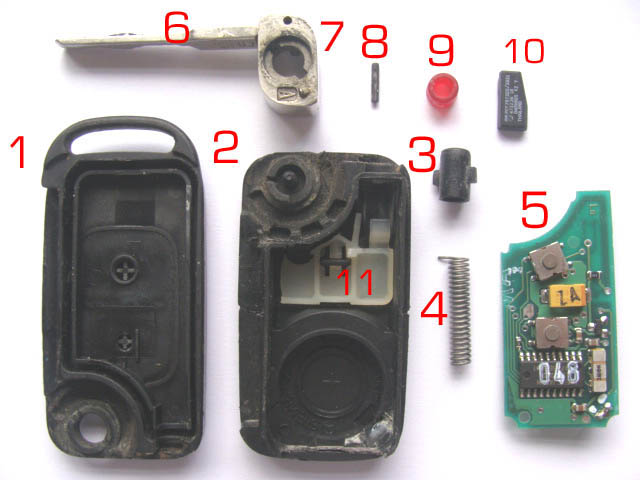
Component parts from second hand /used key:-
1.Plastic casing Front
2 Plastic case rear
3 Blade release button
4 Spring
5 PCB
6 Key blade
7 Key Blade holder
8 Blade securing pin.
9 Reflector (incomplete)
10 Transponder Pea.
11 PCB support plate
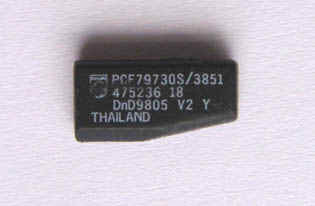 The transponder pea which measures 11..95mm x 5.99mm from the purchased/second hand key should be discarded and the pea from your own defective none working key inserted in the new case along with the replacement PCB.
The key/blade from your none working key fob will also need to be switched to the new casing.
The now assembled not sealed, remote key will almost certainly want re-synchronising with your car before the central locking will work.
The procedures for undertaking this task is on the previous page (page 6)
If you do still find the newly constructed key does not work, then bear in mind it like your own key may contain defective components.
although the key should operate the remote locking after synchronising , bear in mind that the key blade must be changed from your own defective remote key or you will simply get a 'start error' message.
Even if this trial does not work the new case can still be salvaged, as you can test the remote before sealing the case.
If the trial does not work then all you have lost is the cost of the second hand key, so do not pay over the odds as you will not be able to return it, even if that was acceptable to the seller!
Therefore there is little to be lost in undertaking this trial.
Please note I have not undertaken this task myself and so cannot say if it will work or not , but as far as I'm aware the only difference in owners two button Mercedes-Benz keys is the coding of the transponder pea and the blade which can be switched with your own.
Good luck why not be the first to give it a try, little to lose and all to gain if you can get a defective key working.
I'm aware that at least 5 owners have purchased new key cases if you have managed to successfully rebuild your key please let me know how you got on, as both my keys are working and i have no reason at this point to carry out a total rebuild.
Thanks.
Lofty
Next
Back to Index
Return the Homepage