Component parts and Assembly
Vacuum Locking System & Pump.
I for one have never owned a car before that had vacuum locking system, in almost all the car the locking is mechanical and although to date have not suffered any problems other owners have where the central key fob infra-red system has failed mainly due to the vacuum pump situated in the boot becoming water logged for one reason or another. This is typical of the e-mails I receive when the central locking fails :-
Lofty I'm emailing you in the hope of maybe pre-empting a problem on the
horizon. Today the central locking system took a holiday.
Not even
the button on the dash would operate the system. I just had a good
look at the page 41 on your web site and so checked key fob batteries,
fuse (No°29) etc, then had a look in the boot at the pump system.
I
felt carefully around the sponge casing and noticed that it was
completely dry (although I do know for sure that the rear windscreen
hose has come adrift). Strange thing is that the central locking now
works normally again!! I only felt gently around the top of the unit
and cables but it is as though I did something to make it work again.
Could this be a bad connection or something? For more details on this case go to question 166 on mypage 3
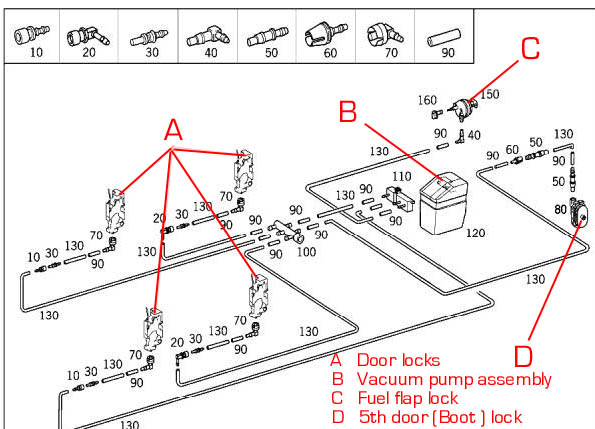
As can be see from this diagram above the system is made up of close on 50 components, all interlocking provided gas tight joints, plus the tubing plus the pump, encased in it is high density rubber jacket. Where any of these components fail or are dislodged the locking system will also fail, to that individual or all components. The first thing you will like this owner notice is that the central locking will not always work or indeed work at all . Always check the batteries in the fob or try your spare key fob before looking further or you may well be wasting your time.
Few of us worry about the Vacuum pump hidden away in the boot, that is until our locking packs up then we are directed to look for the pump that operates the system. When you do find it do not be surprised if the foam casing is soaking wet and the well that it sits in is partially full of water! So is the boot seal leaking ? Most unlikely but the rear screen washer-hose has certainly got a leak, prove it to yourself, operate the rear screen wash and note how much water if any comes from the washer jet. Watch long enough and the water/screen wash fluid that should have come out of the nozzle will show itself in the boot. If you dry the pump out you may be able to salvage it but this really does depend on how long it is been submerged in the mixture of water and screen wash fluid . New pumps can be purchased from Mercedes-Benz parts but like most things do not come cheap, at least having discovered the problem you can save the costs of diagnostics by Mercedes Workshops and having purchased the pump you can easily fit it yourself. In the above owners case the pump was saved but it took him some time to clean up the electrical connections which were in very poor condition, this is the male section of the connector which you can see is in a poor condition although salvageable.
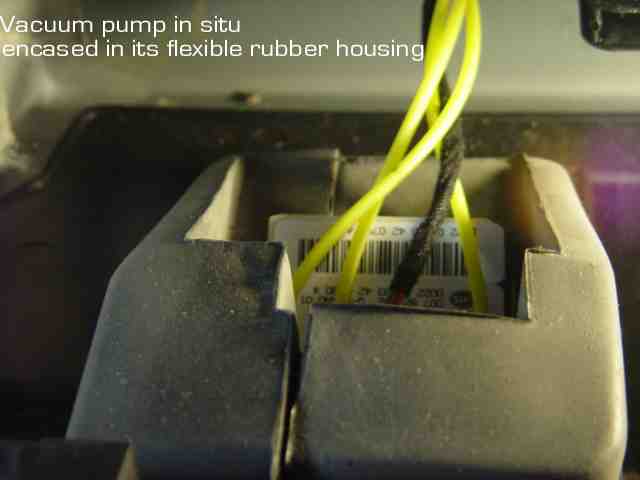
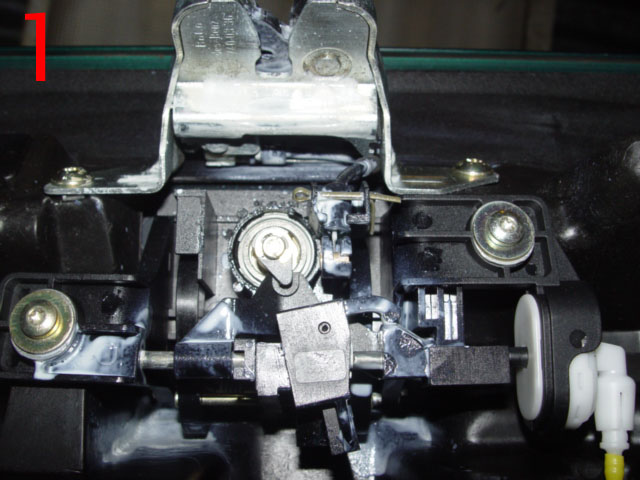
This is the vacuum pump which is situated in a separated section, near side far corner of the spare wheel compartment in the boot, it is function is to actuate the locks on all doors, boot and fuel flap and operates with the central locking facility or door key. Note the positioning of the stowed unit, the yellow tubes in which the vacuum is created point towards the front of the vehicle.
This photo shows the vacuum pump and it is ancillary components exposed but still resting in half of its flexible rubber jacket If you are removing this unit for any reason take precautions to ensure that undue pressure is not placed on the yellow tubes, or that the white plastic tube is dislodged from the pump this section of tube is a push fit onto moulded outlets on both the pump and manifold.
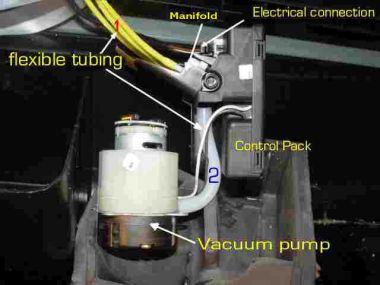
Complete pump assembly appears to consist of two major parts,
the electrical pump, for creating the vacuum, and the control box complete with manifold, if faults develop in components operated by this unit check the the electrical
fuse before considering going further. (However a good look at the relay and fuse allocation sheet obtained with my car does not readily disclose which fuse
services this unit, unless of course it is been listed under some obscure name? if the fuses are sound then I would be looking at the tubes indicated 1 & 2 which appear to be a push fit. Further than that is anybodies guess, although you should bear in mind that there are a number of relays on this car.!
One word of warning, it is a well known fact the that rear screen washer hose becomes detached in the boot lid with the result that the water/washer fluid which should go onto the screen runs down inside the car and has in a number of cases found it is way into the recess where the vacuum pump is located . This in turn flood the recess and submerges the pump in water with the end result being that a new vacuum pump is required . So if your screen wash ceases to function check the the hose is not detached in the boot lid. see page36. If you do find that your pump is submerged in a water soaked foam casing then you will need to remove the pump to dry, service and hopefully salvage the pump, failing that the pump will need to be replaced. Barrie ,a fellow owner who suffered this problem spent so time trying to disconnect the manifold to which the vacuum tubes connect from the pump assembly. he has sent me this information hopefully it will help others who encounter this problem.
Quote
Hi Lofty
I thought you might be able to use this on your website.
When I was removing the white plastic manifold, that has the yellow flexible tubing attached, from it is housing it was apparent it was fixed on securely.
It took me almost half an hour to work out why I couldn't remove it.
There is a small black plastic lug in the centre of the white plastic manifold with a small hole above it. You need a small screwdriver to put into the hole and pull the black plastic lug towards you. That releases the manifold from the housing and you can lift it off.
Once again thanks for all your help.
unquote Thank you Barrie every little helps when your confronted by features on the 'A' Class.
Barrie managed to get his pump running however one less fortunate owner had to replace his complete pump assembly.
On the other hand if you do need to remove your pump for any reason then you will need to follow this procedure to remove the manifold from the pump assembly.
Remember this unit provided power for locking /unlocking all 4 (Four)Doors the boot 5th door and the fuel flap if any of these fail to work ,then the problem will be somewhere on this system or the individual locking mechanism. mypage.53
On the
 I for one have never owned a car before that had vacuum locking system, in almost all the car the locking is mechanical and although to date have not suffered any problems other owners have where the central key fob infra-red system has failed mainly due to the vacuum pump situated in the boot becoming water logged for one reason or another.
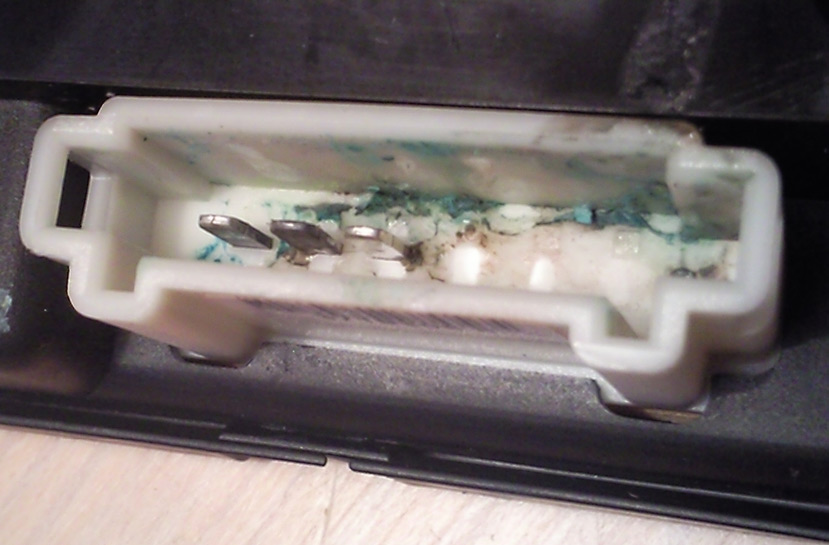
 This is the vacuum pump which is situated in a separated section, near side far corner of the spare wheel compartment in the boot, it is function is to actuate the locks on all doors, boot and fuel flap and operates with the central locking facility or door key.
 Complete pump assembly appears to consist of two major parts,
the electrical pump, for creating the vacuum, and the control box complete with manifold, if faults develop in components operated by this unit check the the electrical
fuse before considering going further. (However a good look at the relay and fuse allocation sheet obtained with my car does not readily disclose which fuse
services this unit, unless of course it is been listed under some obscure name? if the fuses are sound then I would be looking at the tubes indicated 1 & 2 which appear to be a push fit.
Complete pump assembly appears to consist of two major parts,
the electrical pump, for creating the vacuum, and the control box complete with manifold, if faults develop in components operated by this unit check the the electrical
fuse before considering going further. (However a good look at the relay and fuse allocation sheet obtained with my car does not readily disclose which fuse
services this unit, unless of course it is been listed under some obscure name? if the fuses are sound then I would be looking at the tubes indicated 1 & 2 which appear to be a push fit.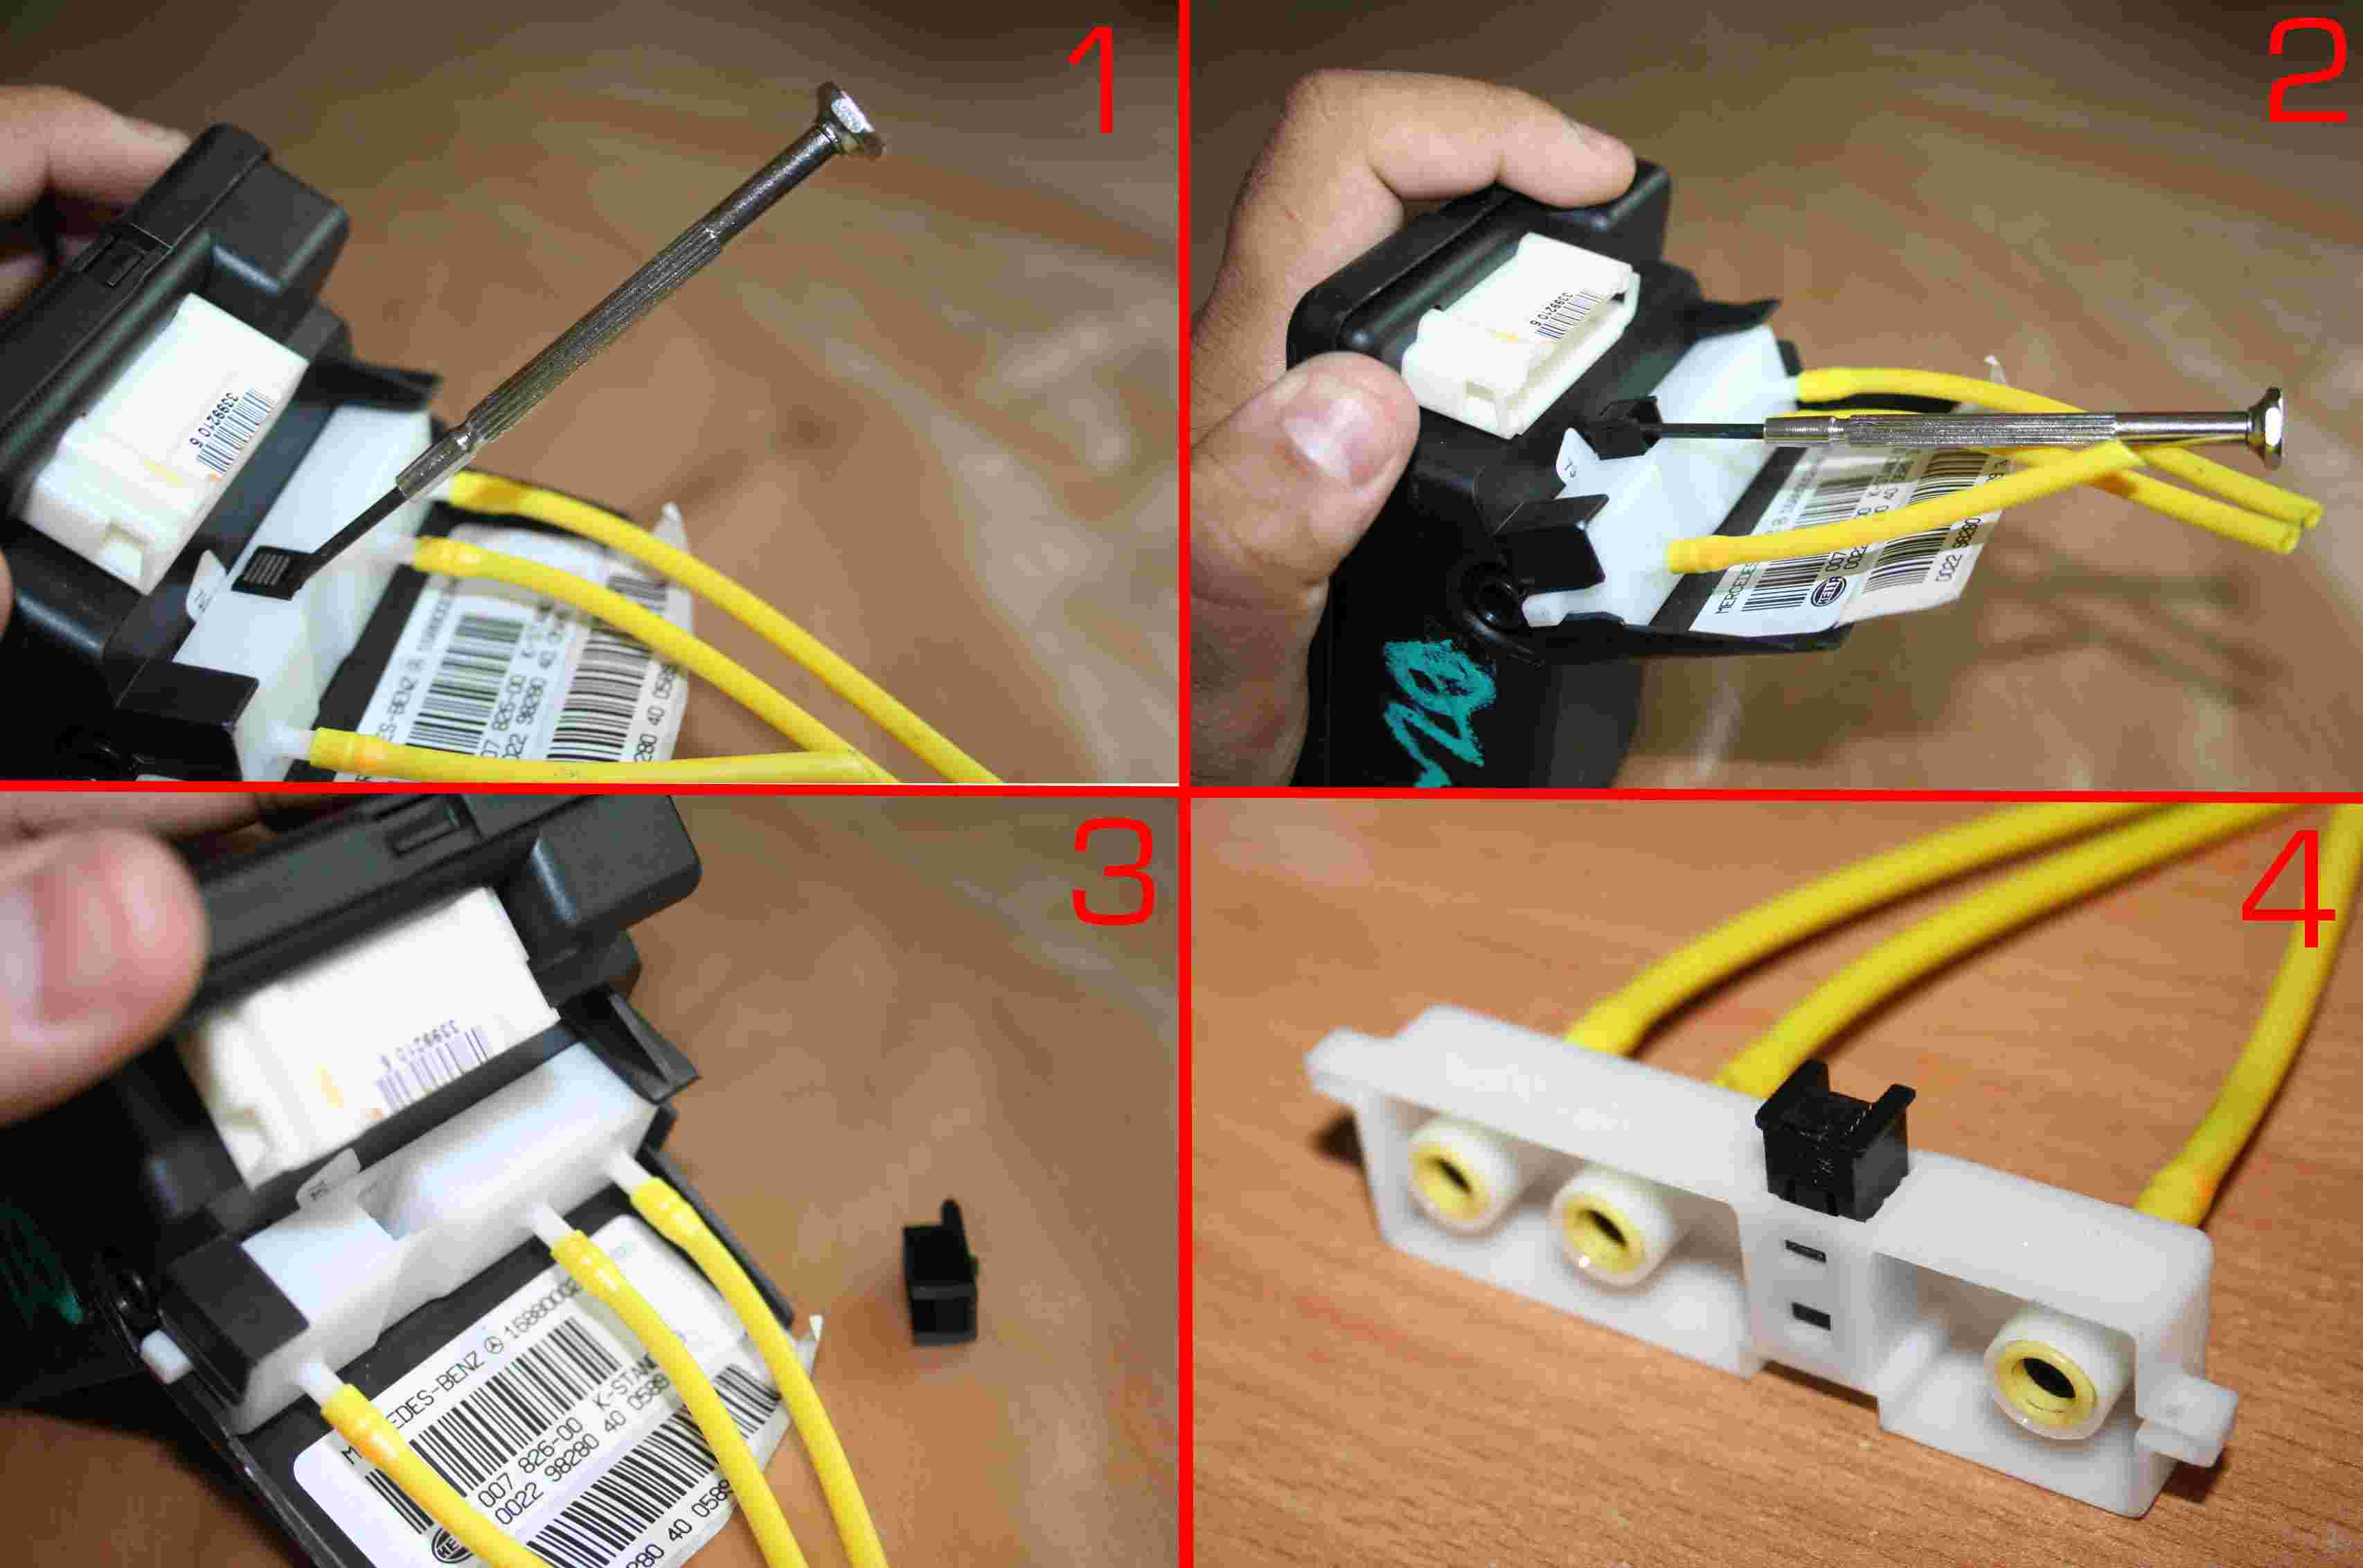
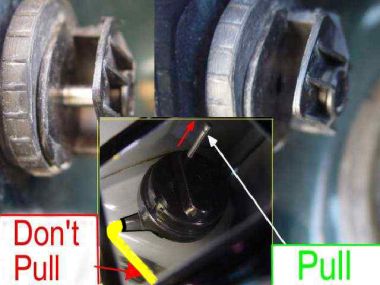 Fuel flap locking devise The third photo, the devise mentioned in the owners manual If for any reason the lock doesn't allow you to open the flap then:- Open the flap marked for the first aid kit, O/S there you will find the hatch that allows access to the rear light cluster. Remove the oval felt pad & place your hand with caution due to sharp edges into the access between the body panel and the boot lining, moving your hand towards the filler flap or following the yellow pipe, incidentally the connection onto this unit is the same as on the headlight remote adjusters. The devise photographed is at the far end of that pipe, do not pull on the pipe, it is not the release mechanism. To release the flap pull the PIN towards you. Job done