Even worse was the fact that we never did here if the boot ever opened again or what happened to the dog?
When John suffered the same problem with his A140 W168 2002 after only two months of ownership he was at his wits end trying to work out how he was going to overcome this problem , and be assured it is a problem. Unlike the fuel filler flap, there is no secondary opening facility on either the boot lid or the bonnet.
John having seen my e-mail address on the www.SVC Global web site mailed me to see if I had any ideas or answers. Short of what was already on my site, No I hadn't got an answer . However John at this point was not yet aware of of my site Lofty's Homepage Please save this in your favorites and make linking easier, so he'd got a lot of reading to do.
After e-mails that just ran into double figures, me encouraging him to try different techniques for opening the boot, which included ensuring that the boot lock key was turned ANTI CLOCKWISE thus ensuring it was in the open position. John, was still no further forward, the boot door was still jammed firmly close.
It was then that John disclosed that in World terms he only lived just up the road, and so we were able to put our heads together to try and solve this problem. I must admit to tackling this job with some trepidation as working on other peoples cars is not always easy for fear of causing more damage than is already present.
One post that I had read on the baby-benz.com site where another owner had suffered the same problem had finished up having to have a new lock fitted and a large bill for labour, all though not as large as it could have been as Mercedes fitted some parts themselves because of the damage they caused in trying to release the lock.
I was aware of the things John had tried over the last couple of days due to his e-mails. One of which was plenty of WD40 to try and free of any seized components, if indeed that what the cause of the problem!
I was aware that he had tried pressure from the inside, pressing the lid down from the outside, all the time off course lifting the boot handle, along with giving the boot in the area of the lock a good thump all to no avail. None had helped in the least.
We therefore took the following action and it is this that may help other owners who suffer the same problem, but please do try lubricating the mechanism through the key slot first as well as ensuring you try unlocking the boot manually with the key before going further.
After all it is always worth checking to see if a door is unlocked before breaking it down!! And as an ex fire officer I can assure you, you will not be the first person to do that!
If you are working in this area of the boot or on the lock make sure you have the keys on your person or to hand twice while touching the locking mechanism on my car I tripped the lock and set the alarm. If your keys are in the car they will be locked in with the boot open. not an easy job to get over the seats to reclaim them If however they are in the ignition It should not lock, BUT WHEN EVER WORKING ON THE CAR IT IS GOOD PRACTICE TO HAVE THE KEYS OUT OF THE IGNITION UNLESS THERE IS A NEED FOR THEM TO BE THERE.
Action to take when all else fails:-
Note
If you have an earlier model pre-face lift, you would be advised to read the information provided in this link www.baby-benz.com/stuck-boot-lid. before starting work.
This information is kindly provided by Steve the Administrator/Web Master of http://www.baby-benz.com>
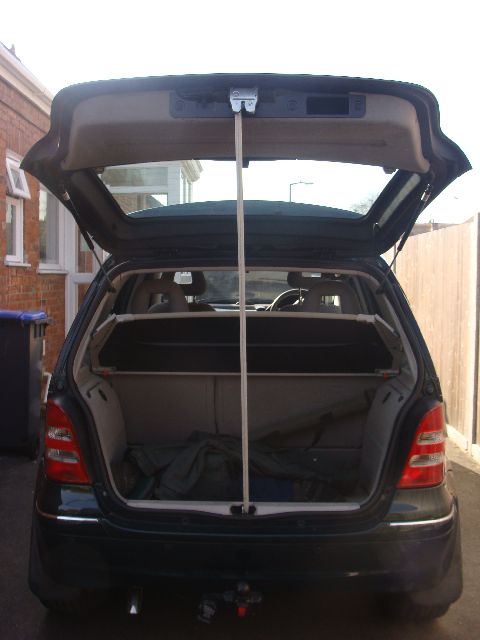
* Start by removing the rear seats from the car if only to give yourself room to work, (Do ensure you replace the double seat first when replacing the seats see page 36 for details.
* Remove the parcel shelf, whether of the fixed or flexible kind, remember the rigid shelf has a couple of sliding bolts easily pulled back to release the shelf.
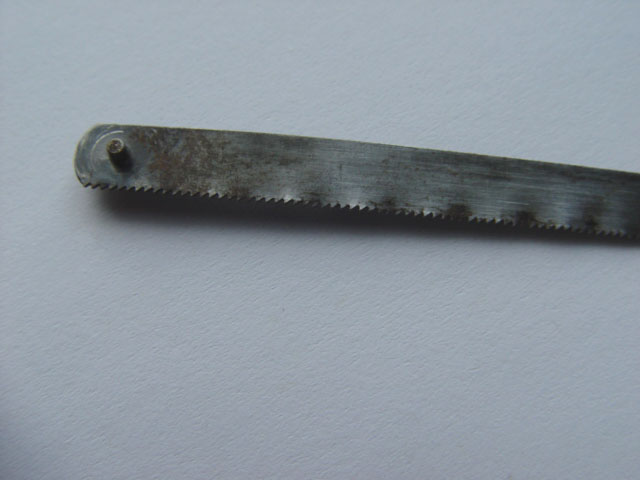 * You will need to arm yourself with a couple of 6" x 1/4" mini hacksaw blades + two wide blade screw drivers to use as levers as well as a T80 'Torx' bit and suitable ratchet, 1 medium 'Phillips' screwdriver, a portable lamp is useful.
 *We started off by easing the boot lining away from the top inside of the boot lid, it is held in place by white pop studs and does come free quite easily.
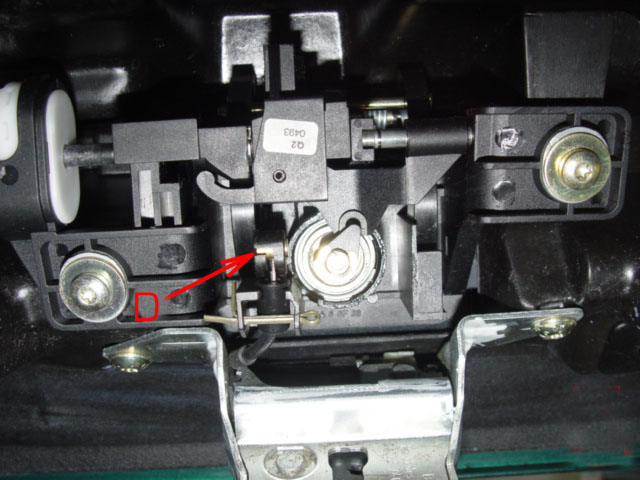 *
Please note, this photo shows the mechanism as seen from inside the car. We were able to tilt this away from the door so as to get to the lock release cable mechanism,
D
This normally releases the locking catch, having tried moving that we were not further forward, and the boot lid remained firmly closed.
*
Please note, this photo shows the mechanism as seen from inside the car. We were able to tilt this away from the door so as to get to the lock release cable mechanism,
D
This normally releases the locking catch, having tried moving that we were not further forward, and the boot lid remained firmly closed.This photo shows the lock in the unlocked position.
Readers please appreciate that this photo was taken when the door was open, not all of the lock mechanism can been seen when the boot lid is closed.
* More drastic measures were called but the aim was to keep any damage to an absolute minimum
*
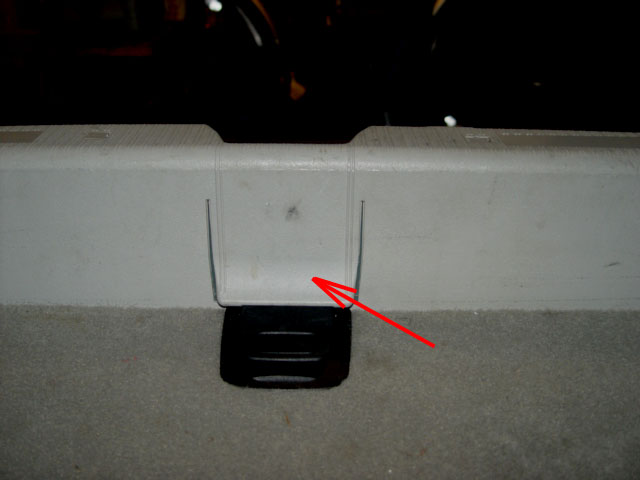 On the back edge of the lower rail of the boot surround there is a flap moulded into the plastic anti scuff moulding, which runs across the width of the car and down under the spare wheel cover, the flap forms the locking devise for the spare wheel cover.
*To get at the jammed lock mechanism attached to the boot lid, this flap has to be broken away, this was straight forward, lever out with a screw driver then bend to & fro and until it breaks off.
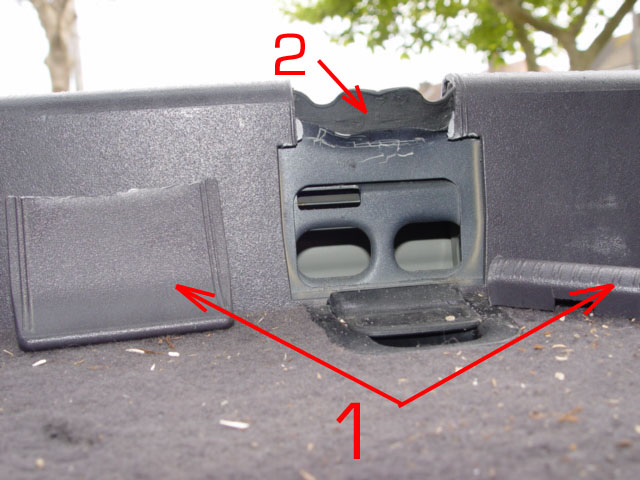 * Next using the mini hacksaw blade only with the end protected with insulation tape to protect yourself, cut away the remaining plastic which runs over the lower door sill, this then allows you to get at the jammed section of the lock, and gives clear access to the mechanism.
 1 Shows the broken and cut-away sections of the plastic scuff plate.
2 Shows the composite rubber gasket that can be easily folded back
 *Folding the rubber gasket back and using the screw drivers as levers locate them under the bottom of the locking mechanism, we were after only minutes able to get the boot undone. Do remember to lift the outside handle while attempting to open the door.
* This is a double handed job as you want one person outside and one inside .
*Having managed to get the door open, we took the catch off the boot lid and packed that with Moly-Grease' and well as checking the mini 'Bowden-Cable' that operates the lock, and checked for wear all was OK.
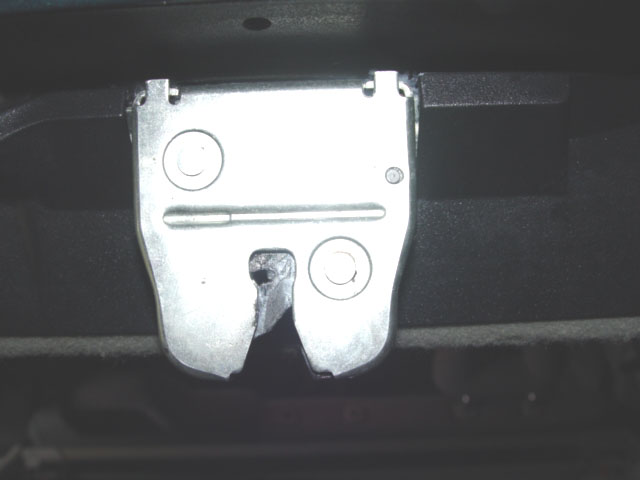
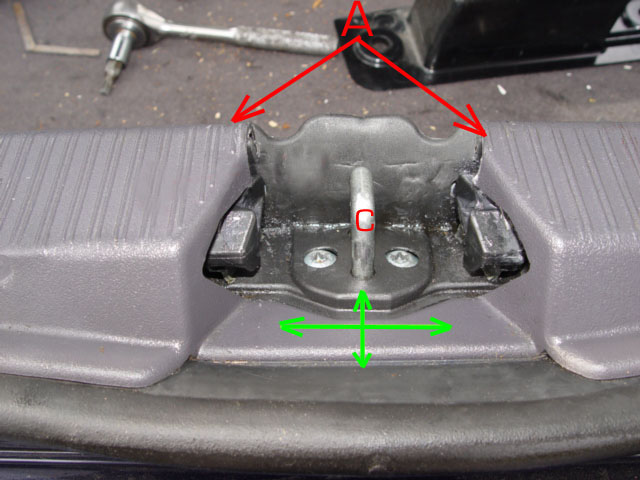
However on the first occasion of closing after re-assembly the boot lid again refused to open but was easily opened with the screw drivers, used as levers again under the locking mechanism. A Shows the cut away plastic , 2 Shows the rubber composite gasket which is easily folded back to reveal C the catch * When adjusting the catch not that it can be moved backwards and forwards as well as left and right , It is important to get this positioned correctly if the boot is to close and open with ease.
 *We then adjusted the catch onto which the boot lock secures, this required the 'Torx' bit, having adjusted the catch backwards and forwards as well as centering it we had a boot lid that closed and opened like new.
* Remember you do need to check that it opens with the key and with the remote, ensuring always that you have the right key, If the boot lock barrel has been changed without provision of the new key blades then you will not open it with the key even though it goes into the the key slot with ease.
One Word of warning if you do suffer this problem remember no matter how hard you turn the key in the boot lock it will not open , you merely damage the key blade.
If you break the blade in the lock you will have even more problems although it can be pushed out of the barrel by stripping the locking mechanism it makes yet more work, and this is a complex lock. So be warned take care.
The same applies to lifting the release handle it is only plastic and will only take a certain amount of abuse before breaking.
When the remote is used to lock the boot there is a click, although this could not be heard all the time the door was stuck closed.
On this occasion it appears the lock was just jammed due to the setting of the fittings possibly being too tight or even miss-aligned, however there will be cases where the lock will need to be replaced, even in those circumstances you have first to get the boot open, before you can attempt a repair or fit replacement parts. It is hoped these photo's and words will help you do just that.
If after having released and reset the 5th door so that is closes and opens easily you find that your interior lights do not extinguish as normal you may well find that the boot switch had been damaged or broken, (If the light does not go out check before searching for the fault further that the interior light is not switched to the permanently ON position)this happened on Johns car but I was wise to the cause and fitted a small rubber cap to the spindle of the switch this effectively lengthened the switch spindle and it then worked as normally.
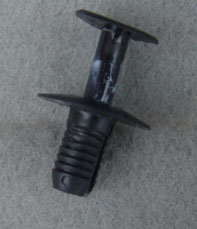
*The total of damaged parts that needed replacement were the scuff plate Part number 168 693 0291 or 0391 dependent on the colour required Slate Grey beige, and the three studs that secure the plastic plate situated on the bottom underside edge of the boot lid (when closed)
Top tip When replacing these put a small amount of grease on the stem of the push in portion, and next time! they will come out without breaking.
* You may find that you require a couple of the white securing studs which secure the boot lid lining these go brittle with age and only cost a few pence from MB parts.
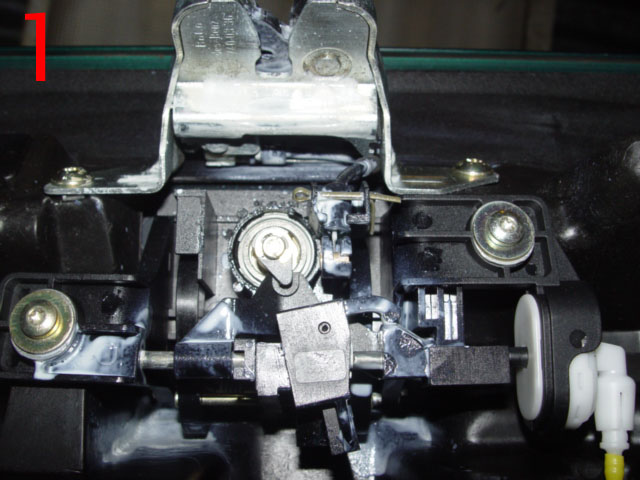
 The boot lock
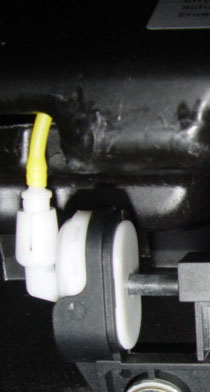
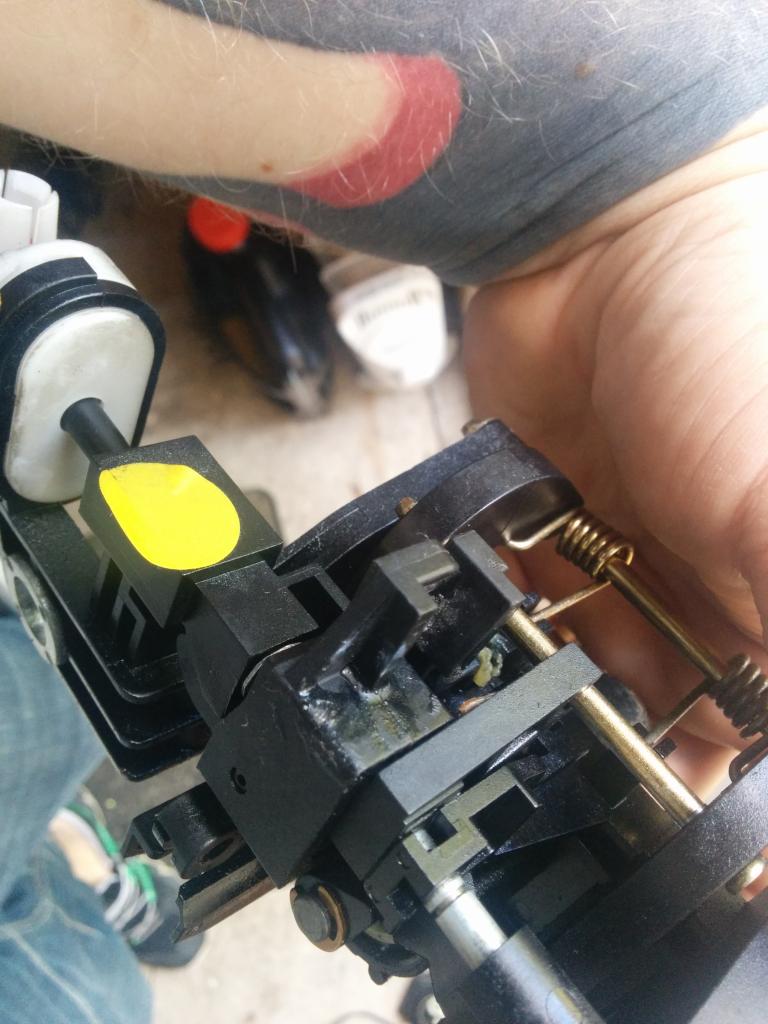
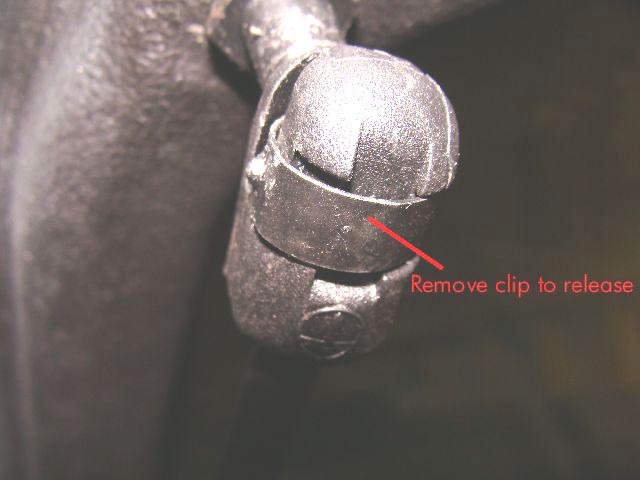
As well as being operated by the key blade the boot lock is operated by the vacuum system, which is created in the yellow pipe which is attached to the vacuum unit, this lock is a sophisticated piece of equipment, whether there need to be quite so many moving parts to a boot lock is any bodies guess, photo shows the mechanism 'locked'.
2

 20.06.2014 And Emanuel a fellow Fire Officer from Sweden has suffered the same problem on a W168 he has bought for his wife.
However in Emanuel case it was not just a case of the boot being jammed as is often the case, there was in fact in his case a fractured component part which was preventing the boot being released.
The Photo on the right has a red line where the fracture occurred, Emmual purchased and fitted replacement parts from a donar car(scrap) but having repaired the damaged unit with super glue indicates that it would in his opinion be re-usable,
For my money I am confident he did the right thing in fitting replacement parts, repaired parts could fail again and you can bet at a very inconvenient time.
Thank you Emanuel for at least pointing out one cause for the boot failing to open.
Boot lining
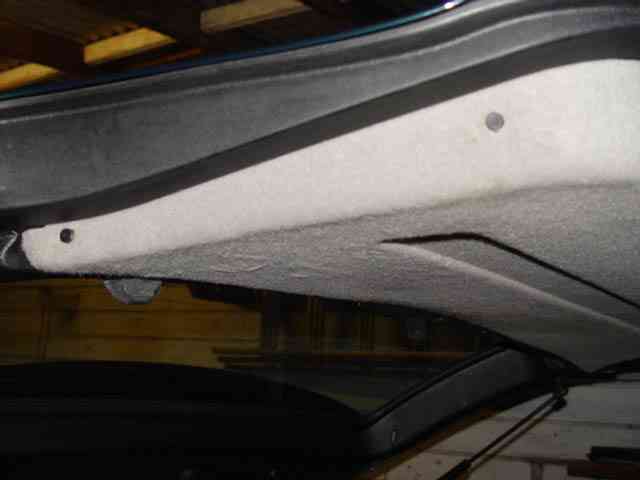
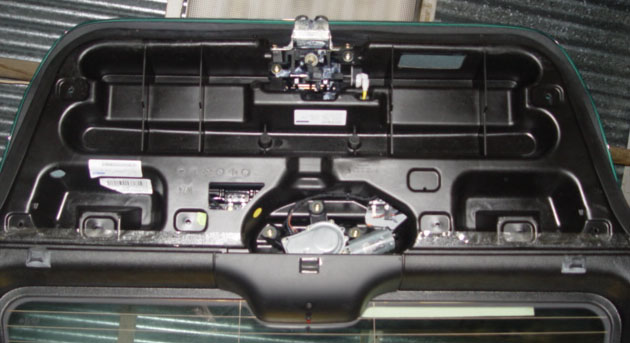 The photo shows these boot lid with the lining removed, It only takes a few minutes to remove the boot lining but you would be advised to get spare clips before attempting to replace it as damaged clips will allow the lining to rumble and drum.
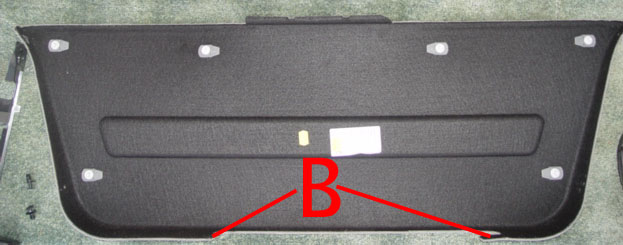
Replacing the lining
If you look closely at the lining you will see there is a lip at middle top which must be engaged under the edge of the rear window stop light housing, hold the lining at 45% to the boot lid lip it under the lamp housing and the lower lining onto the boot lid and secure.
The white clips can be pulled from their location holes, take care when re-fitting to get them aligned with their holes, The space C at the head of the stud slides into a flat retainer on the boot lining. Note it is not unusual to break these clips.
TOP_TIP When your next at your MB parts, purchase a few white clips and a couple of the black studs as spares. If you have got spares you are unlikely to need them .'Murphy's law'
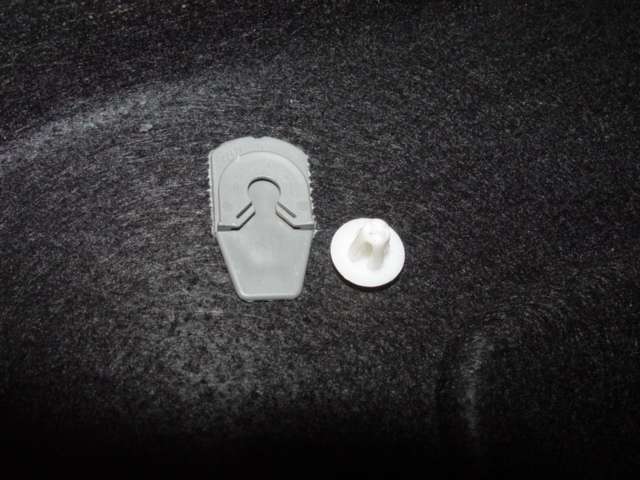
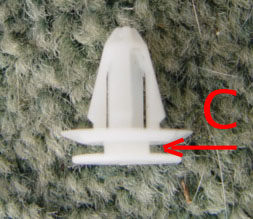 this is one of the clips and the housing into which the stud slides,
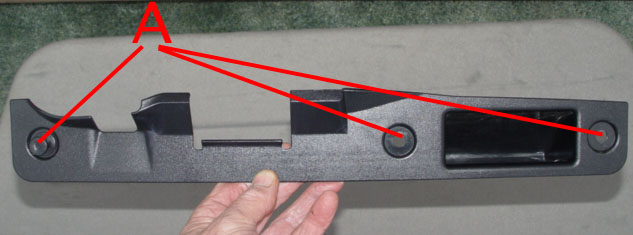
 To access the wiper motor or expose the locking mechanism we need to remove the boot lining, to do this we need to remove the plastic moulding by the boot lock first.
There are three stud heads A approx 1 cm in diameter. the heads ease out of the body, having withdrawn the stud , which can be stiff to move, the plastic moulding will come away from the bottom of the door.
 TOP_TIP
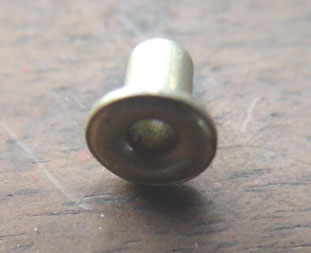
If you should and break a head off one or more of the Black plastic pins heads do not panic. Using a suitable tool drive the center pin only, through into the boot, and simply remove the body of the clip. When replacing the damaged unit find a suitable stud to hold the clip in place until a spare stud & pin can be obtained. I used the aluminum head section of a 3/16 rivet. Remember all the pin is doing is holding the black plastic moulding in place to stop coming away from the boot.
TOP_TIP
If you should and break a head off one or more of the Black plastic pins heads do not panic. Using a suitable tool drive the center pin only, through into the boot, and simply remove the body of the clip. When replacing the damaged unit find a suitable stud to hold the clip in place until a spare stud & pin can be obtained. I used the aluminum head section of a 3/16 rivet. Remember all the pin is doing is holding the black plastic moulding in place to stop coming away from the boot. Noisy /loose tailgate lining.
Many 'A' Class owners complain about noise from the back of the car. Much of it on my car was coming from the head-rests which tend to vibrate if left extended out from the backs of the seats, this can be reduced by lowering them fully when not in use, and one third can be eliminated by placing the middle rest in the storage provision in the lower center seat area, this also improves vision when reversing.
Much of my noise was coming from the tailgate lining which because it was loose on its studs was again able to vibrate, I must have replaced it a dozen times ensuring that the white pyramid studs located behind the lining were properly located but even then the lining was ill fitting.
I have now completely overcome this problem by fitting four plastic rivets MB invoice number MA201 990 01 92 / 3303 Rivet. Cost about 20p each) I have installed two per side drilling through the carpet lining then positioning the lining in its correct position, then while holding the lining firmly in
position drill through the plastic beneath using a 1/8 drill, (Ensure when drilling that the drill is not too large or the rivet will not lock in position) then install the rivets, and apply the spreading pin.
The lining is now held very firmly and the noise coming from that area has been greatly reduced, it also look much neater when the boot is opened.
The major benefit of using these plastic studs & pins as distinct from pop rivets is that these can be removed should the lining need to be removed again and will not damage or split the plastic beneath. The boot lining is now only held in place by six clips and two screws, the white clips can be seen, B indicates the location of the two screws.
However remember if you have a lock problem you will not be able to remove the lining to check the cable, before going further, In John's case this wouldn't have mattered because the cable was not at fault.
Although John left with his boot lock working like new, the lock did jam again, luckily John had not replaced the plastic scuff plate and so no further damage was done, he did manage to re-open it using the technique explained on this page and made further adjustments to the locking plate fixed to the cross member rear of the boot space, this appears to have resolved the problem again. Only time will tell if it cures the problem long term, either way as a precaution do not be in a rush to fit the new scuff pate, ensure that the lock is working correctly first.
Finding a cure is one thing finding the cause is quite another!
I mentioned that when we adjusted John's rear door to ease the locking situation his interior lights would not then go off, having examined the switch stem it is obvious that about 3/16 of an inch had been broken of it; I seriously consider therefore that the previous owner, bearing in mind John has only had the car two months, had adjusted the lock to cure the interior light problem being unaware that a small section of the switch stem had broken off.
If you suffer the same problem DO NOT adjust the boot lock to cure the switch defect either extend the switch stem as we did or replace the switch, if you adjust the locking positions then you are likely to suffer a jammed boot door, like John did and others have in the past .
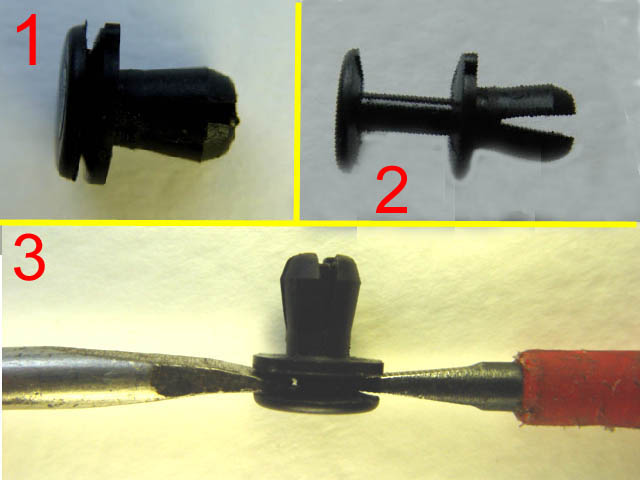
These rivets are used else ware on the car and are ideal for the purpose of securing the boot lining. Fitting withdraw the pin, press the body of the rivet home, reinsert the pin this spreads the rivet ensuring it is retained in position. To remove ease the pin out carefully from the body, using two suitable screw drivers. Having removed the pin ease the body from its location.
(Boot Lid) 5th Door gas filled Support Struts
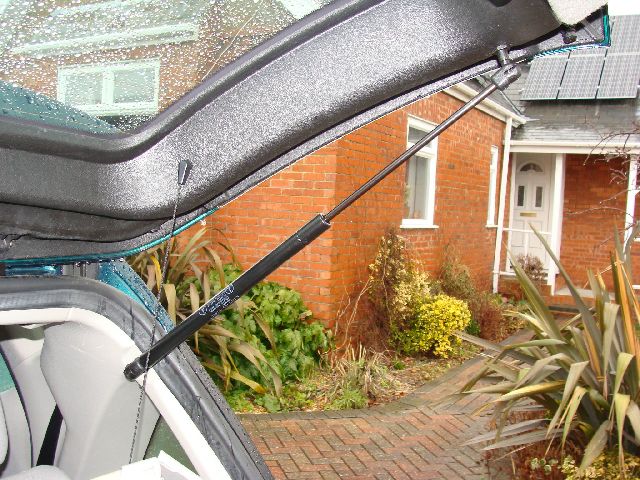 The boot Lid Gas filled support struts can weaken over time, this results in the lid not reaching it is normal opening height and making it heavy to open .
The struts can be replaced by owners the units being obtained from either Mercedes-Benz Parts or one of the many parts companies who are now stocking more spare parts for the 'A' Class models .
 When the struts are new and working well there is only a need to open the boot lid a couple of feet before the struts take over automatically opening the boot to maximum height. See demo left.
If this is not happening then it can be a real pain! Not because it's a difficult job to open but because if your 6-0 feet tall like me you will continually hit your head on the partially open door.
Because I have a GSF carparts Store very near to where I live I opted to purchase parts from them, they units were available the next day at a cost of £27.93 which included the 20% VAT.(GSF Part Number 877ME0070) GSF Carparts.com>
 The old struts are easily removed and the new ones replaced, however you must support the door while fitting as it is very heavy when even the defective struts are removed, so take care to ensure injuries do not occur while the units are being replaced.
Be aware that even when the old struts are removed it is unlikely that you will be able to push the ram portion of the strut back. These unit's are very powerful.
To remove the old struts
Remove and fit one unit at a time to reduce the weight on the support used.
 You will need a small flat screw driver to insert behind the black retaining clip, which is then eased out and away from the strut fixing .
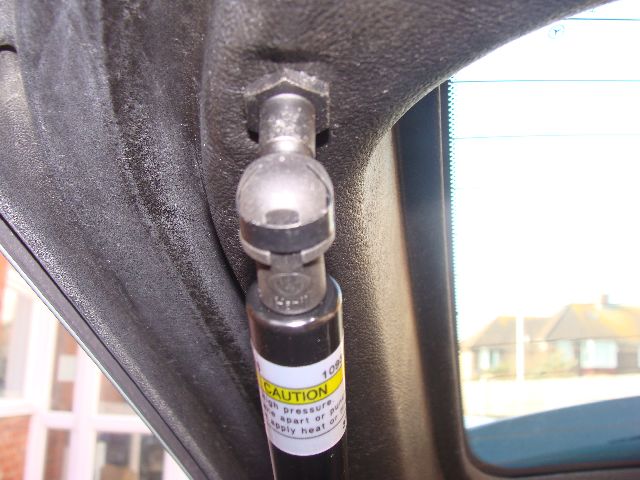
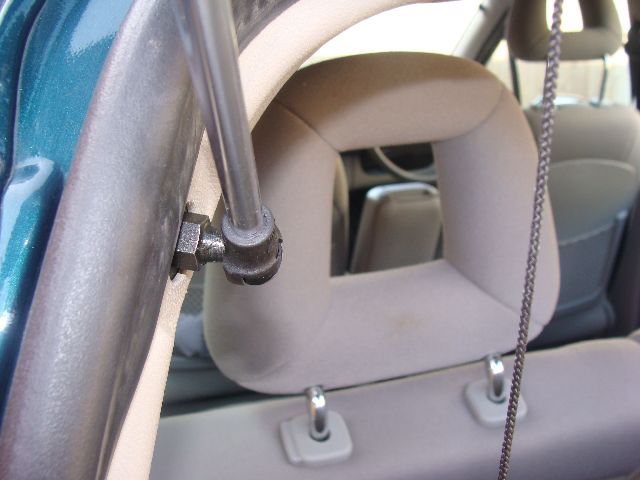
This action has to be repeated at both ends of each strut.
Having removed the retaining clips you will now be able to remove the old strut from the fixing points.
To fit the new unit
Firstly ensure the connection cup that goes on the fixed fitting on the lid and rear of the car are aligned correctly, you will not be able to rotate the ram (moving portion) by hand, I used a 1/4 bar from a socket set, any such item will give you the leverage to turn to ram in the unit until it is aligned with the fixing points.
When correctly aligned push the socket of the strut firmly onto the fixing points, the new clip will automatically engage and lock the cup into position.
Then Repeat this procedure on the other side.
If the support struts are working correctly you will find more resistance when closing the boot lid and the lid will open as in the demo file above.
Next.
Back to Index,
Purchase DVD.
Please Make a Donation.